-

Qualtrics Platform -

Customer Journey Optimizer -

XM Discover -

Qualtrics Social Connect
Adding Subjects, Evaluators, & Managers (360)
About Adding Subjects, Evaluators, and Managers
Before you conduct a 360, you need to figure out who will be participating. This page will cover the different kinds of participants, their relationships, and how to upload them properly to your 360 project.
Differences Between Subjects and Evaluators
Subjects are the participants being evaluated in your 360. Evaluators are the participants who evaluate a subject.
It is possible to be a subject and an evaluator at the same time. For example, I may evaluate you, but then my manager evaluates me, making me a subject and your evaluator. A person who self-evaluates is their own subject and evaluator. It’s also possible to only be a subject or an evaluator.
You can easily make a subject an evaluator by assigning that subject as someone’s evaluator. On the other hand, to make an evaluator a subject, you have to carefully upload the participant with the exact same SubjectUniqueIdentifier in the Subjects subsection.
Being a subject or an evaluator can determine which mailings you qualify for.
Relationships and Managers
Relationships explain how a subject and an evaluator know each other. For example, someone who works on the same level as me could be labeled my Peer or Colleague, depending on my company’s preference.
Qualtrics has several relationships built in by default:
- Self: This relationship cannot be reassigned, and always refers to the subject’s self.
- Manager: This relationship allows the evaluator to be displayed in the Manager subsection of the Participants section. Managers can have special tasks no other evaluators can. For example, managers can approve or view their direct reports’ subject reports. If John Doe is marked as Jane Smith’s manager, Jane Smith is automatically marked as John Doe’s direct report.
- DirectReport: A direct report is someone who reports to a manager. If John Doe is marked as Jane Smith’s manager, Jane Smith is automatically marked as John Doe’s direct report.
- Peer: This relationship indicates when a subject and their evaluator are on the same level. It does not have any special functions, and can be replaced in favor of any custom relationship you like.
The best way to define relationships is by using the Relationship column in the CSV or TSV file when you upload evaluators.
You can create custom relationships by typing whatever you want into this column. These custom relationships can later be managed in the participant tools.
Metadata
Metadata is any extra information you want to associate with a participant aside from the Qualtrics required fields (full name, unique identifier, and email). Examples include department, title, level, and team. Metadata is recorded as responses are collected, and allows you to control what questions will be displayed to certain subjects, as well as build data sources to further segment and analyze your data. Metadata is also a handy filter when reporting.
The best way to add metadata is by including additional columns in your subject and evaluator CSV or TSV files. You can include as many additional metadata columns as you like, since there is no limit to the amount of additional information you can associate with your subjects and evaluators.
Preparing Your Subjects File
Getting a Template File
- Go to the Participants section of the Participants tab.
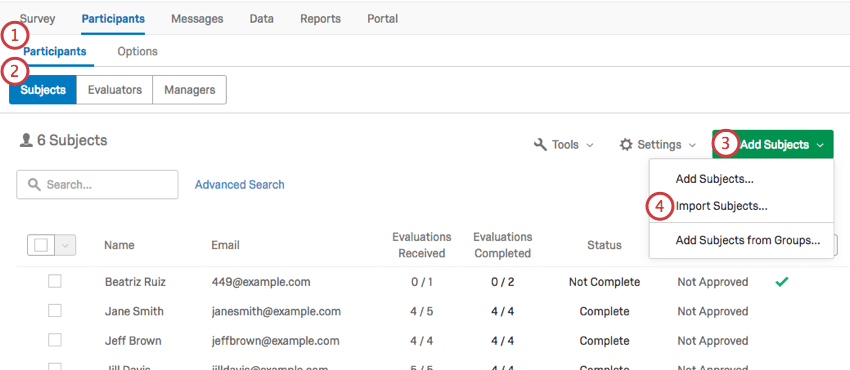
- Make sure you are in the Subjects subsection.
- Click Add Subjects.
- Select Import Subjects.
- Click Example CSV to download a template file.

Preparing the File
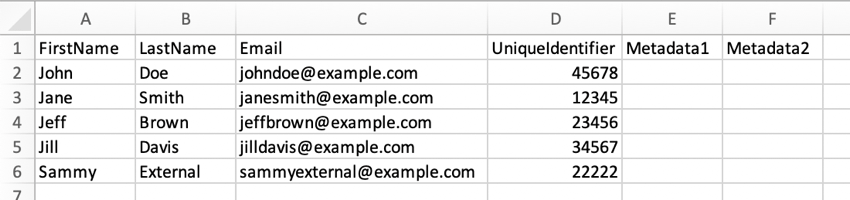
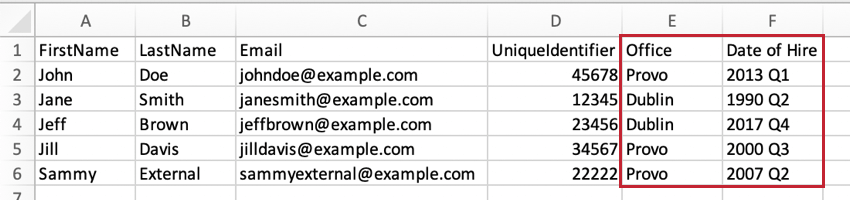
- Keep your header row! The only thing you should change in the header are Metadata 1 and Metadata 2. Instead of these headers, feel free to add any metadata you want, such as Office, Location, Department, and more.
- Every row is a separate subject.
- Every subject needs a first name, last name, email, and a unique identifier (such as an employee ID). The email will later serve as their login ID.
- If you add a Language column, values should be language codes, not language names.
- When you save the file, keep it as a CSV or TSV.
- Add as many rows of subjects as you need. Your max file size is 100M
Preparing Your Evaluators File
Getting a Template File
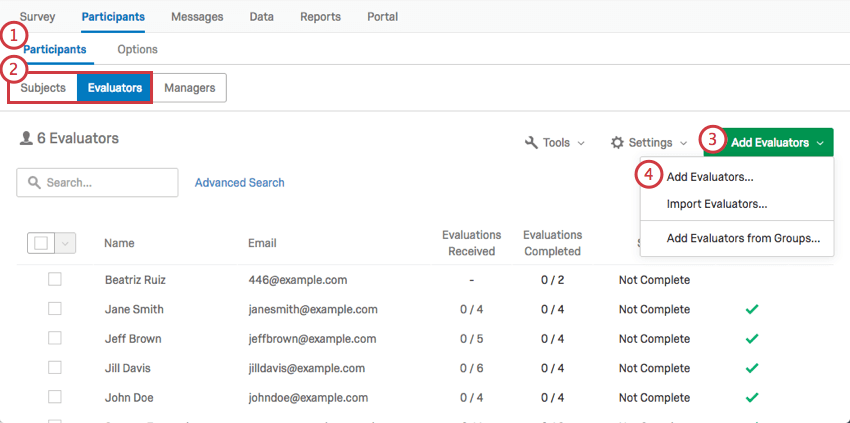
- Go to the Participants section of the Participants tab.
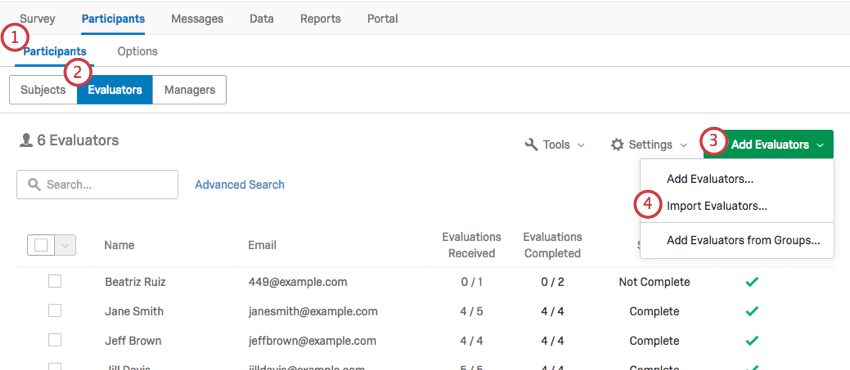
- Make sure you are in the Evaluators subsection.
- Click Add Evaluators.
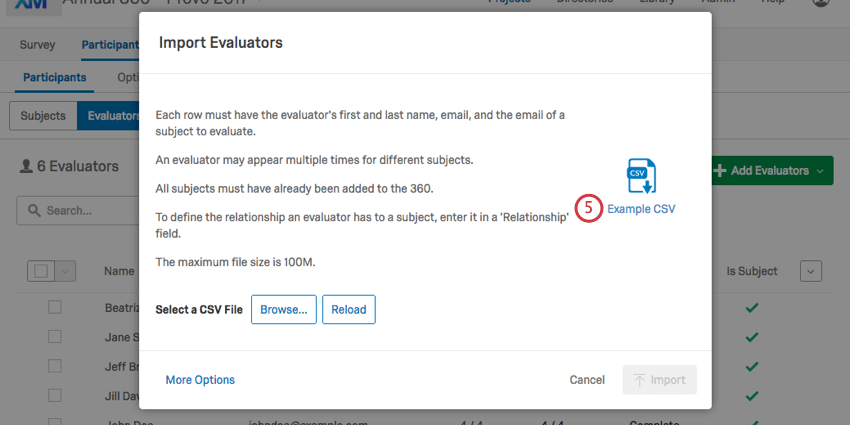
- Select Import Evaluators.
- Click Example CSV to download a template file.
Preparing the File
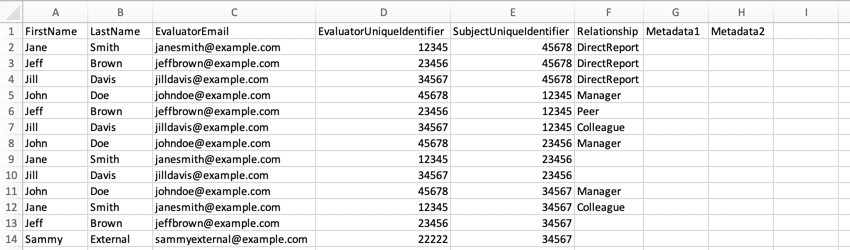
- Keep your header row! The only thing you should change are Metadata 1 and Metadata 2. Instead of these headers, feel free to add any metadata you want, such as Office, Location, Department, and more.
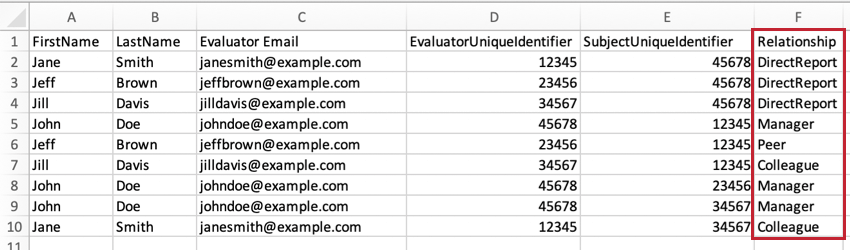
- Every row is a separate subject-evaluator relationship. For example, let’s say you want to add 2 evaluators for Jane Smith and 3 evaluators for John Doe. Even if some of these evaluators are the same people, you will fill out 5 new rows.
- The FirstName and LastName columns are for the evaluator. These columns should reference the same person whose email is in the Evaluator Email column and whose unique identifier is in the EvaluatorUniqueIdentifier column.
- The SubjectUniqueIdentifier column should match each UniqueIdentifier you designated when you prepared the subject file.
- The Relationship column refers to the relationship of the evaluator to the subject. For example, if John Doe is Jane Smith’s manager, and John Doe is the evaluator, the Relationship should say Manager. If Jane Smith is evaluating John Doe, the Relationship should say DirectReport.
- The metadata columns are for the evaluator. Try to keep rows where the evaluator recurs consistent.
- If you add a Language column, values should be language codes, not language names.
- When you save the file, keep it as a CSV or TSV.
- Add as many rows of relationships as you need. Your max file size is 100M.
Importing Subjects or Evaluators
After you have prepared your subjects file or evaluators file, follow these steps to upload it. Remember to always upload subjects before you upload evaluators.
- Navigate to the Participants section of the Participants tab.

- Make sure you are in the correct subsection. Subjects MUST be uploaded under the Subject subsection, and evaluators MUST be uploaded under the Evaluators subsection.
- Click Add Subjects/Evaluators.
- Select Import Subjects/Evaluators.
- Click Browse. Select the CSV or TSV you have saved.
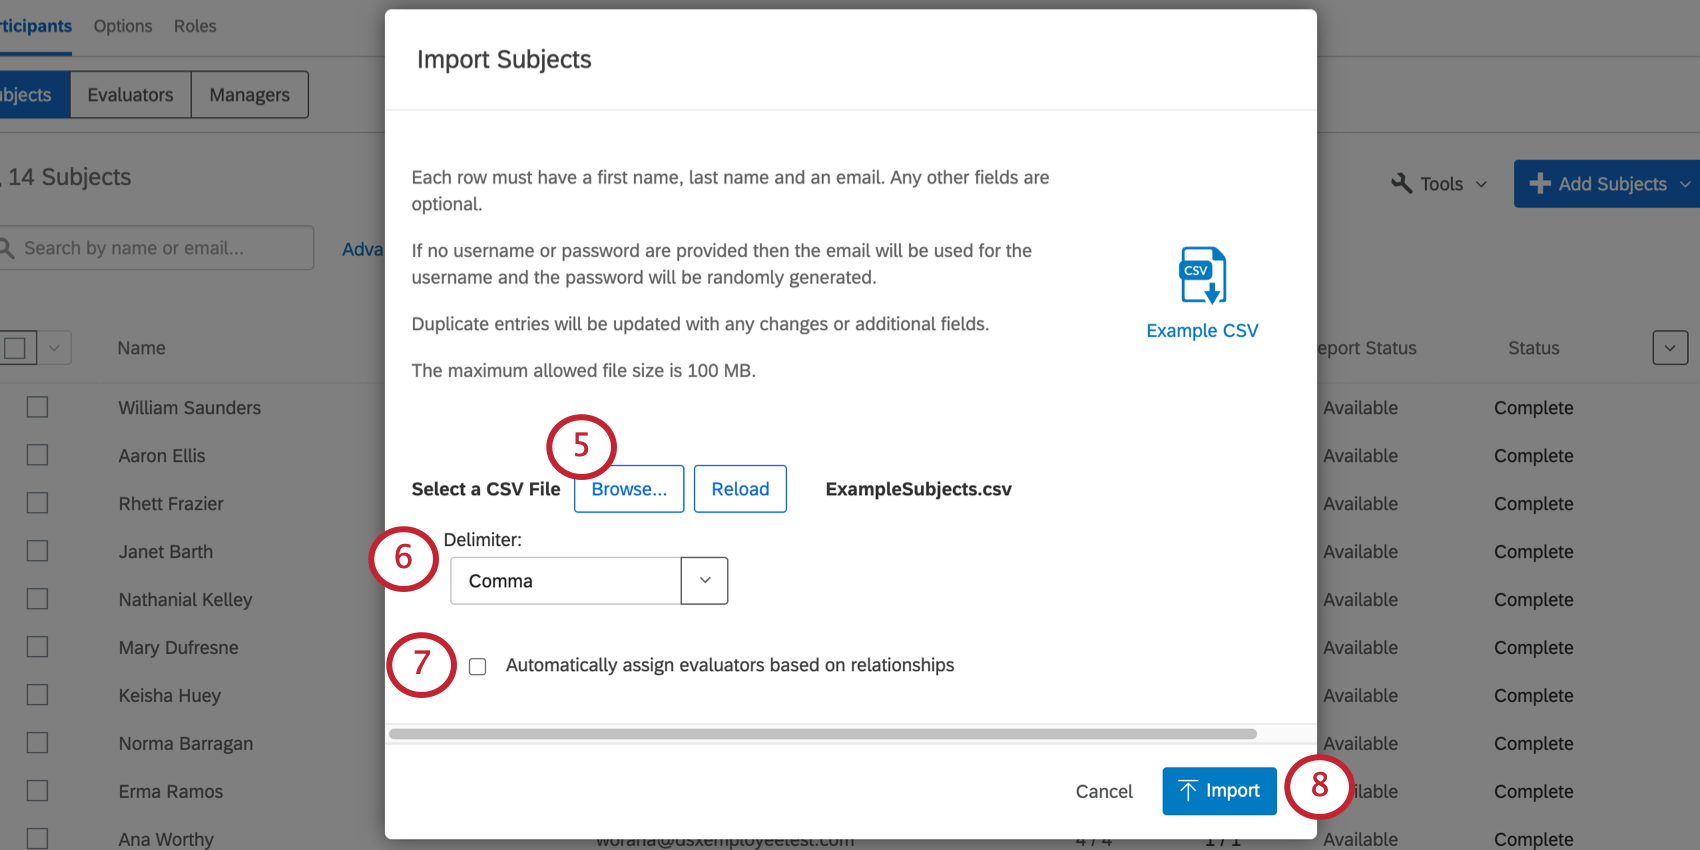
- Adjust the Delimiter as needed. This is the character that separates entries in a sheet. (E.g., commas in a CSV, tabs in a TSV.)
- If you have participants already saved in your directory, you can assign them evaluators based on who’s already listed in their directory relationships. Just select Automatically assign evaluators based on relationships and select the eligible relationship types.
- Once your fields look correct, click Import.
Adding Managers without Adding the Manager as an Evaluator
Sometimes you may want to add managers to your projects to perform administrative tasks or look at reports, but you do not want the managers to participate in evaluations. This section will walk through how to add managers without adding them as an evaluator.
- In your subject file, add a column called ManagerID.
- For the value, enter the subject’s manager’s unique identifier.
- Import your subject file as normal.
- Import your evaluator file as normal.
Adding Subjects and Evaluators Manually
When you manually add subjects or evaluators, you must fill out the same columns as the ones in the CSVs described above.
To add participants manually:
- Navigate to the Participants section of the Participants tab.
- Make sure you are in the correct subsection. Subjects MUST be uploaded under the Subject subsection, and evaluators MUST be uploaded under the Evaluators subsection.
- Click Add Subjects/Evaluators.
- Select Add Subjects/Evaluators.
Adding Subjects
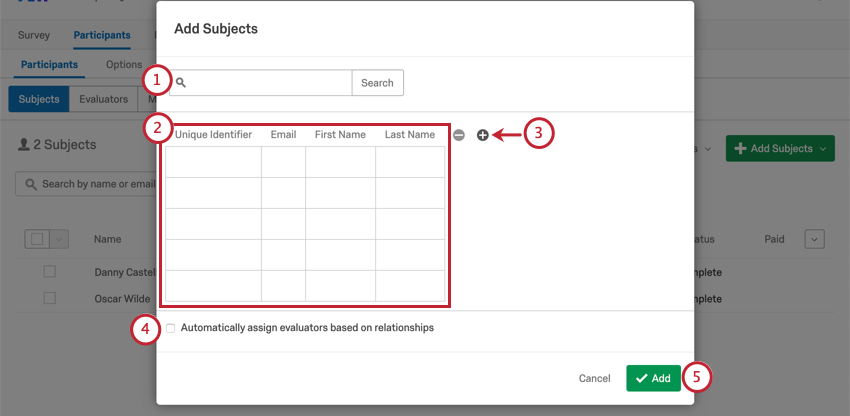
- For members that exist in your directory, you can use the search bar at the top. Type in a name and click the user to add them.
- Each row is a new subject. Fill out all the columns.
- Click the plus sign ( + ) to add a new metadata column.
- If you have participants already saved in your directory, you can assign them evaluators based on who’s already listed in their directory relationships. Just select Automatically assign evaluators based on relationships and select the eligible relationship types.
- When you are all done, click Add.
Adding Evaluators
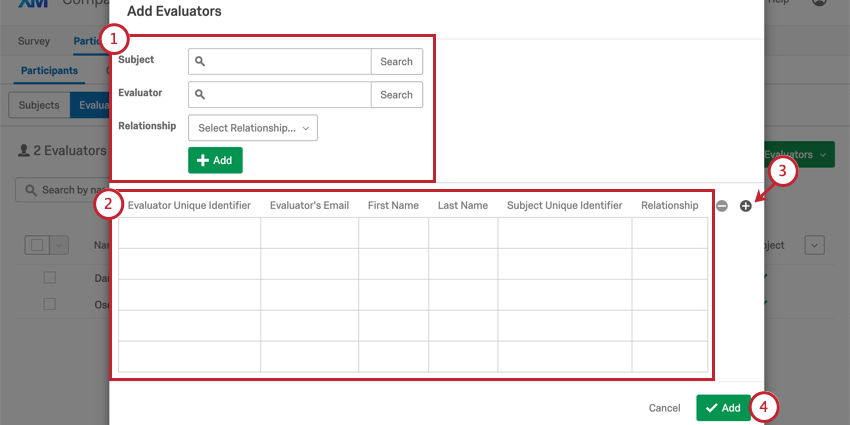
- For members that exist in your directory, you can use the search bar at the top. Search for the Subject and the Evaluator, assign them a relationship, then click Add.
- Each row is a new subject-evaluator relationship. Fill out all the columns.
- Click the plus sign ( + ) to add a new metadata column.
- When you are all done, click Add.
Importing Subjects and Evaluators from the Global Directory
In addition to importing subjects and evaluators to your 360 project from a CSV or through manual import, you have the option to import them both directly from the employee directory. This can be useful when you already have metadata and relationship data saved in your directory.
For more details, see Importing Subjects and Evaluators from the Employee Directory.