
Fraud Detection
What's on this page
About Fraud Detection
Some of the biggest threats to data quality are bots and cheaters. Often bots will complete surveys en masse, or a person will take surveys on behalf of someone else multiple times. Thankfully, Expert Review tracks these patterns, so you can ensure your surveys are collecting only the highest quality of data.
With Expert Review Fraud Detection, you can do the following with responses identified as fraudulent:
- Discard them, preventing them from being counted against auditable responses or quotas.
- Redirect these responses for analysis separately.
- Flag these responses so they can be filtered, reported on, etc.
- Analyze the number of fraudulent responses you’ve received, breaking them down by duplicates and bots.
You can also prevent email scanning software from inadvertently submitting a survey response to begin with.
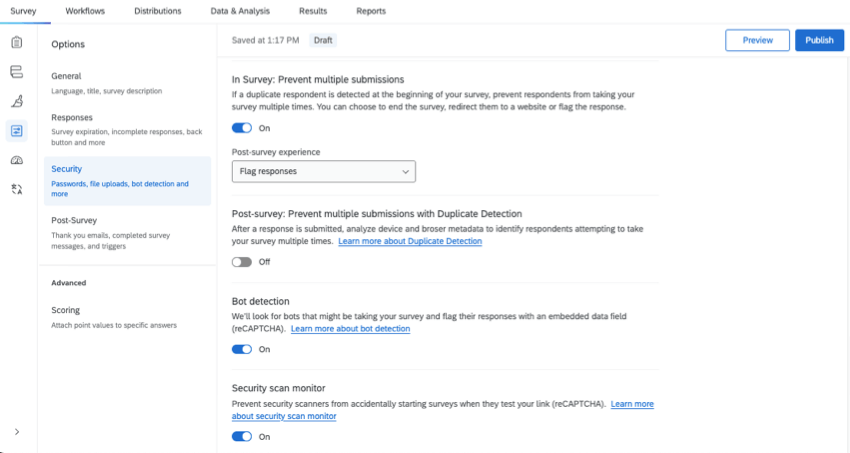
You can enable “prevent multiple submissions,” bot detection, security scan monitor, and duplicate detection all in the same survey.
Enabling Fraud Detection
Attention: Fraud Detection is not available for all licenses. Please have a Brand Administrator contact your Account Executive or Account Services if you are interested in this feature.
Once Fraud Detection is added to your license, users can decide whether to enable all or some fraud detection settings for each of their surveys.
The only way to limit user access to fraud detection is by using division permissions. Those permissions are in the General section, and they’re called:
- Bot Detection
- Enhanced Ballot Box Stuffing (prevent multiple submissions fraud detection features)
See this linked page on division permissions for more details. Duplicate detection and security scan monitor cannot be controlled by division permissions.
Qtip: Fraud Detection is only available in surveys, conjoint, MaxDiff, and in most Employee Experience projects. Fraud Detection is not available in 360.
Prevent Multiple Submissions
Attention: In order to accurately capture fraudulent responses, you must have Prevent multiple submissions enabled before you collect data! (And if you are done customizing your survey, don’t forget to publish.)
When enabled in your survey options, Prevent multiple submissions allows you to detect duplicates and keep them from making their way through the survey. During the first survey session, Prevent multiple submissions places a cookie on the browser. If the same respondent comes back on the same browser and device, without having cleared their cookies, they are flagged as a duplicate.
Qtip: This feature used to be called “prevent ballot box stuffing” in the old survey options.
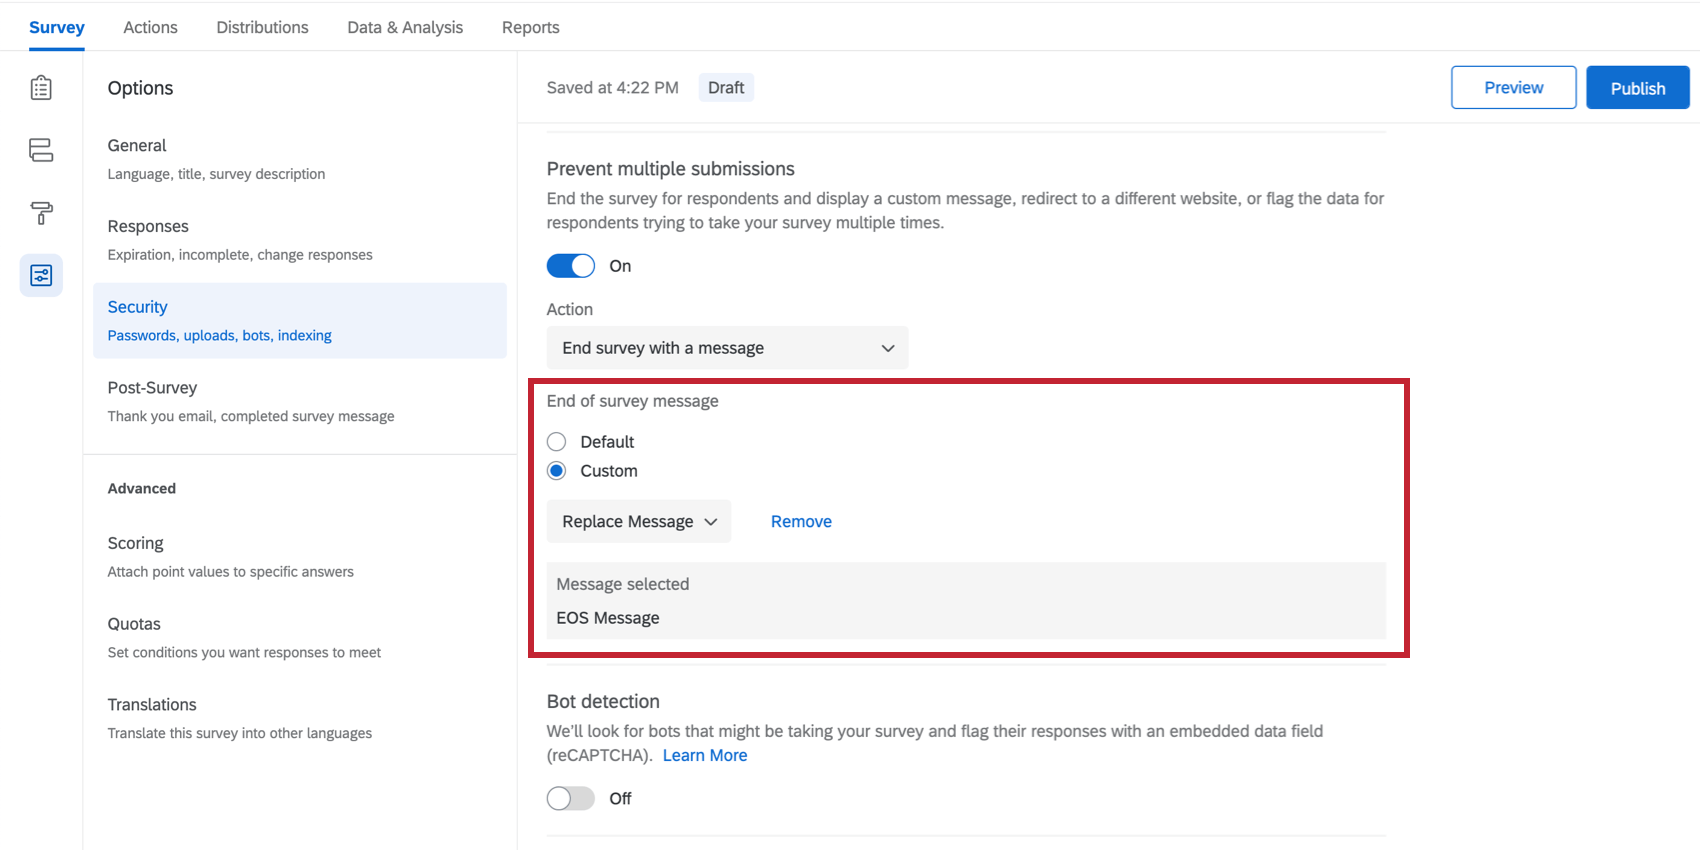
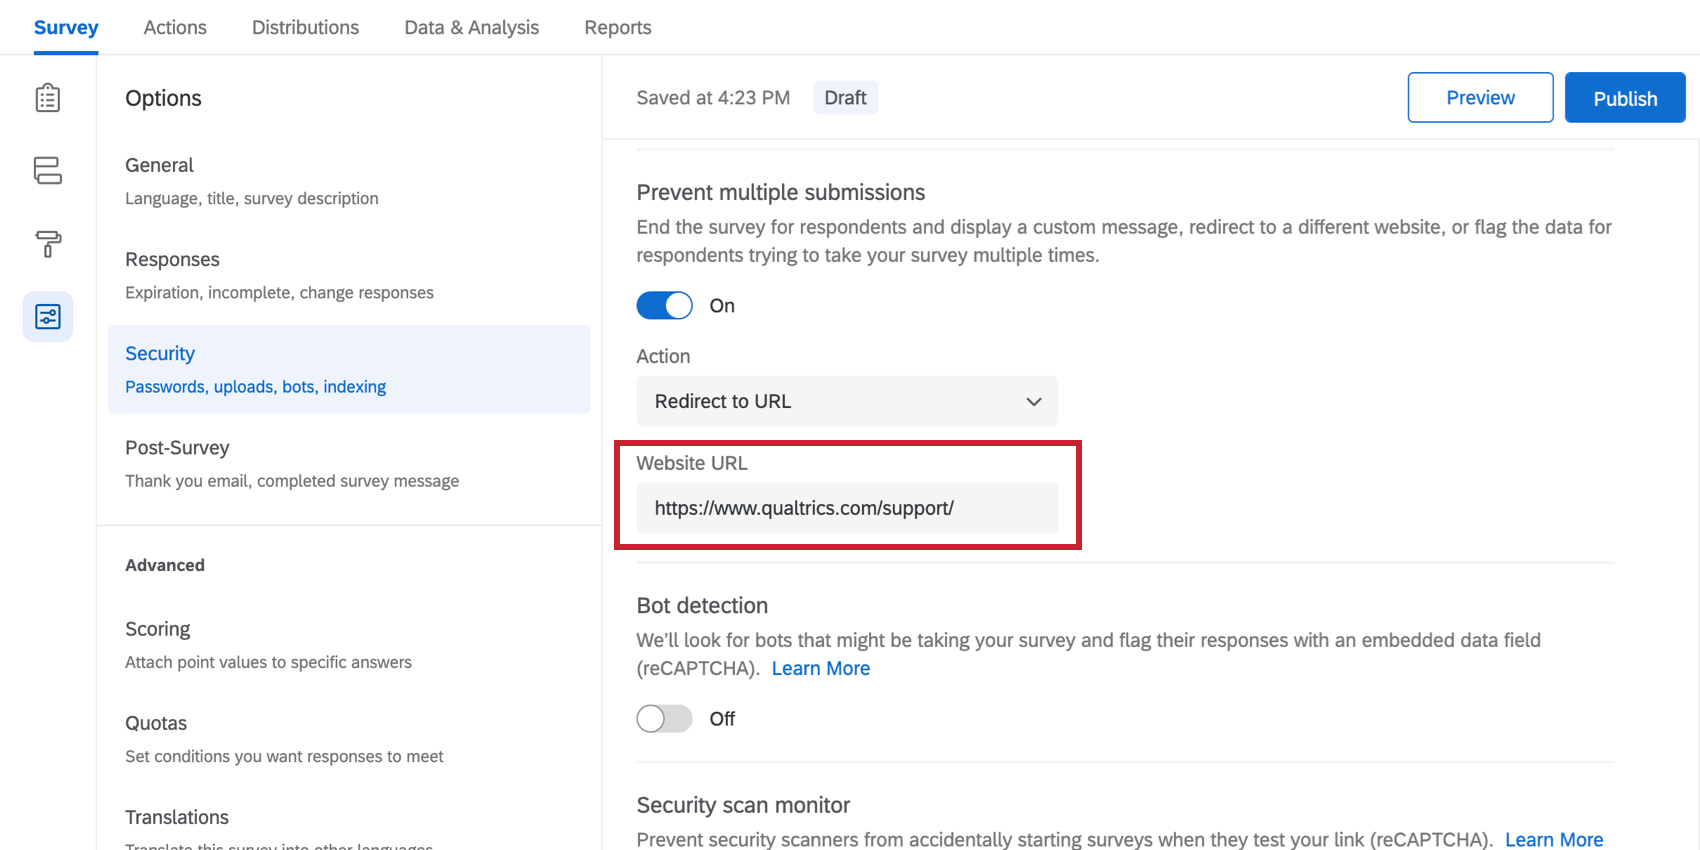
Enabling Prevent Multiple Submissions
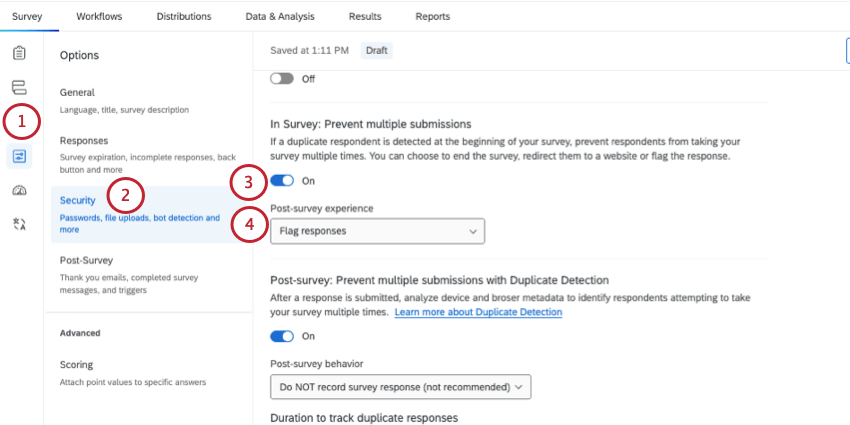
- End survey with a message: Once a respondent is determined to have already taken the survey, the respondent is sent out of the survey and we display an end of survey message. Since the survey ends before the respondent can fill it out, you will not have any data this duplicate respondent might produce.
- Redirect to URL: Once a respondent is determined to have already taken the survey, immediately redirect them out of the survey to a URL. Since the survey ends before the respondent can fill it out, you will not have any data this duplicate respondent might produce. Qtip: This feature is not available for free accounts.

- Flag responses: Duplicate respondents will not be sent out of the survey, and will be allowed to finish their response. However, their responses will be assigned a value under the field Q_BallotBoxStuffing.
Qtip: Save this step for when you are done setting up your survey!
Q_BallotBoxStuffing
When you select Continue survey and set embedded data field, respondents will not be sent out of the survey, but their response will be recorded and be assigned a value under the field Q_BallotBoxStuffing. You can report on or analyze Q_BallotBoxStuffing without adding it to the survey flow. However, in order to set up logic based on this field (such as screening out possible bots), you must add this embedded data field to your survey flow.
Bot Detection
Bot detection allows you to track which responses are likely bots by adding a field to each response called Q_RecaptchaScore. Every response is rated on the probability that the respondent was a bot, which you can then use to filter out data or build reports.
Enabling Bot Detection
Attention: In order to accurately determine the likelihood a response came from a bot, you must have your survey options configured before you collect data!
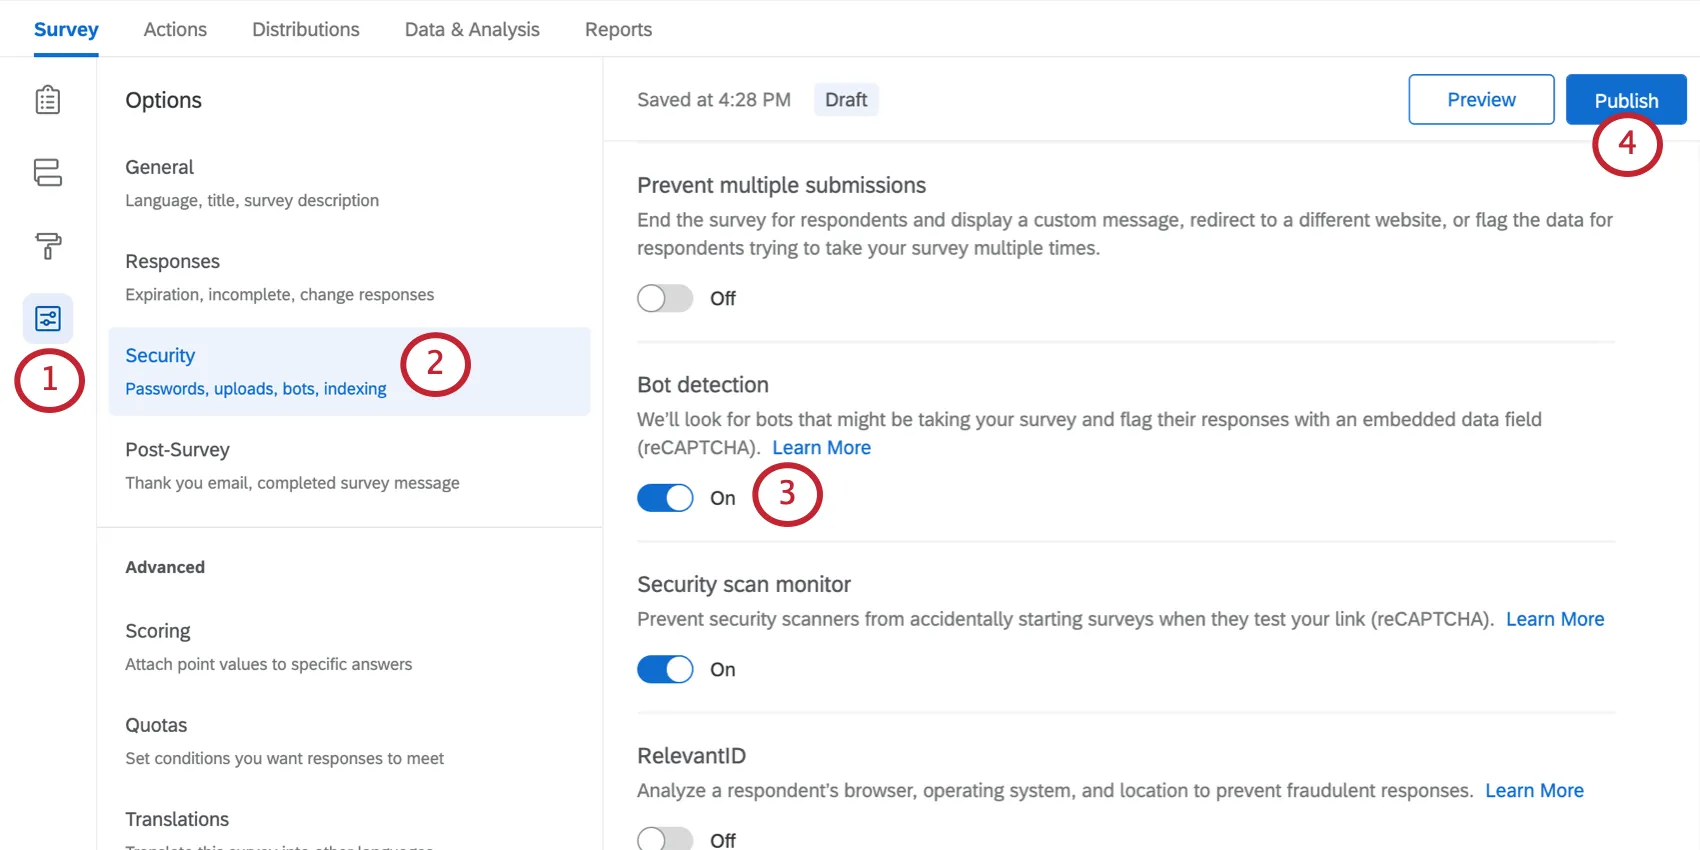
Qtip: Save this step for when you are done setting up your survey!
Q_RecaptchaScore
When you enable bot detection, this activates the field Q_RecaptchaScore, which can be used in reporting to indicate whether a response is more likely a bot or a human. This field uses Google’s invisible reCaptcha technology.
You can report on or analyze Q_RecaptchaScore without adding it to the survey flow. However, in order to set up logic based on this field (such as screening out possible bots), you must add this embedded data field to your survey flow.
Attention: To capture this score accurately, the survey must be open in your respondent’s web browser for at least a few seconds. If your survey immediately terminates, or if there is an error loading the Recaptcha, this field will be set to its default value of 1. Using Recaptcha also introduces a "Q_RecaptchaStatus" field that will be set to either "complete" or "error." The value for Q_RecaptchaScore should be disregarded if Q_RecaptchaStatus is "error."
Qtip: Although the Captcha question and bot detection both use Google reCAPTCHA technology, how they use it is very different. The Captcha question requires the respondent to successfully interact with it and complete the proposed challenge in order to proceed. On the other hand, bot detection uses reCAPTCHA V3 to flag the response with the likelihood of it being taken by a bot. This requires no interaction from the respondent, but will not block them from proceeding if they are indeed a bot. (Although a user can add a survey flow branch to kick the respondent out of the survey based on the likelihood of them being a bot.)
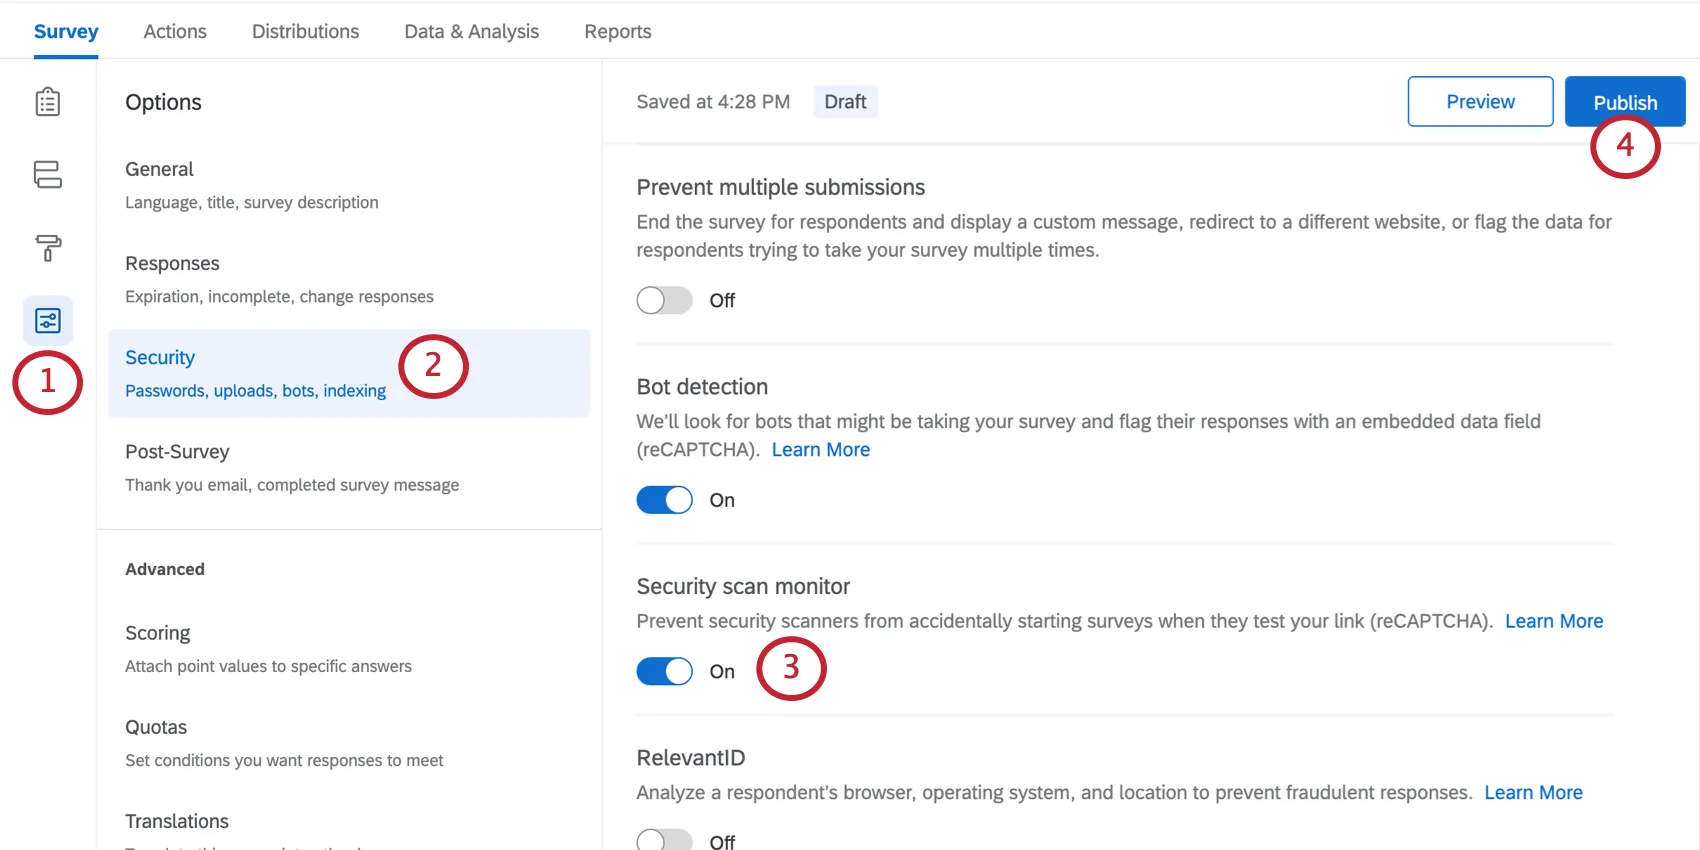
Security Scan Monitor
When enabled in your survey options, security scan monitor allows you to prevent email scanning software from inadvertently starting a survey session when a survey link is included in the email. While this feature is designed to stop email scanning software from opening emailed links, it will apply to links of any type, regardless if they were distributed via Qualtrics or a third-party system.
Qtip: You must have Fraud Detection included in your license to use security scan monitor.
Qtip: This feature used to be called “email scan roadblock” in the old survey options.
How Security Scan Monitor Works
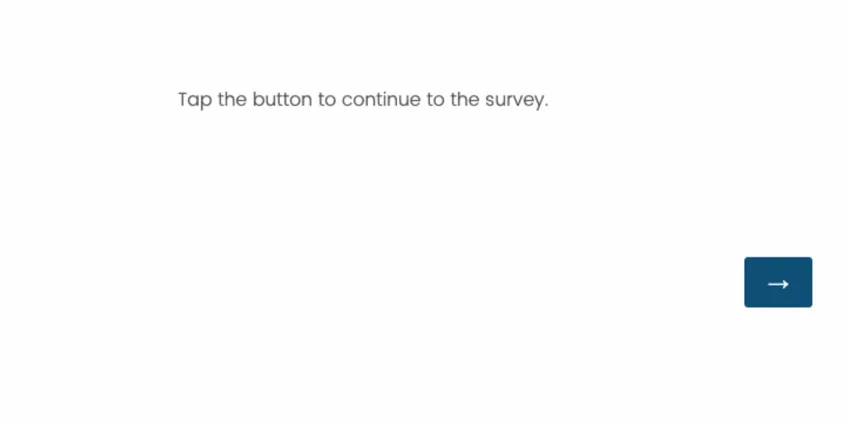
Bot detection is used to determine whether or not a roadblock should be placed at the start of a survey, preventing the email scanning software from starting a survey session. If a bot is detected, a start page will be shown instead of the first question in the survey. If a bot was incorrectly detected, the customer can click the “next” button and be able to continue taking the survey. The look and feel of the survey start page will be consistent with what has been selected from the rest of the survey.
Enabling Security Scan Monitor
Qtip: Although the Captcha question and security scan monitor both use Google reCAPTCHA technology, how they use it is very different. The Captcha question requires the respondent to successfully interact with it and complete the proposed challenge in order to proceed. On the other hand, security scan monitor uses reCAPTCHA V3 to identify when the survey is being tested by email security scanners.
Qtip: Previously, when using the security scan monitor feature, "Protected by reCAPTCHA" appeared at the bottom of your survey. Beginning in April 2026, surveys with either bot detection or security scan monitor enabled will no longer see this text at the bottom of the survey.
Duplicate Detection
The Duplicate Detection feature analyzes a response after it has been submitted to determine if it’s a duplicate. This option detects duplicates by analyzing device and browser metadata. When enabled, Duplicate Detection will collect the survey respondent’s IP address and certain metadata to identify likely duplicate responses. IP addresses will not be collected or used for Duplicate Detection if you have otherwise disabled their collection.
Enabling duplicate detection
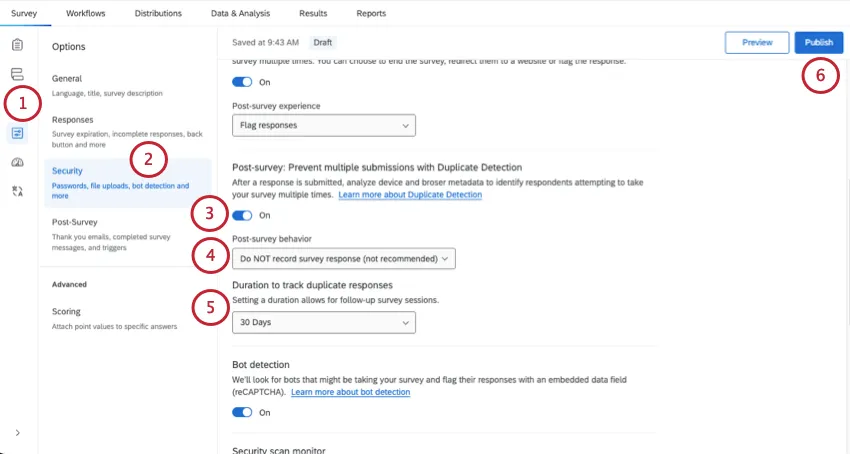
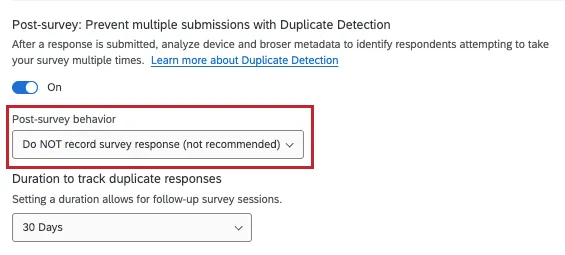
- Flag response: Record the response, but add the field Q_DuplicateRespondent = true to each duplicate.
- Do NOT record survey response (not recommended): This option deletes the response entirely, preventing it from being recorded against your response limits. Keep in mind that no duplicate detection system is perfect, so if you choose this option, you consent to the small chance that real responses are occasionally deleted. Once a response is screened out this way, it is irretrievable.
Qtip: Options include 1 week, 30 days, 3 months, 6 months, and 1 year.
Qtip: Save this step for when you are done setting up your survey!
Q_DuplicateRespondent
If you record duplicates instead of deleting them, an embedded data field named Q_DuplicateRespondent will be added to your responses.
- When a response’s Q_DuplicateRespondent field is true, that means the response was detected as a likely duplicate.
- When the field is empty, it means the response was not flagged as a duplicate.
Attention: Q_DuplicateRespondent is not recorded until after the survey’s submitted. That means you can use it in reporting, filters, and workflows, but you can’t use it in branch logic.
Qtip: Instead of using branch logic to screen out responses, try using the Do NOT record survey responses setting described above. If you use branch logic for a different purpose and don’t want to remove responses, try using Q_BallotBoxStuffing in branch logic.
Replacing RelevantID with Duplicate Detection
Qtip: Because we’ve added a new system for detecting fraudulent survey respondents, we’re deprecating RelevantID on June 30, 2025. Qualtrics may, in its sole discretion and without liability, change the timing of any product feature rollout, change the functionality for any in preview or in development product feature, or choose not to release a product feature or functionality for any reason or for no reason.
In the past, you may have used RelevantID to set up different ways to detect fraudulent responses. For example, you may have used:
- Embedded data
- Workflows
- Branches
- Piped text
- Filters in reports and data
- Dashboards
Because RelevantID embedded data will no longer work the same way, this section covers how to replace this embedded data anywhere in Qualtrics you might be using it.
Fields that No Longer Record Data
All existing RelevantID embedded data fields will stop working, and instead only record a value of 0 (zero), “false,” or “undefined.” This includes:
- Q_RelevantIDDuplicate
- Q_RelevantIDDuplicateScore
- Q_RelevantIDFraudScore
- Q_RelevantIDLastStartDate
Keep in mind that any existing responses that have data for RelevantID will not be affected. Only new responses going forward will have empty data.
Attention: Some users may still see recorded values in RelevantID fields. However, any data collected in these fields should be ignored since they are no longer supported and will not be available in the near future.
Replacing Embedded Data
The new embedded data field is Q_DuplicateRespondent. Its values are:
- true: This response is a duplicate response.
- Blank / empty value: This is not a duplicate response.
Warning: Q_DuplicateRespondent is not set until after the response is submitted. That means Q_DuplicateRespondent cannot be used in branch logic, display logic, or in-survey piped text. It can, however, still be used with workflows, piped text in workflows, filters, and other features centered on already-collected data.
Example: Here is a branch dependent on Q_RelevantIDDuplicateScore. This embedded data is also saved at the top of the survey flow.
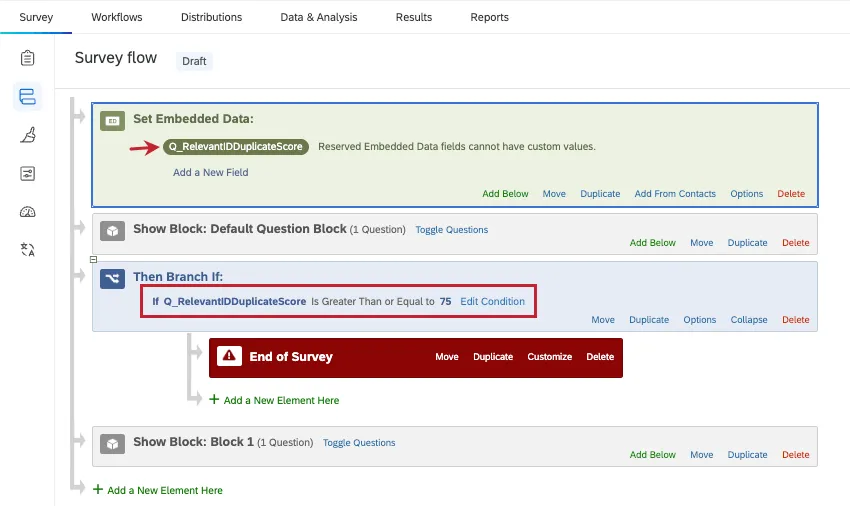
Because Q_DuplicateRespondent doesn’t work until the response is submitted, you cannot use it in branch logic. Instead, you need to set your survey options to delete duplicate responses, as shown below. This will ensure duplicate responses do not count towards interaction limits.
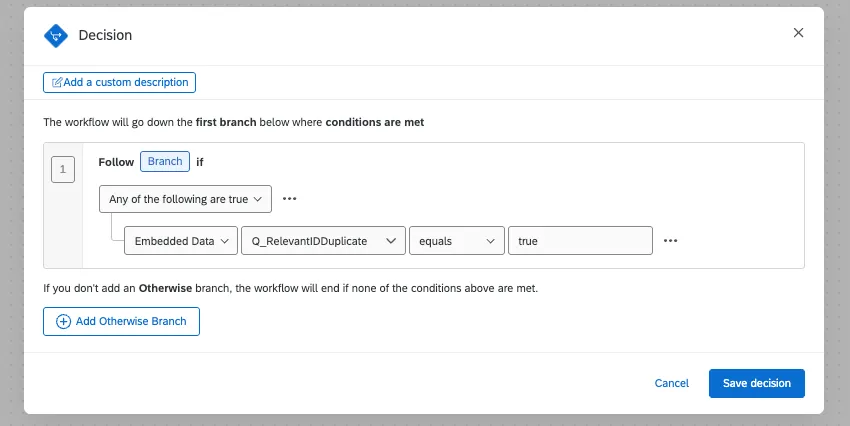
Example: Here is a workflow dependent on Q_RelevantIDDuplicate.
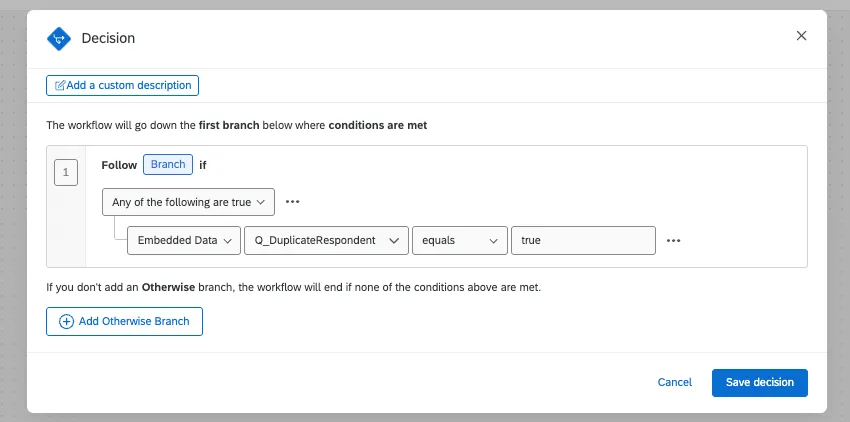
Here, we can replace the condition with Q_DuplicateRespondent. This works because workflows don’t trigger until after a response is submitted.
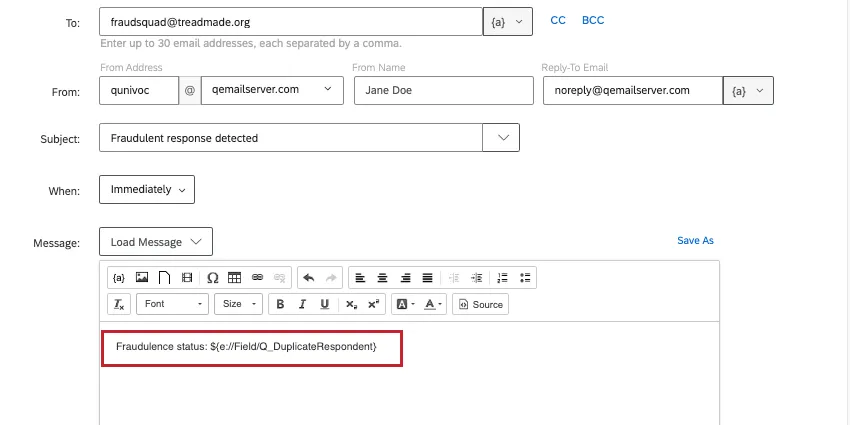
Example: Imagine the workflow in the previous example has piped text for different Relevant ID fields.
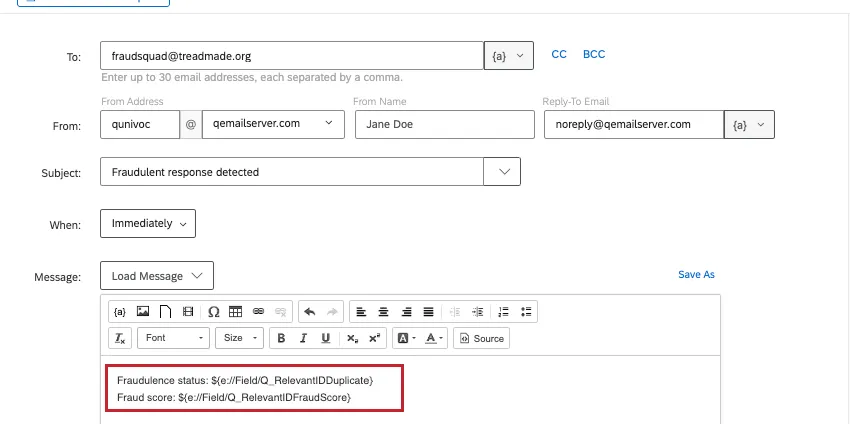
Below is a corrected email with Q_DuplicateRespondent piped in. Notice how the new embedded data only has true and false, so we have to remove the text where we show a numeric score.
Keep in mind that this change only affects new responses. Responses recorded before RelevantID was deprecated will be tagged with the same information (Q_RelevantIDDuplicate, Q_RelevantIDDuplicateScore, Q_RelevantIDFraudScore, and Q_RelevantIDLastStartDate).
Example: We have the old embedded data mapped in our dashboard. We don’t delete the old field, but we do add a new field for Q_DuplicateRespondent.

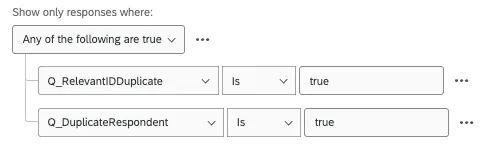
Example: We have a data filter we reuse a lot to analyze duplicates. We edit it to include responses where either Q_RelevantIDDuplicate = true or Q_DuplicateRespondent = true.
Understanding Fraud Detection Fields In Your Dataset
Using certain survey security options will automatically add embedded data fields to responses in your survey dataset. These fields are:
- Q_RecaptchaScore
- Q_RecaptchaStatus
- Q_RecaptchaError
- Q_BallotBoxStuffing
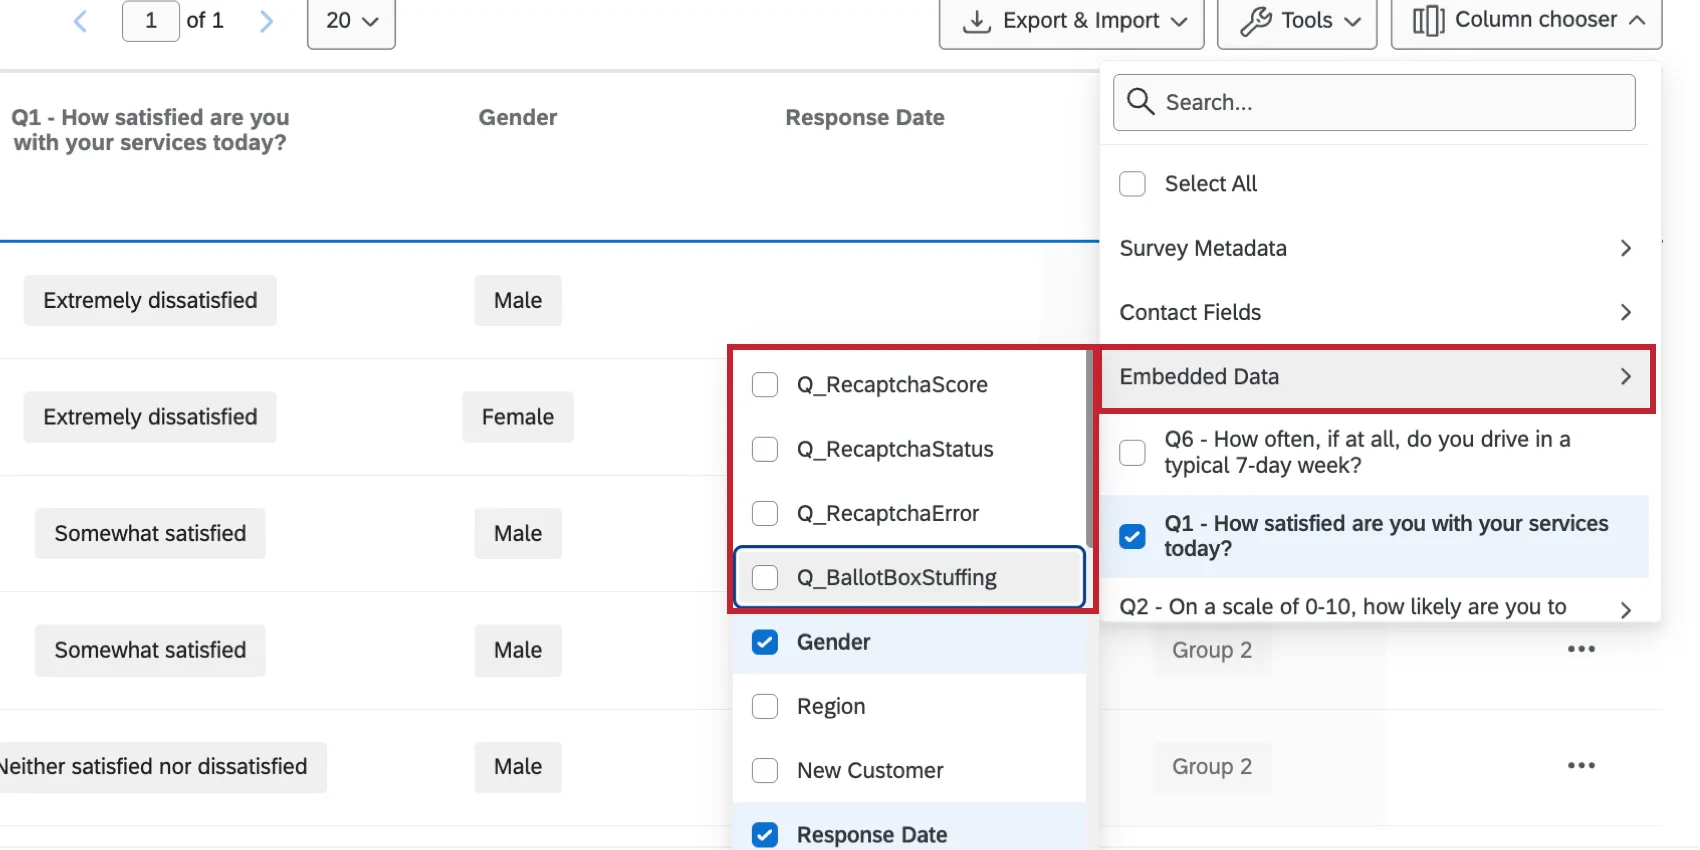
After enabling one of the survey security options listed below, the related embedded data fields will be automatically added to your responses. See the table for possible values and how to interpret these fields.
| Embedded data field name | Survey option enabled | Possible Values | Interpretation |
|---|---|---|---|
| Q_RecaptchaScore | Security scan monitor or Bot detection | Between 0.0 and 1.0, returned by Google reCAPTCHA. | A score of greater than or equal to 0.5 means the respondent is likely a human. A score of Less than 0.5 means the respondent is likely a bot. |
| Q_RecaptchaStatus | Security scan monitor or Bot detection | “Complete” if the analysis ran successfully, or “error” if there was a problem analyzing the respondent. | The score for Q_RecaptchaScore can be discarded if the value for Q_RecaptchaStatus is “error.” |
| Q_RecaptchaError | Security scan monitor or Bot detection | The reCAPTCHA error reason, if it exists. | If Q_RecaptchaStatus equals “error,” then this field will have an explanation for the error. |
| Q_BallotBoxStuffing | Prevent multiple submissions | NULL (0) or true (1) | If true (1), it means the response is likely a duplicate. |
You can report on these fields in a dashboard or analyze them in Data & Analysis without adding them to your survey flow.
However, in order to set up logic based on this field (such as screening out possible bots), you must add the embedded data fields to your survey flow.
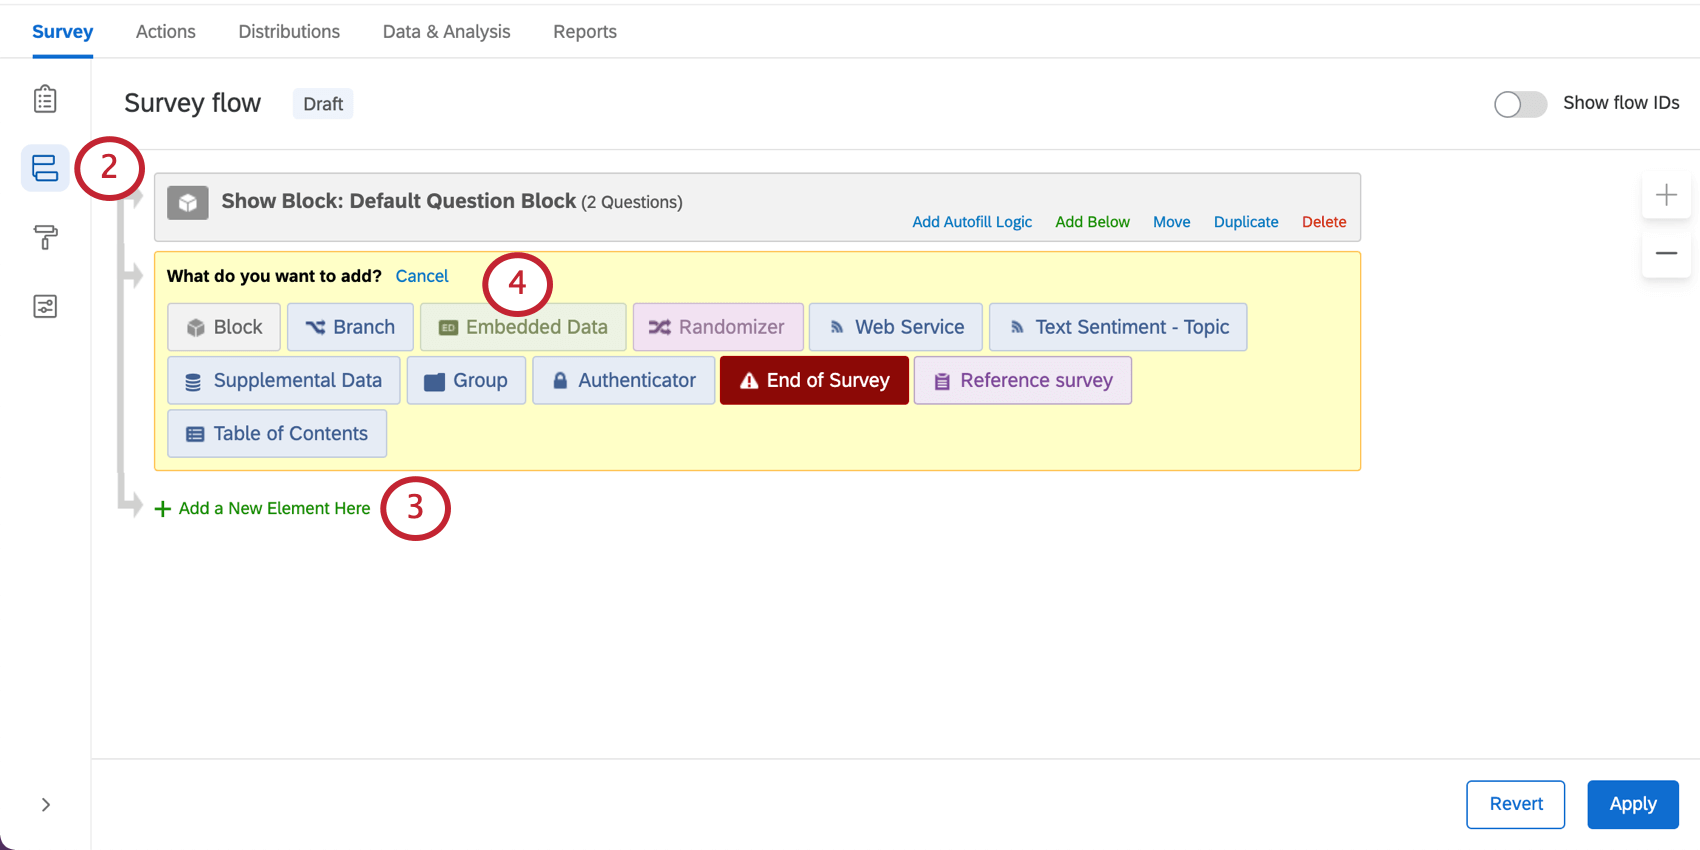
Adding Fraudulent Detection Fields to the Survey Flow
You can report on or analyze Fraud Detection fields like Q_RecaptchaScore or Q_BallotBoxStuffing simply by having the corresponding survey option enabled, without adding them to the survey flow.
However, in order to set up logic based on these fields (such as screening out possible bots or fraudulent responses), you must add these embedded data fields to your survey flow.
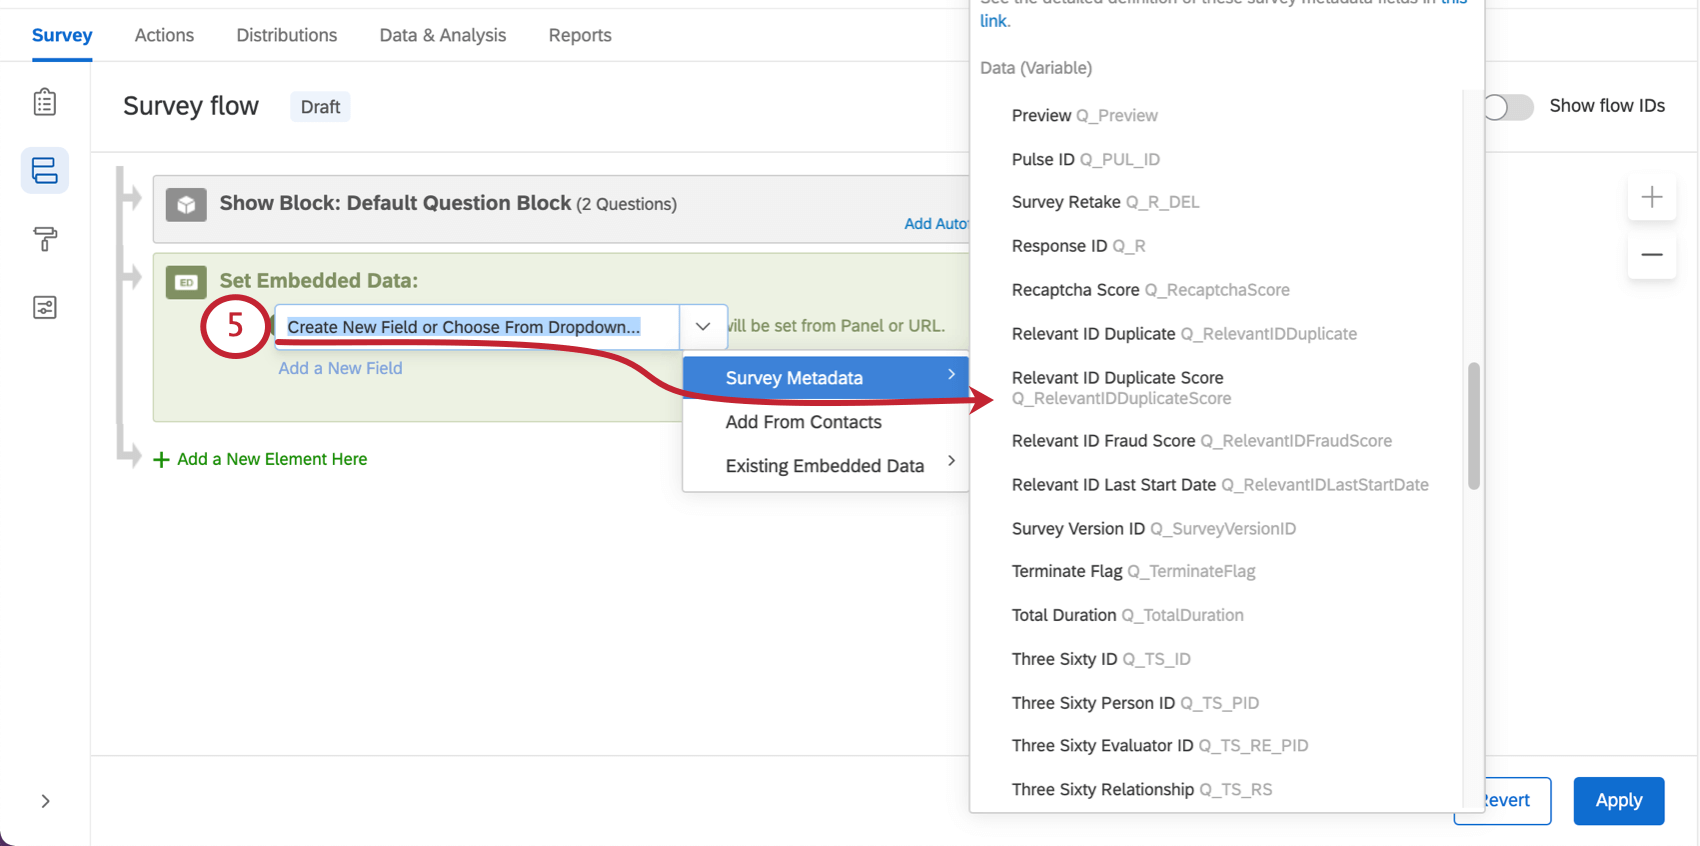
Qtip: Q_BallotBoxStuffing is under “Ballot Box Stuffing.”
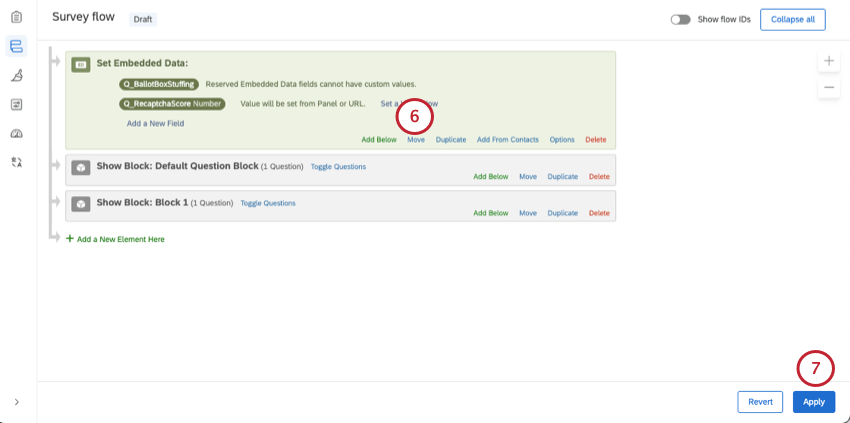
You can now build your desired branch logic.
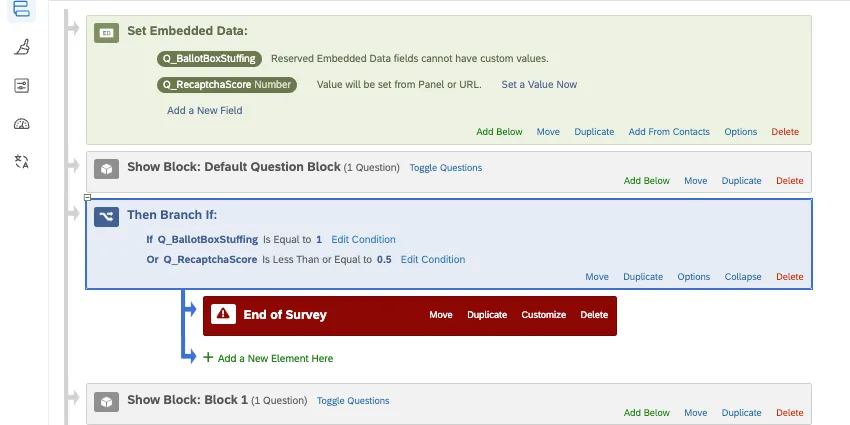
Example: Use these embedded data fields and the values below to redirect fraudulent respondents using branch logic. Note how the block appears before the branch logic.
That's great! Thank you for your feedback!
Thank you for your feedback!