
Loop & Merge
What's on this page
About Loop & Merge
Loop & merge allows you to take a block of questions and dynamically repeat them multiple times for a respondent.
Example: A clothing company wants to ask a set of questions about each of its clothing departments. Rather than taking the time to create new questions for men’s clothing, women’s clothing, and children’s clothing, the questions could be created once. Loop & merge could then automatically repeat the set of questions once for each clothing department the respondent indicated they visited.

For a quick example of what loop & merge can do, view our Loop & Merge Example Survey.
Warning: You cannot use loop & merge to go backwards in the survey. You can only use it to go forward in the survey, or to repeat a block over and over.
Attention: Because blocks filled with multiple questions are being repeated, loop & merge can add many columns to your data. The larger a data file gets, the less easy it is for you to analyze your data, and the longer it may take for data to export. To avoid this, try to keep your repeating blocks short, and only repeat them as needed.
Attention: If your survey is exceptionally large, then only Contact Fields and Survey Metadata will be available when choosing columns. This can occur in surveys with more than 6,500 basic fields such as multiple choice questions, or 2,000 larger fields such as free form text. To access your data, you must reduce the size or your survey’s dataset to be less than 6,500 fields. Additionally, you will not be able to export your dataset if it contains over 100,000 fields. If you have questions on how to reduce the size of your specific survey or how to prevent it in future, please contact Qualtrics Support.
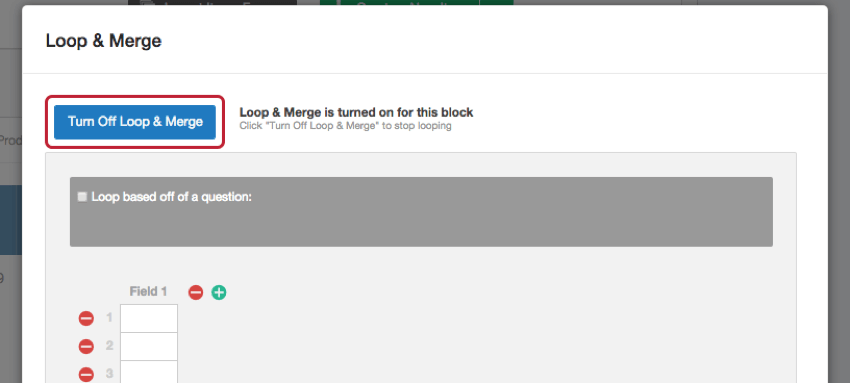
Turning on Loop & Merge
Qtip: Loop & merge is turned on and off for an entire block, so you’ll want to be sure that all of the questions you want to loop through are in one block.
Warning: Do not enable loop & merge on a question if you’ve already collected data, as you will lose already collected data. See Testing & Editing an Active Survey for more information.
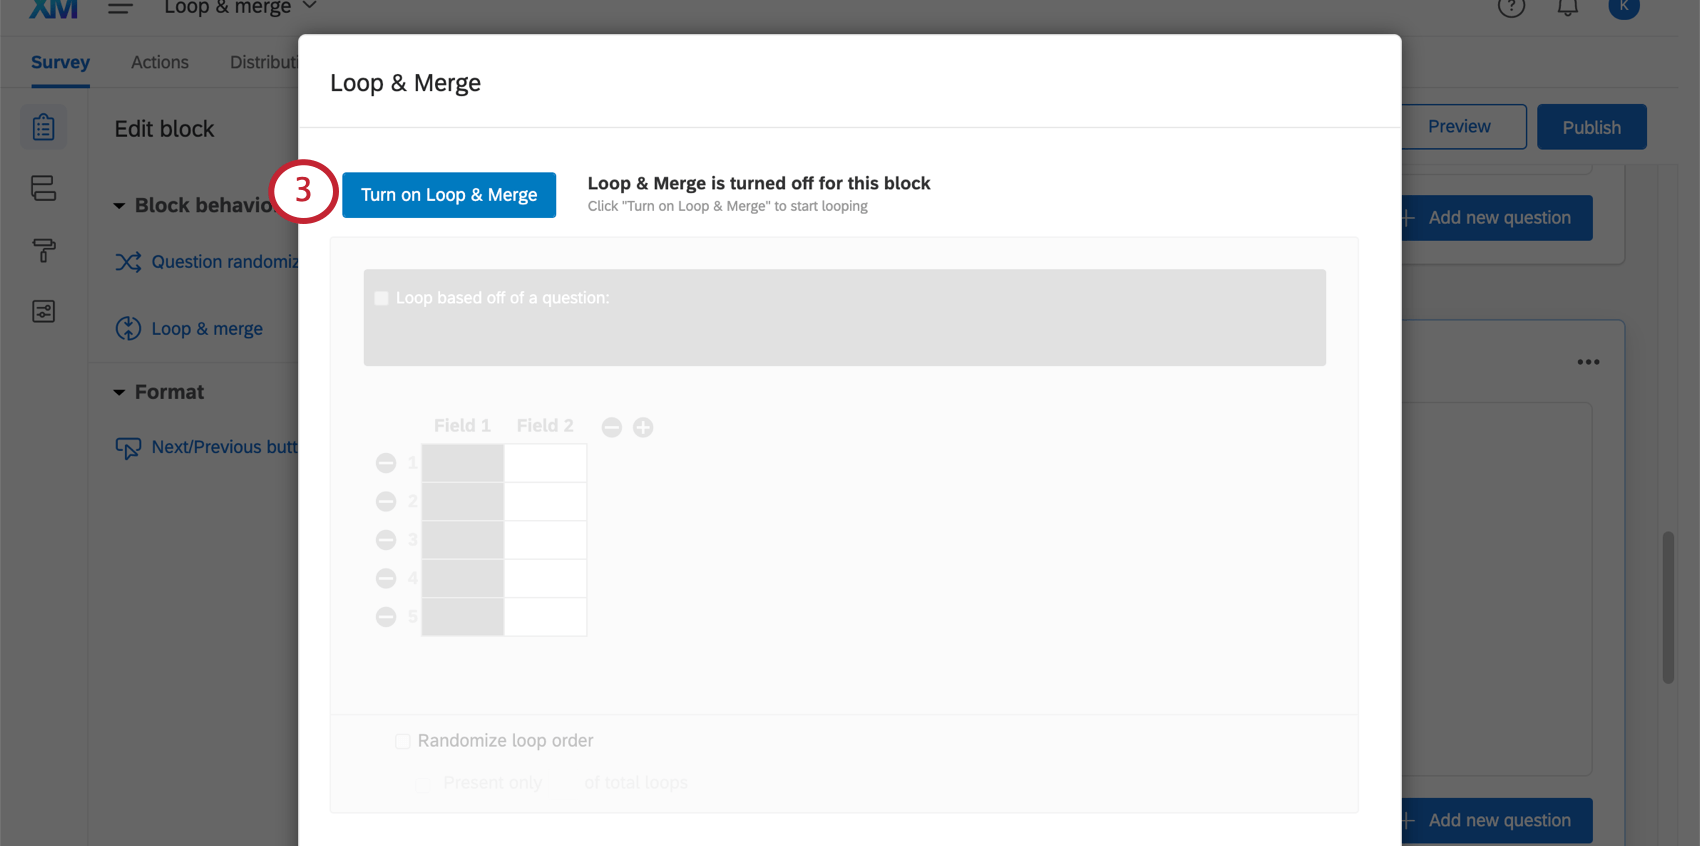
Once loop & merge is turned on, you can specify how your block of questions will be repeated. Choose to loop based on:
Looping Based on a Question
Looping off of a question allows you to present respondents with the same block of questions once for each of a previous question’s choices.
Example: You could ask your respondents which products they typically purchase and then ask them questions about each product.
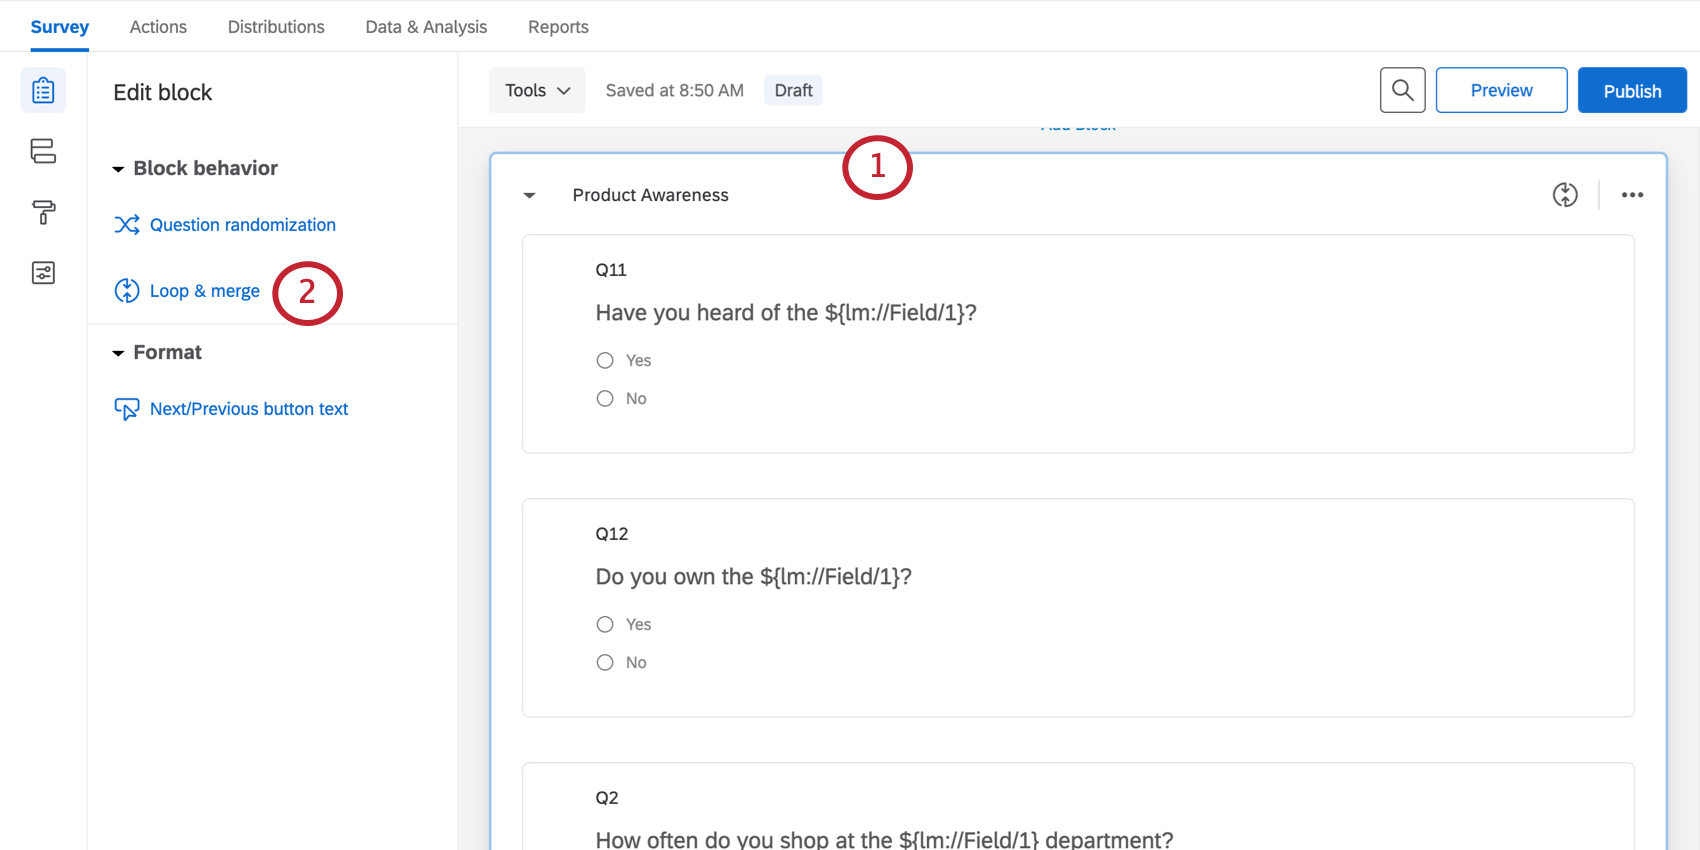
Survey setup
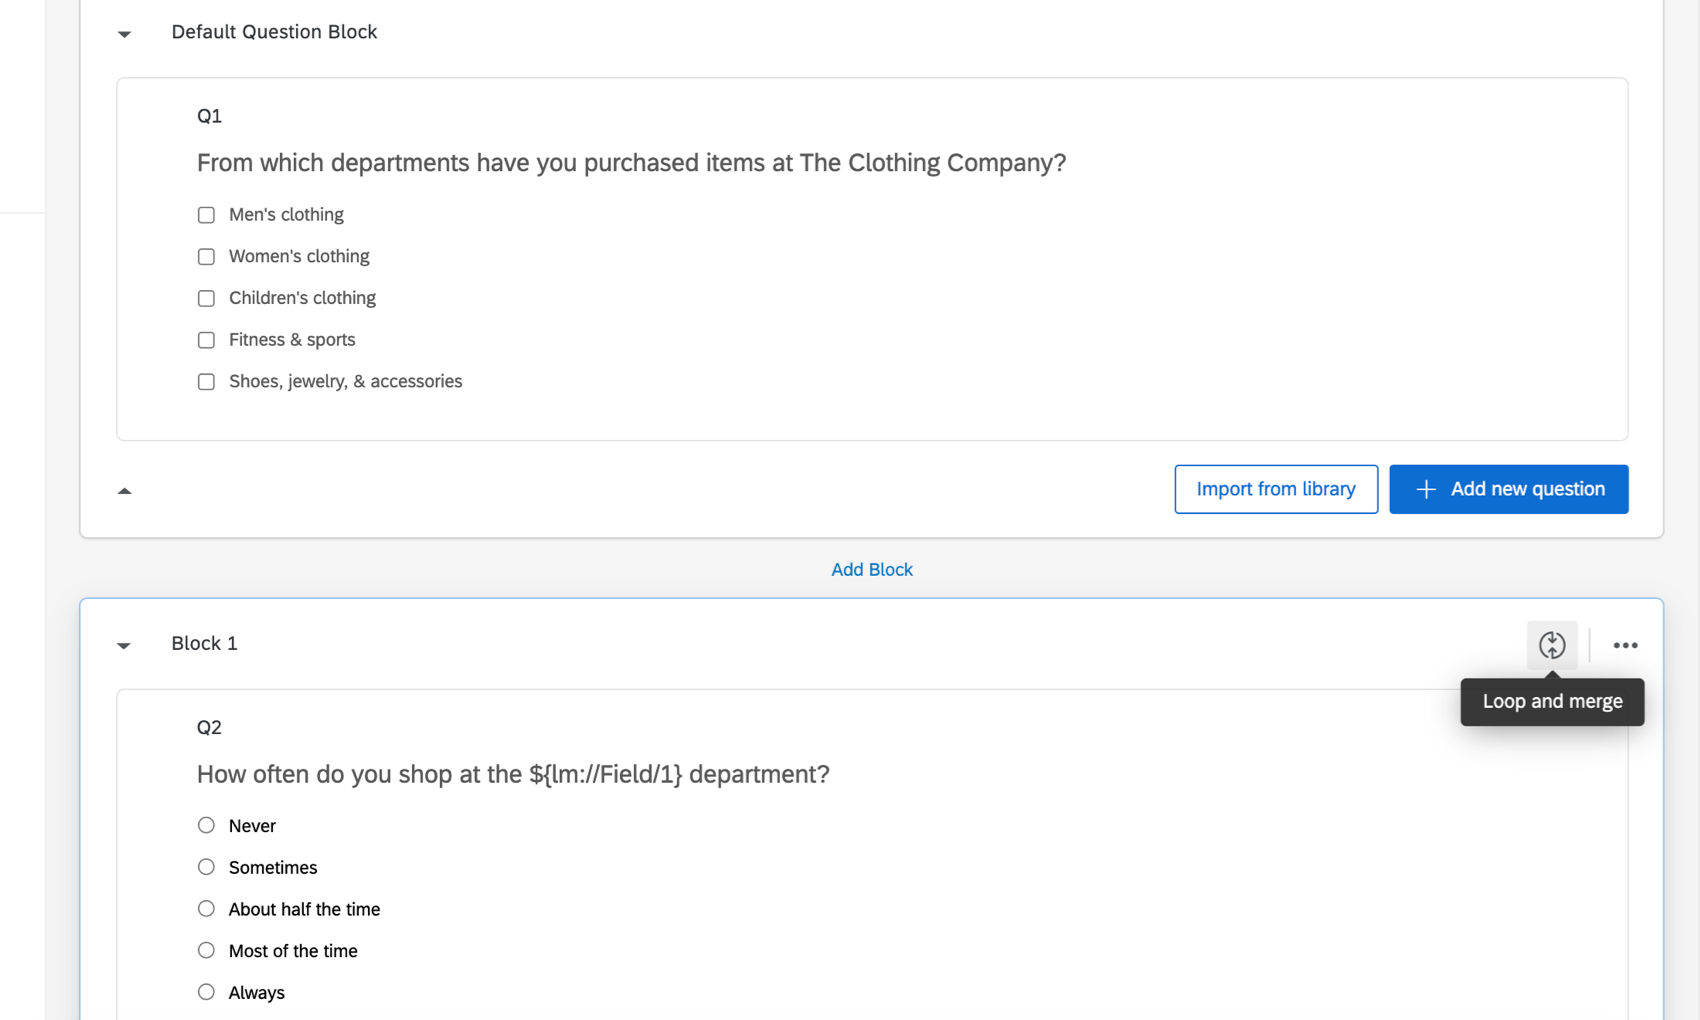
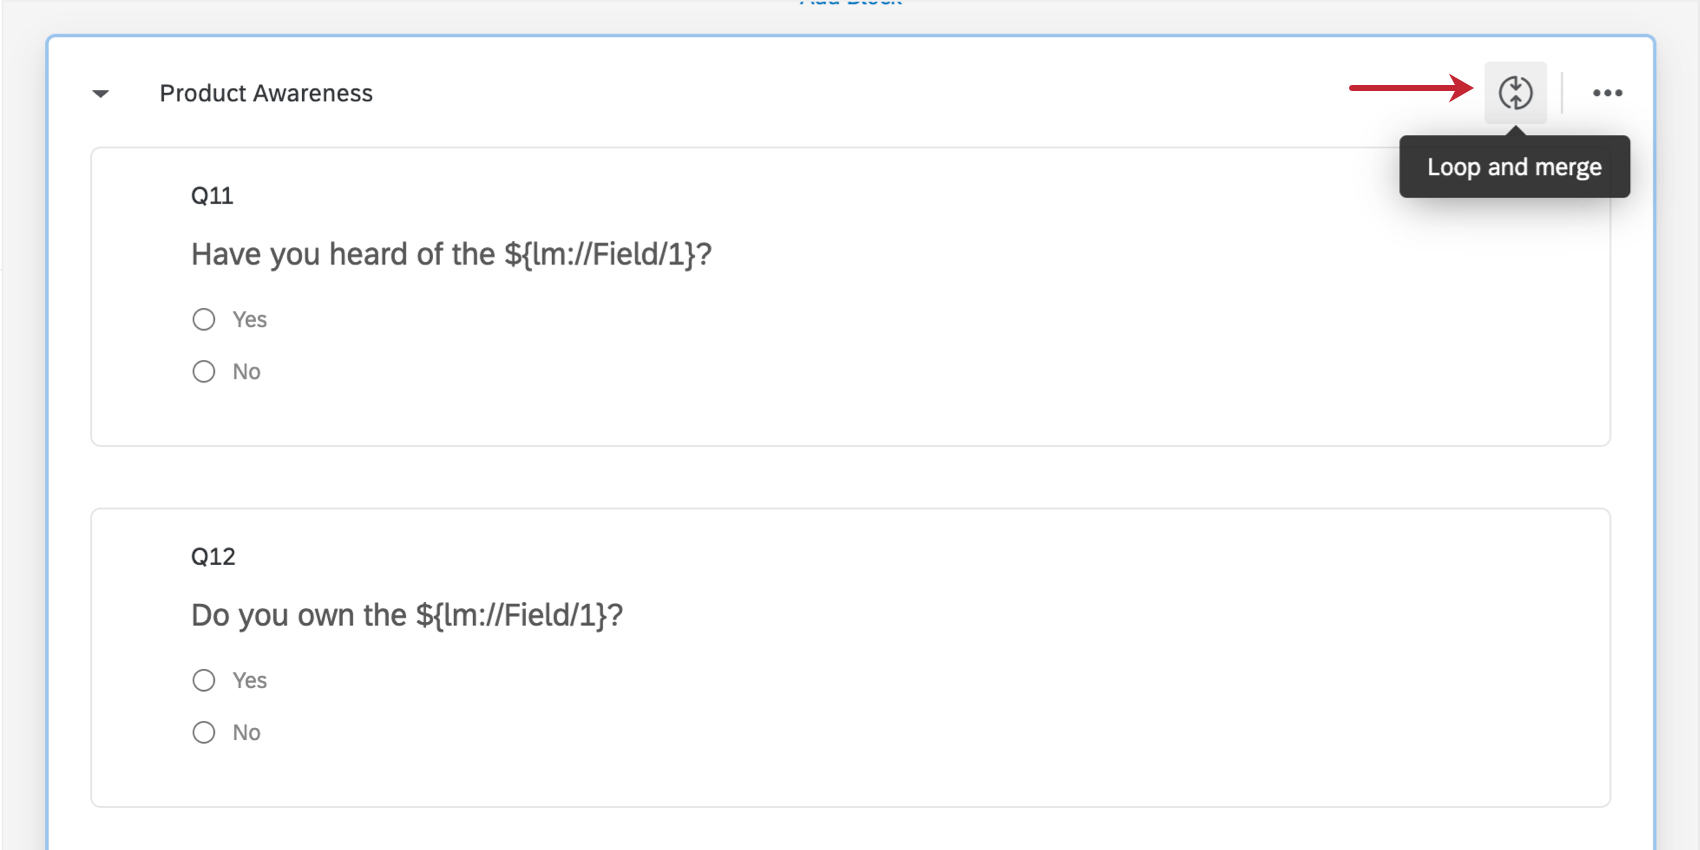
Before setting up this loop & merge, you’ll need at least 2 blocks of questions in your survey. The first block should contain a question that will determine which loops to show to the respondent, usually with a multi-answer question. The second block will be looped.

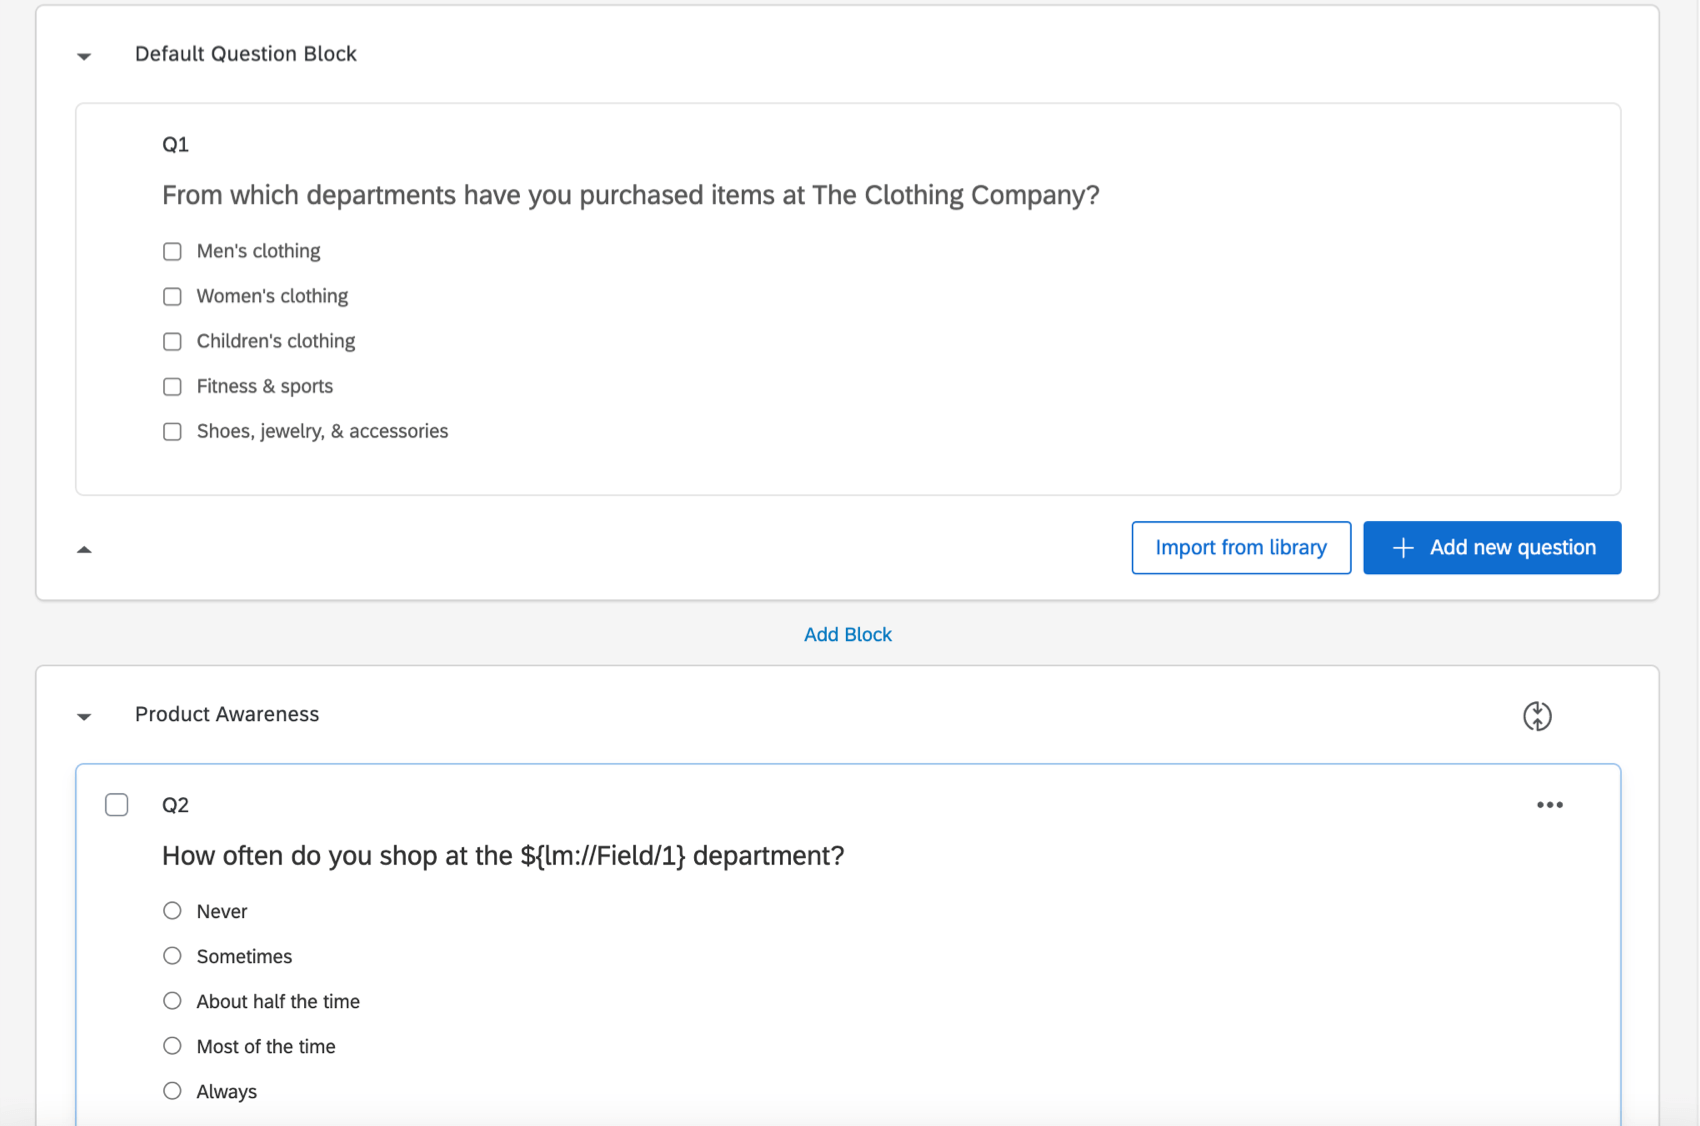
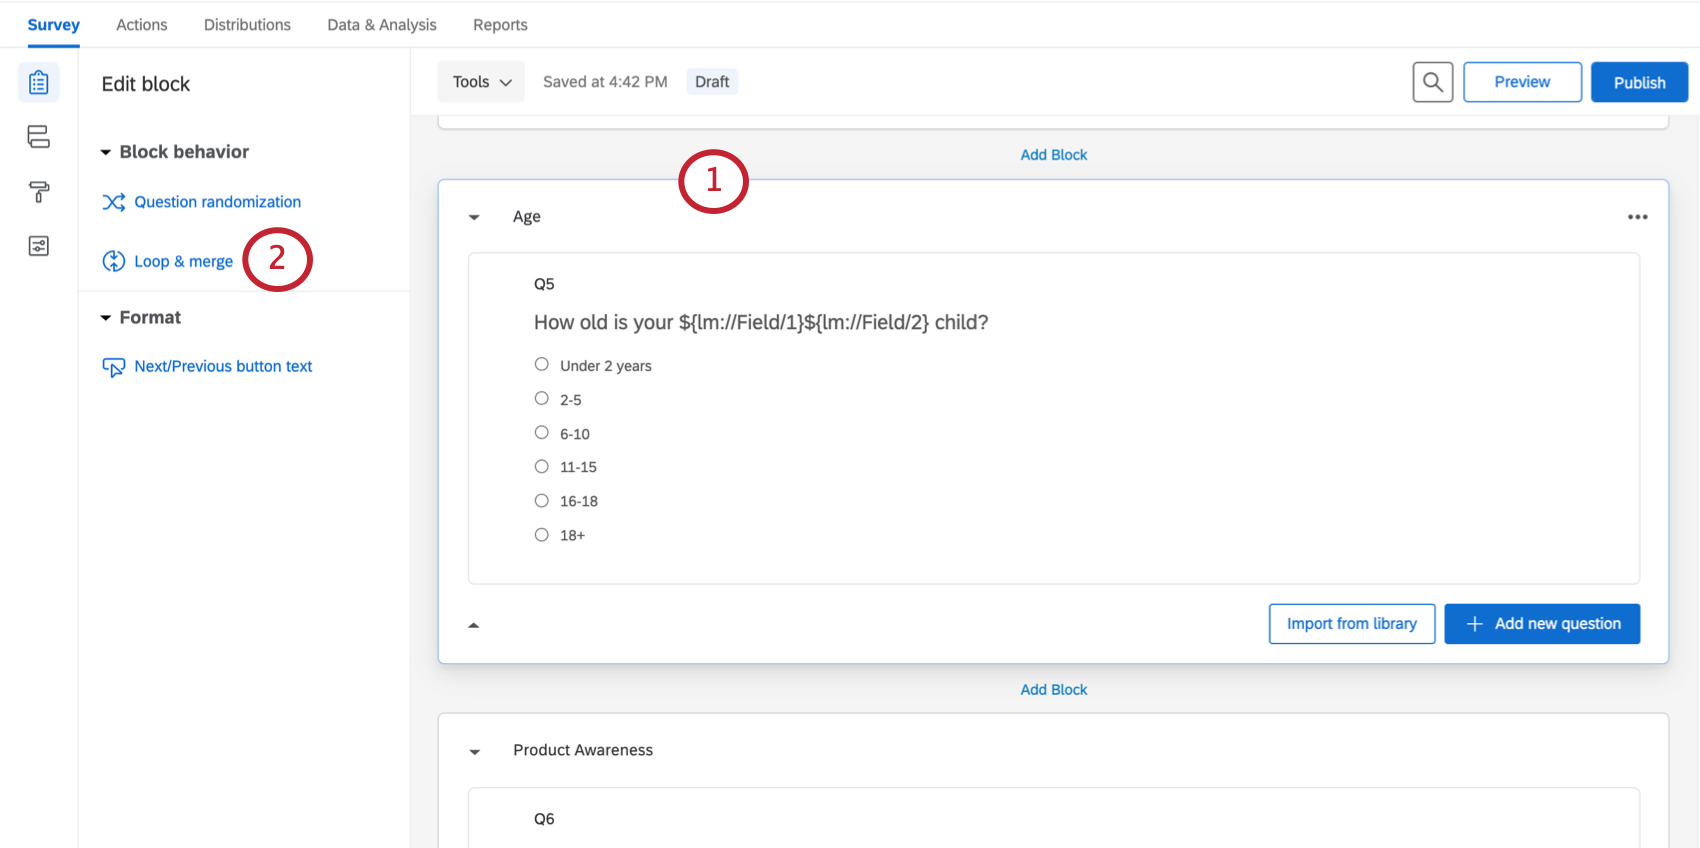
Look at the screenshot above. In the first block (Default Question Block), respondents are asked which departments they shop in. They will then loop through the Product Awareness block once for each department they select.
Looping based on a question
Qtip: A block can be looped based on the following question types: multiple choice, matrix table, slider, side by side, text entry, rank order, constant sum, pick group and rank, and hot spot.
Qtip: You cannot select any questions that are in blocks with loop & merge already enabled.
Qtip: If you have Allow Text Entry set up in the question that your loop is based off of, you can choose Selected Choices – Entered Text to see the typed answers when piping in fields.
Attention: Although you can export the responses given for each field, you cannot export the order in which the loops were presented to the respondents.
Looping Based on a Number
You can use a text-entry question to determine the number of times to loop through a block. That way, you can customize the number of times each respondent loops through the same questions.
Example: You can ask your respondents how many children they have, and then have them fill out a block of questions once for each child.
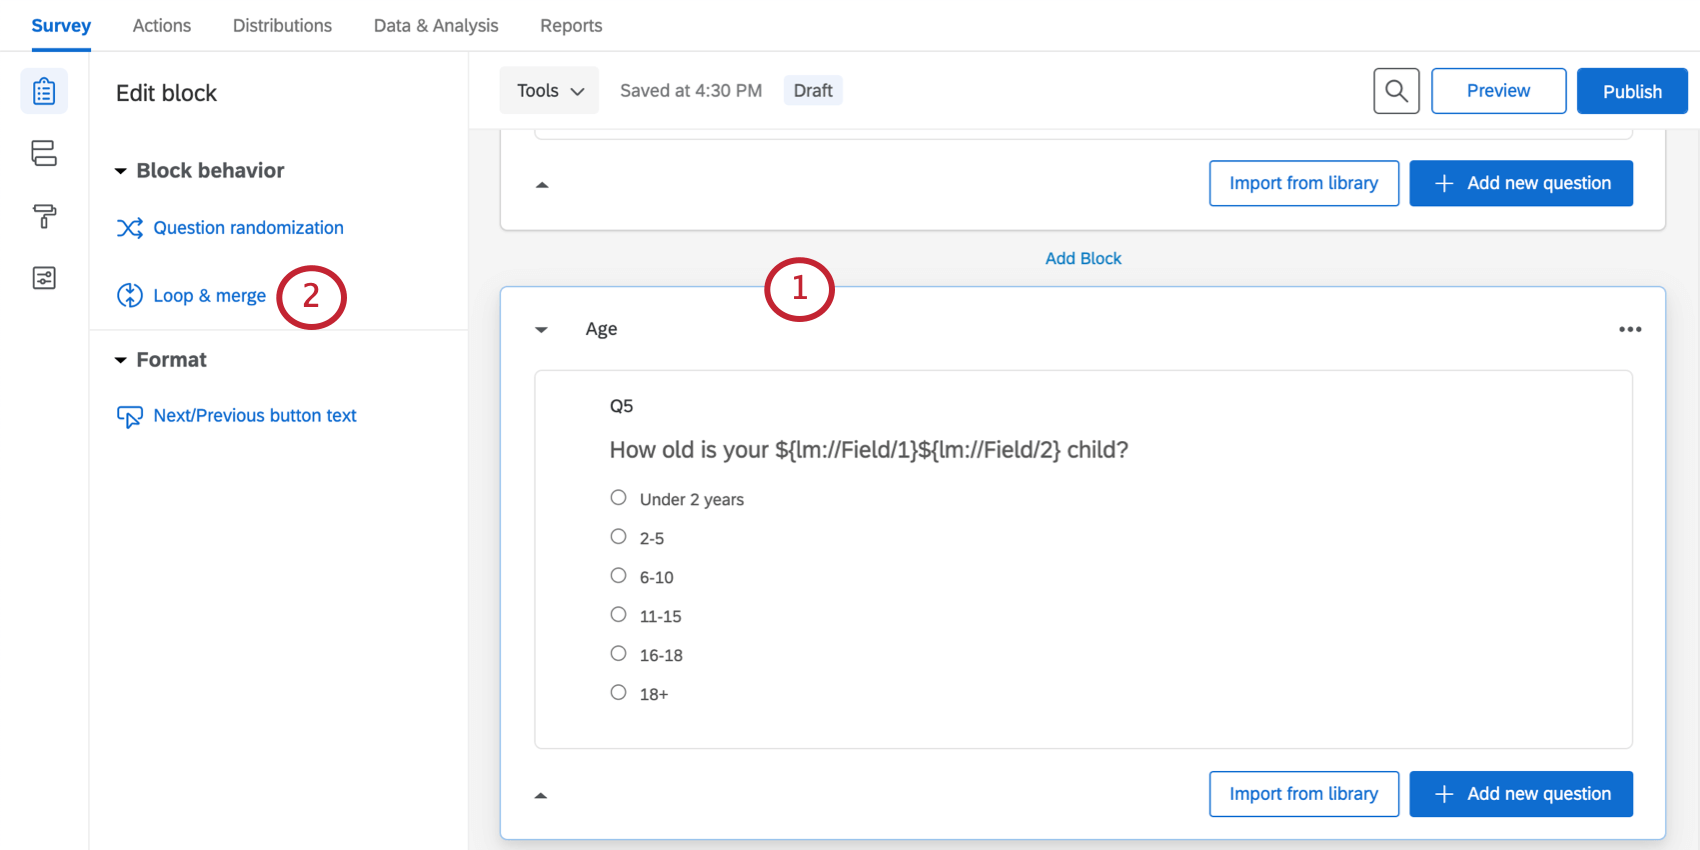
Survey setup
Before setting up this loop & merge, you’ll need at least 2 blocks of questions in your survey.
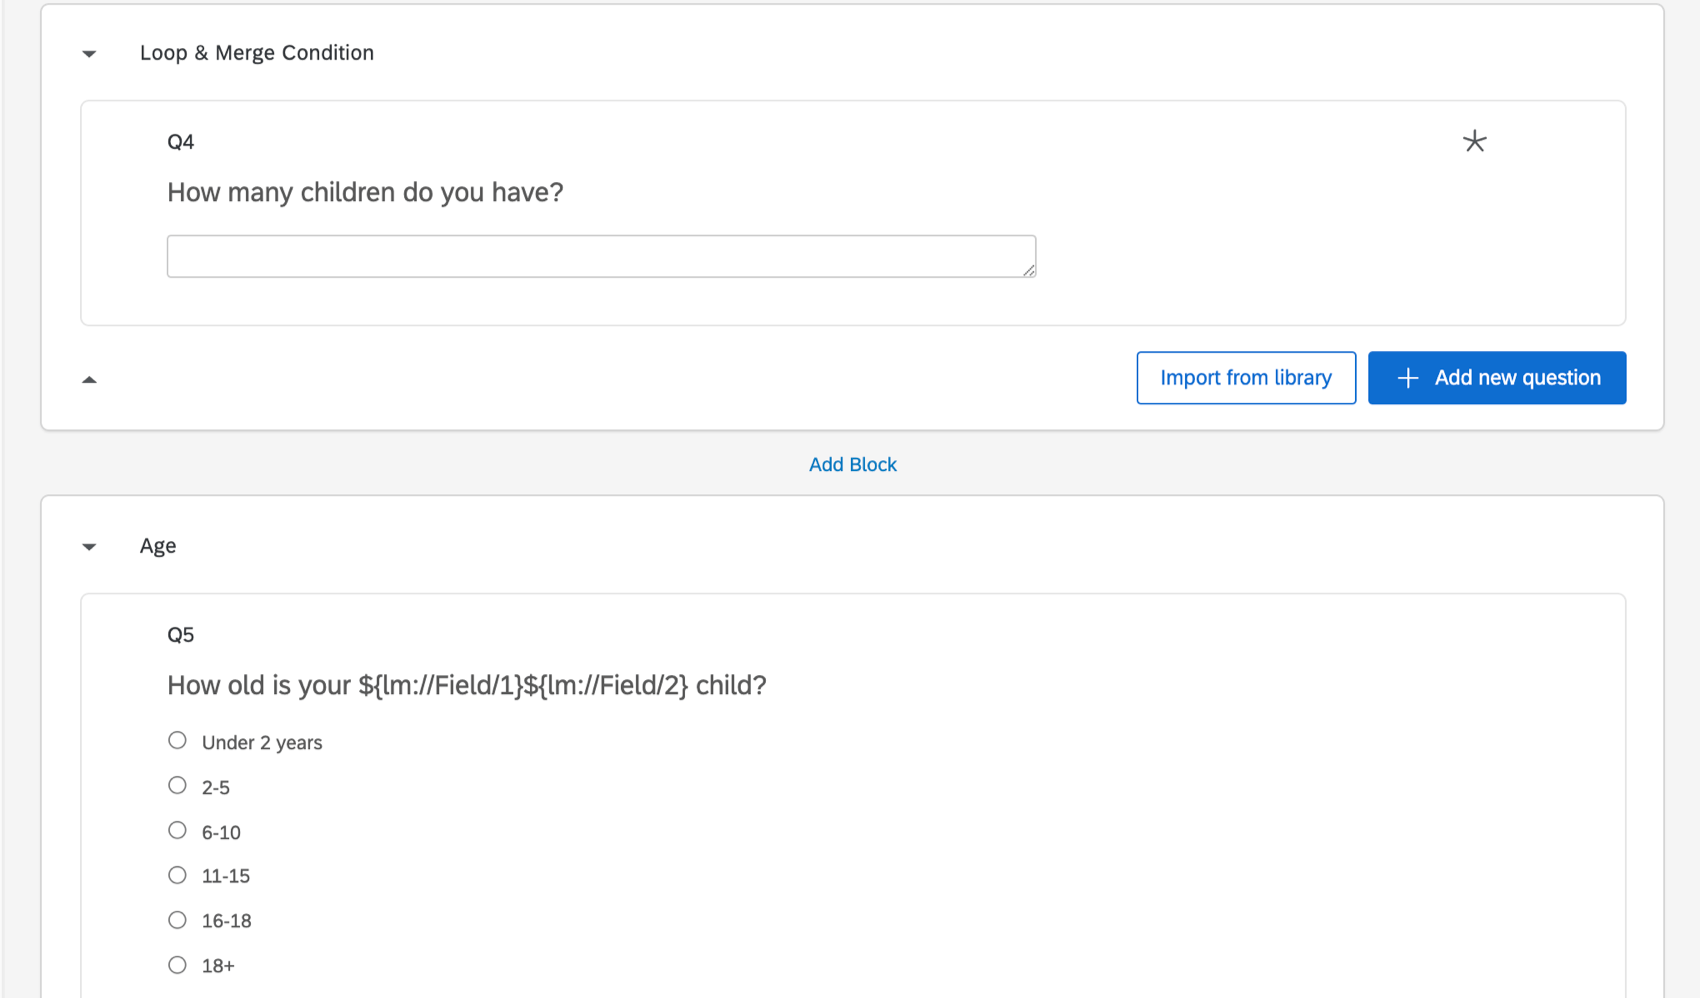
The first block should contain a text entry question that will determine how many loops to show to the respondent. Set this text entry question to numeric format. The second block will be looped.
Example: In the “Loop & Merge Condition” block, respondents are asked how many children they have. They will then loop through the “Age” block once for each child.

Looping based on a Number
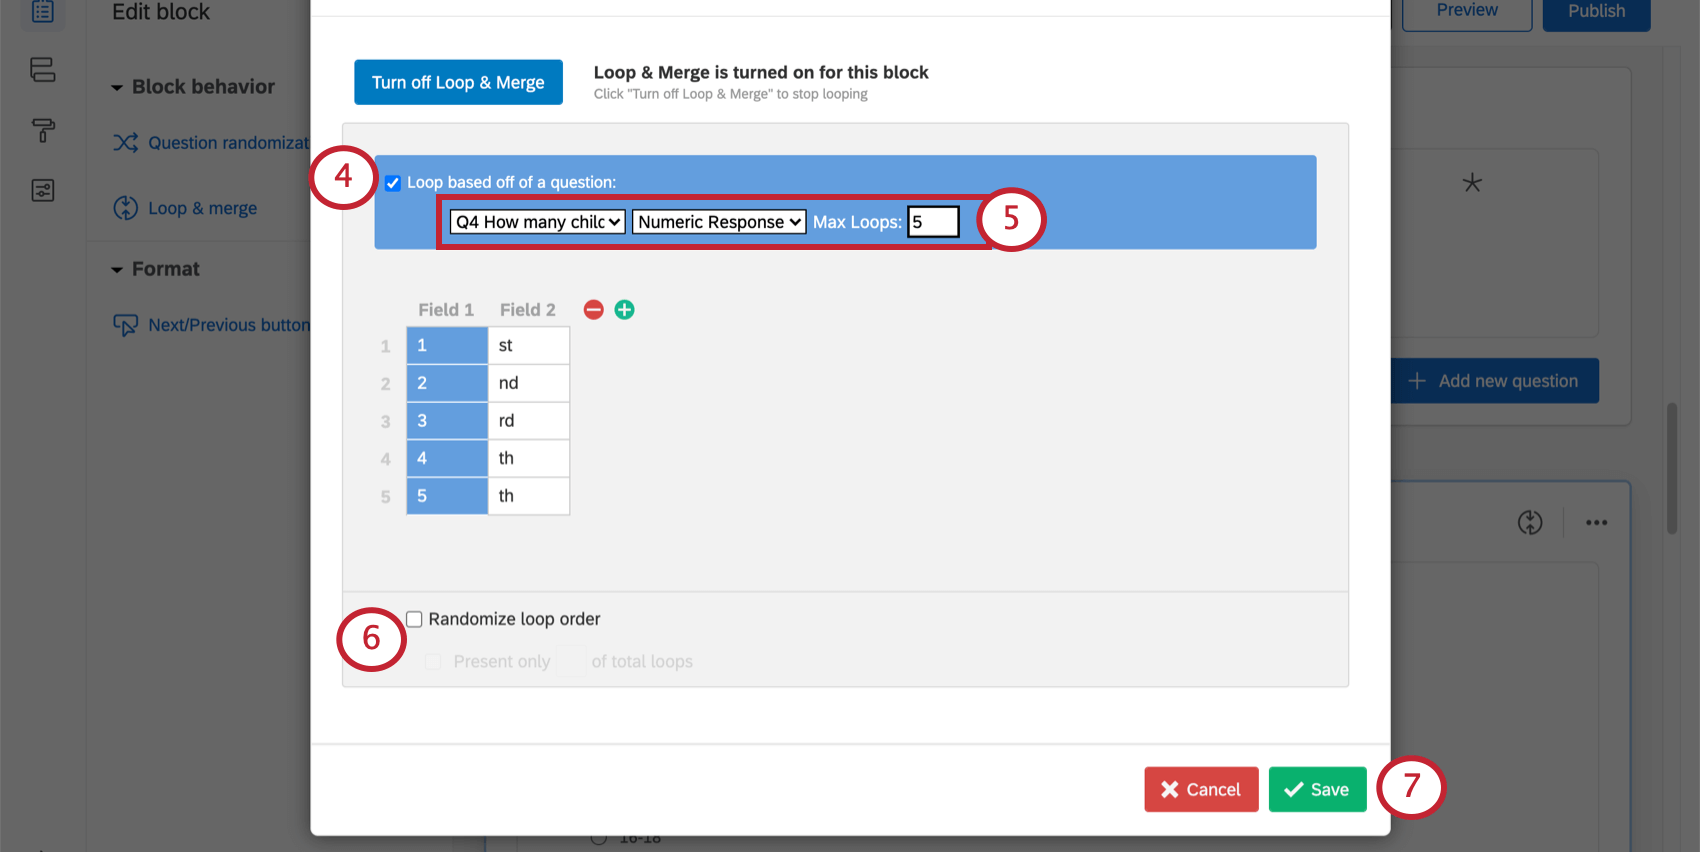
Qtip: We highly recommend adding a maximum number. This will keep your data file from getting too large.
Attention: You cannot export the loop order, so you won’t know what order respondents saw the loops. You will only know the answers they provided for each field.
Static Loop & Merge
You can have the survey loop through the same options for each respondent by setting up static fields. Manually enter the fields that each respondent should loop through.
Example: Have all your respondents loop through a “Product Awareness” block once for each of your 3 products.

Attention: You cannot export the loop order, so you won’t know what order respondents saw the loops. You will only know the answers they provided for each field.

Loop & Merge Fields
Each time you turn on loop & merge, you create loop & merge fields. These fields are used to create dynamic text that is different for each loop. This can be helpful if you’re planning on piping in certain information for different loops.
Example: You want feedback on a few departments in your store: Men’s, Women’s, and Children’s. You also want to ask about 3 products from each department, but these products vary. Loop and merge fields allow you to define the different product names that should be shown to each customer.
Customizing Loop Fields
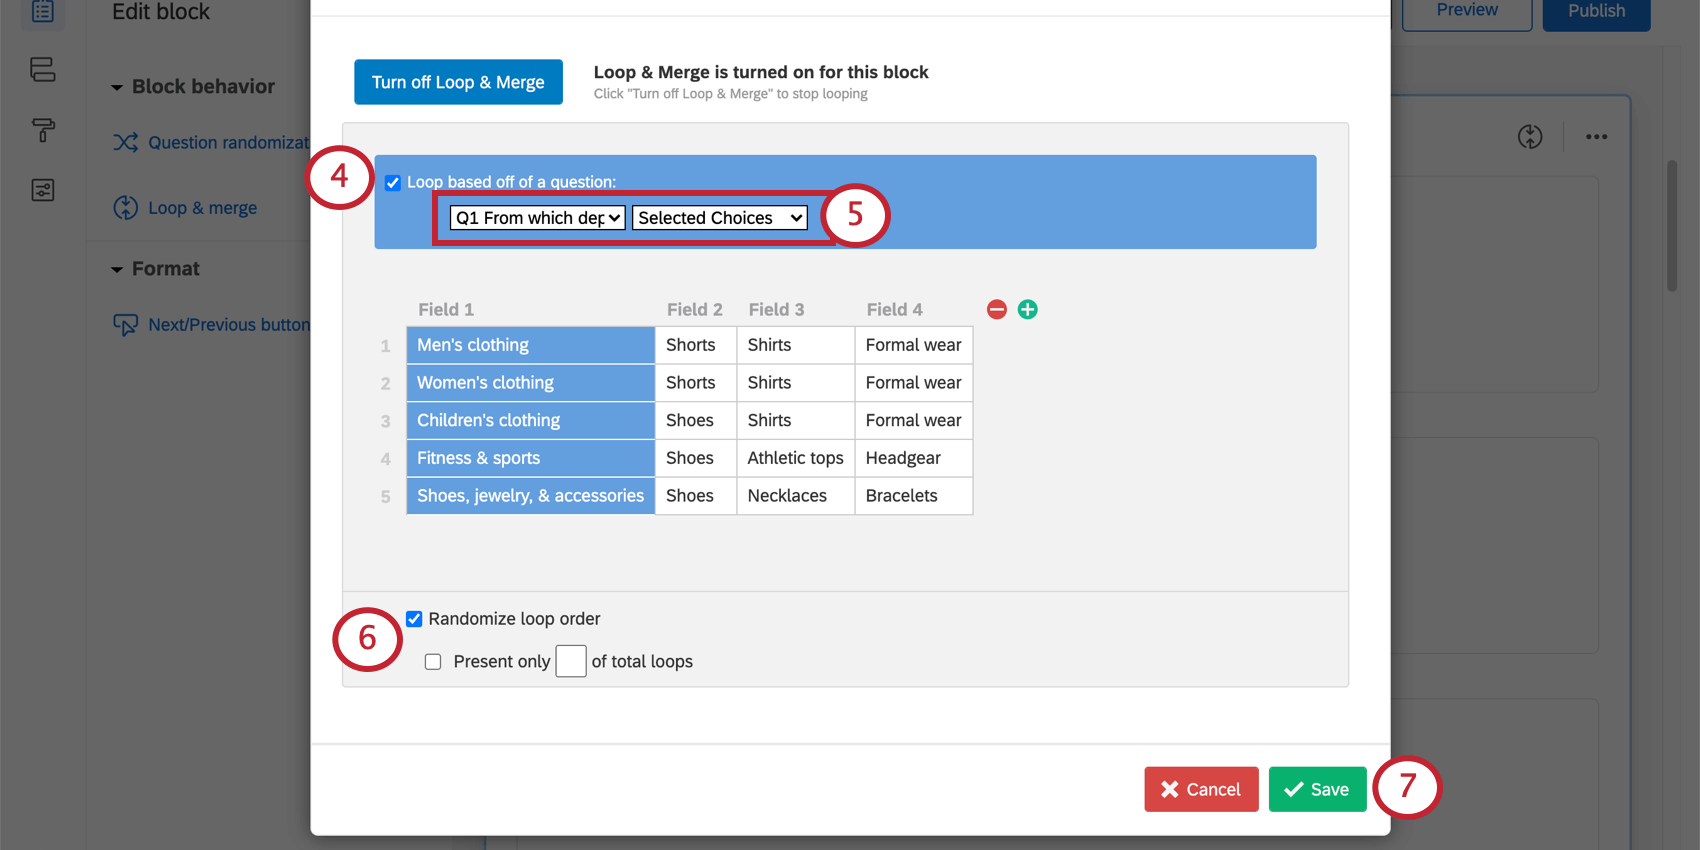
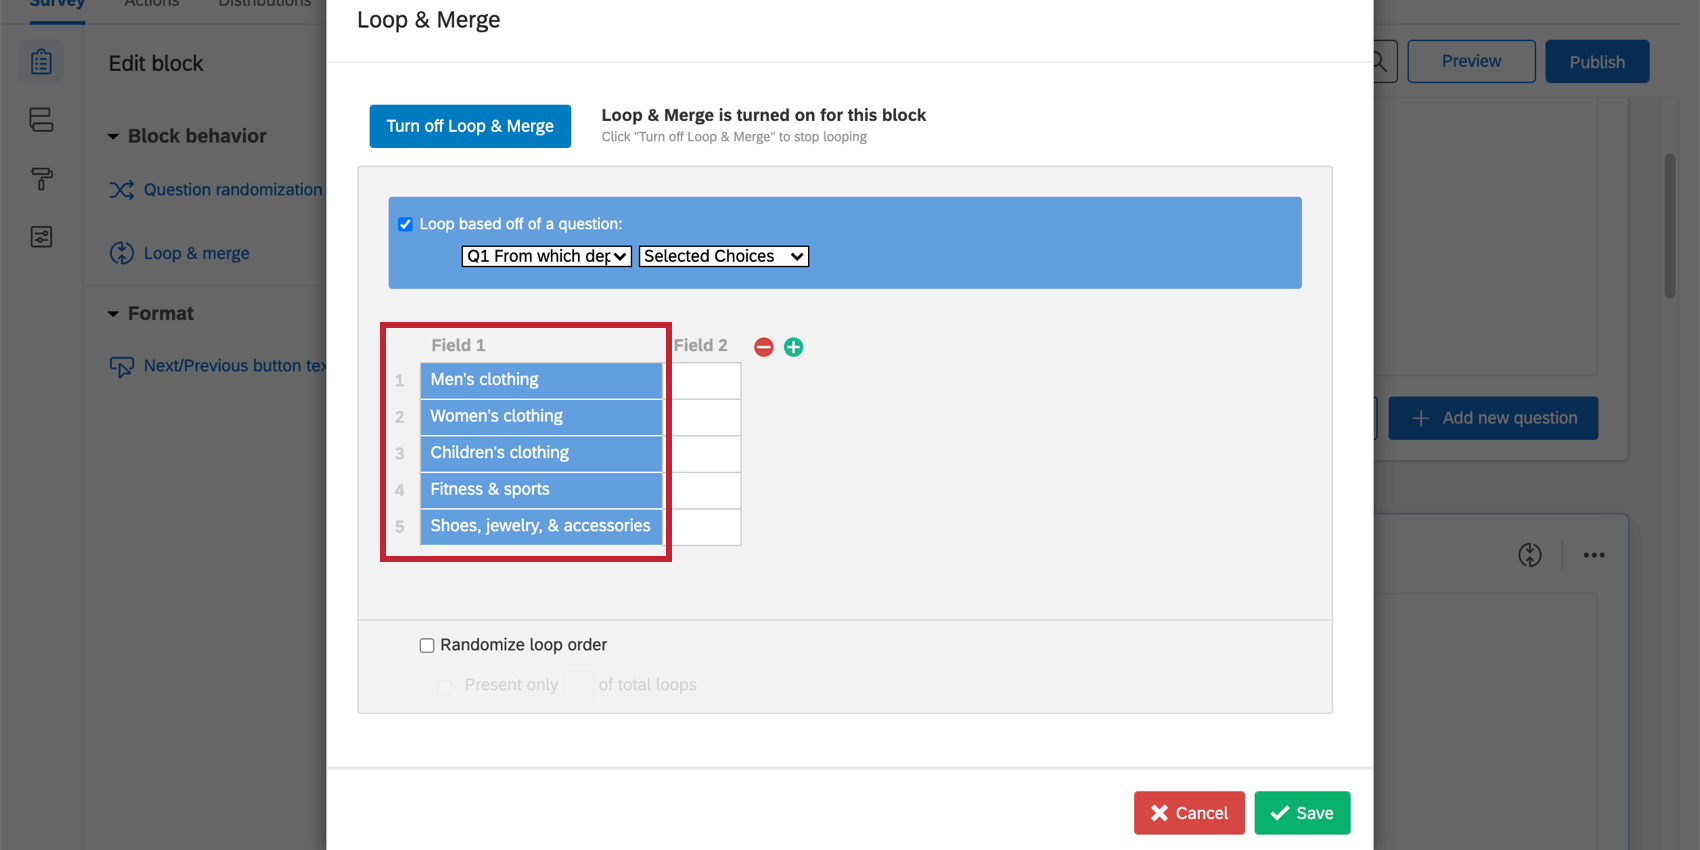
Each loop has its own set of fields. You can think of Field 1 as the “name” of the loop. You can populate Field 1 with answer choices from a previous question, or with manually entered text.
Example: In the image shown below, the fields are based off answers to a question. The first loop is Men’s Clothing, the second loop is Women’s Clothing, and so on.

After entering text in Field 1, you can create additional fields (columns) by clicking the plus ( + ) button. Click on the field you want to name and type text directly into the box. Continue adding and filling fields until you have all the fields you need. You can click the minus button ( – ) to remove fields.
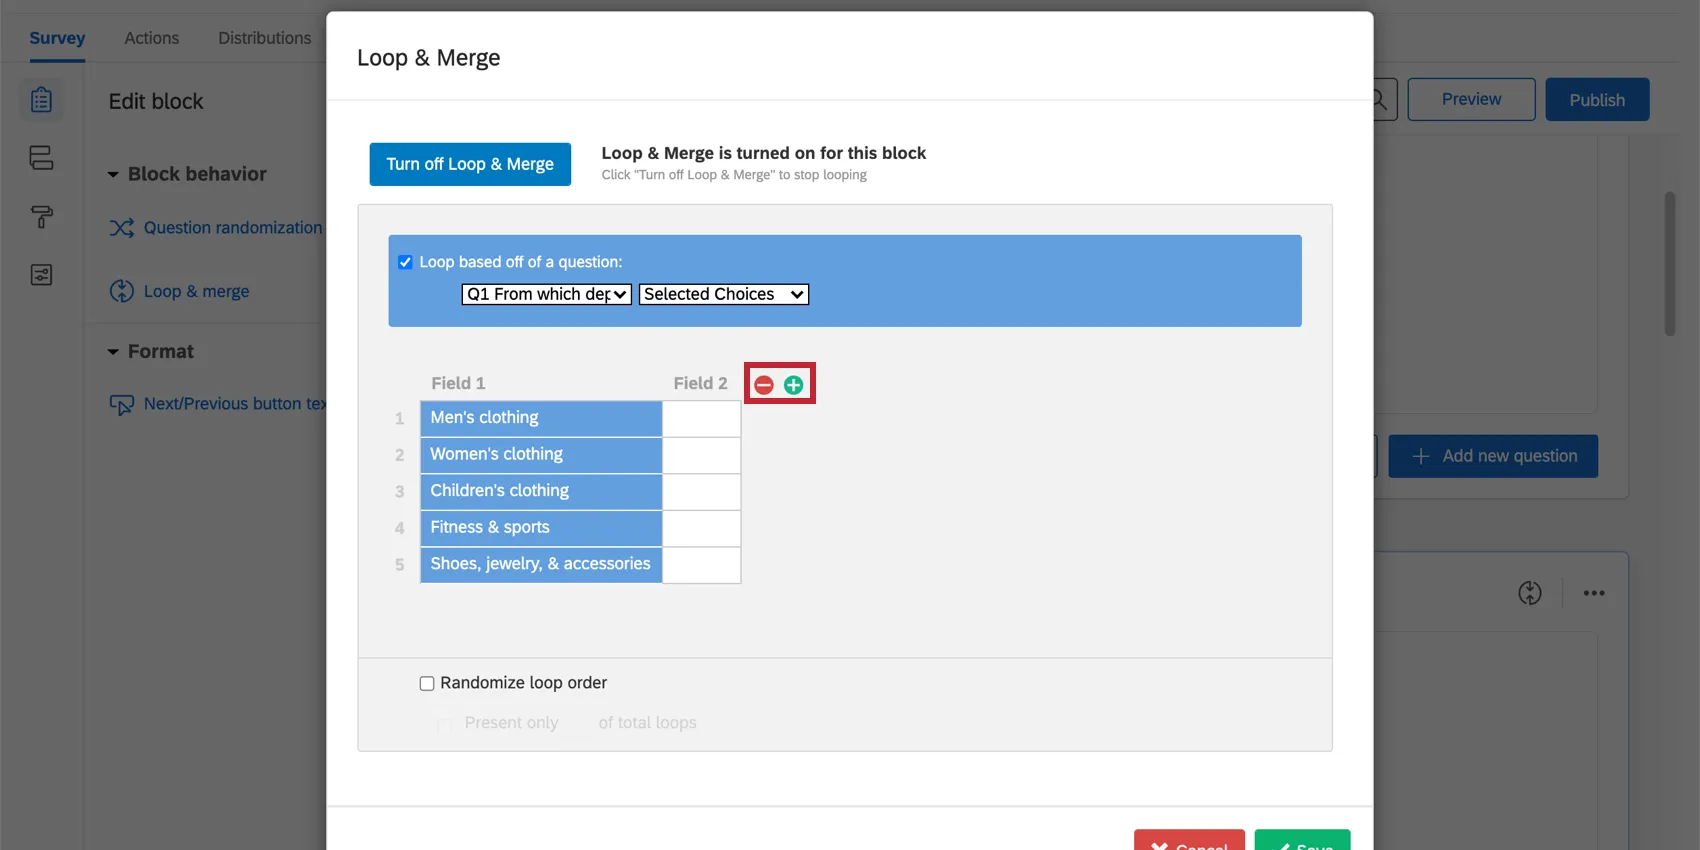
Qtip: If you’re looping based off question answers, you can add as many columns (fields) as you want, but you cannot add additional rows. If you manually enter fields, you can add additional rows and columns as needed.
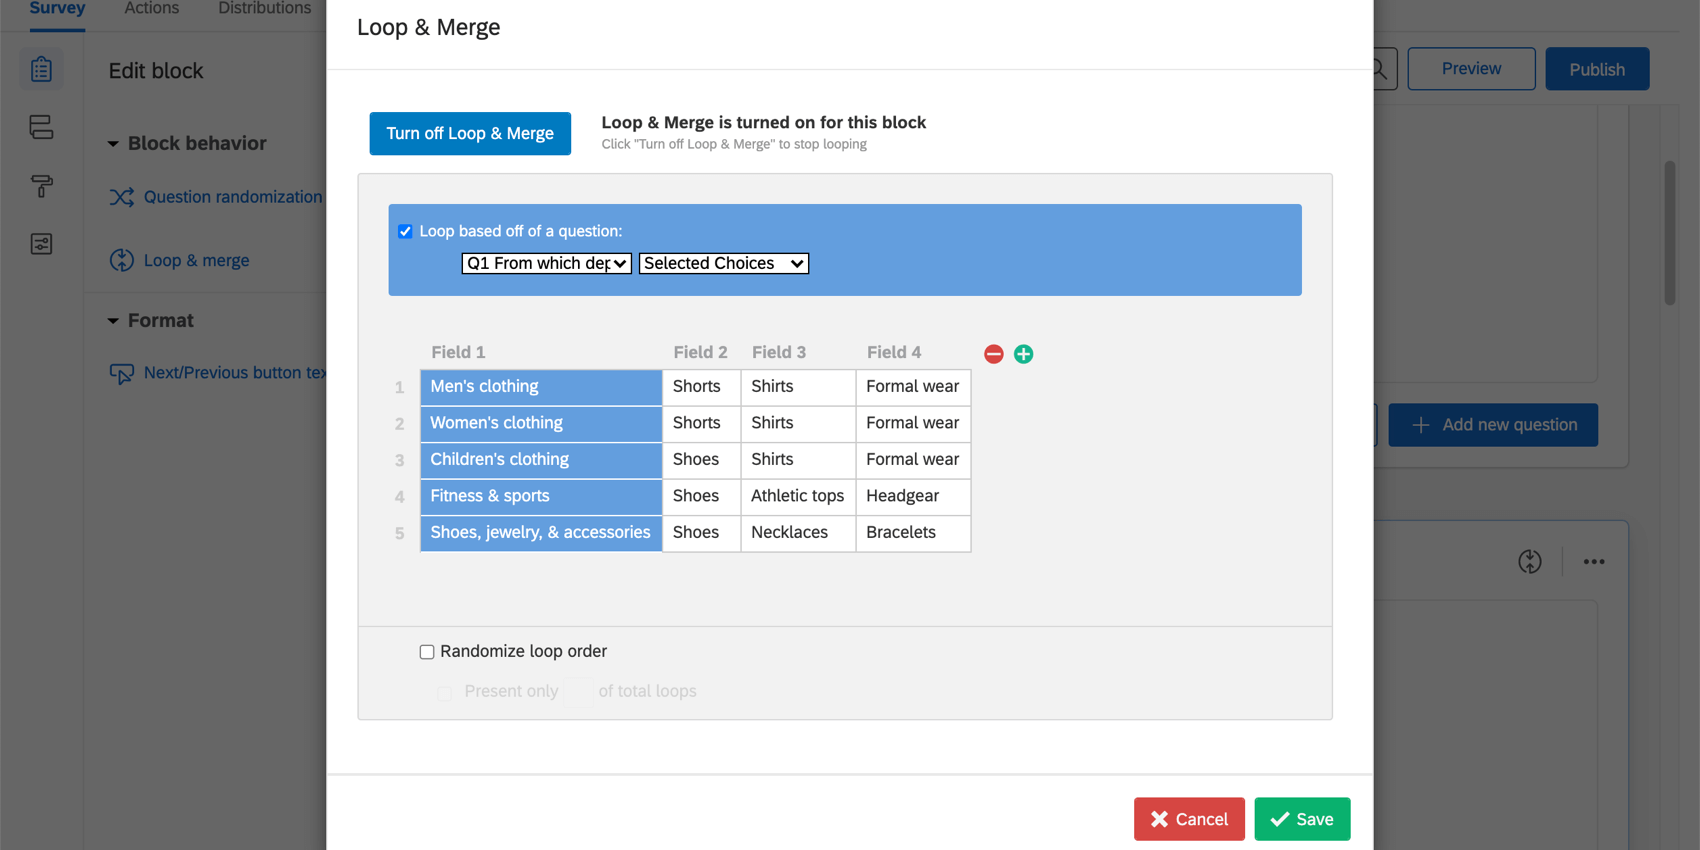
Example: In the image below, the first loop of the survey will have:
- Field 1 = Men’s Clothing
- Field 2 = Shorts
In the second loop:
- Field 1 = Women’s Clothing
- Field 2 = Shorts

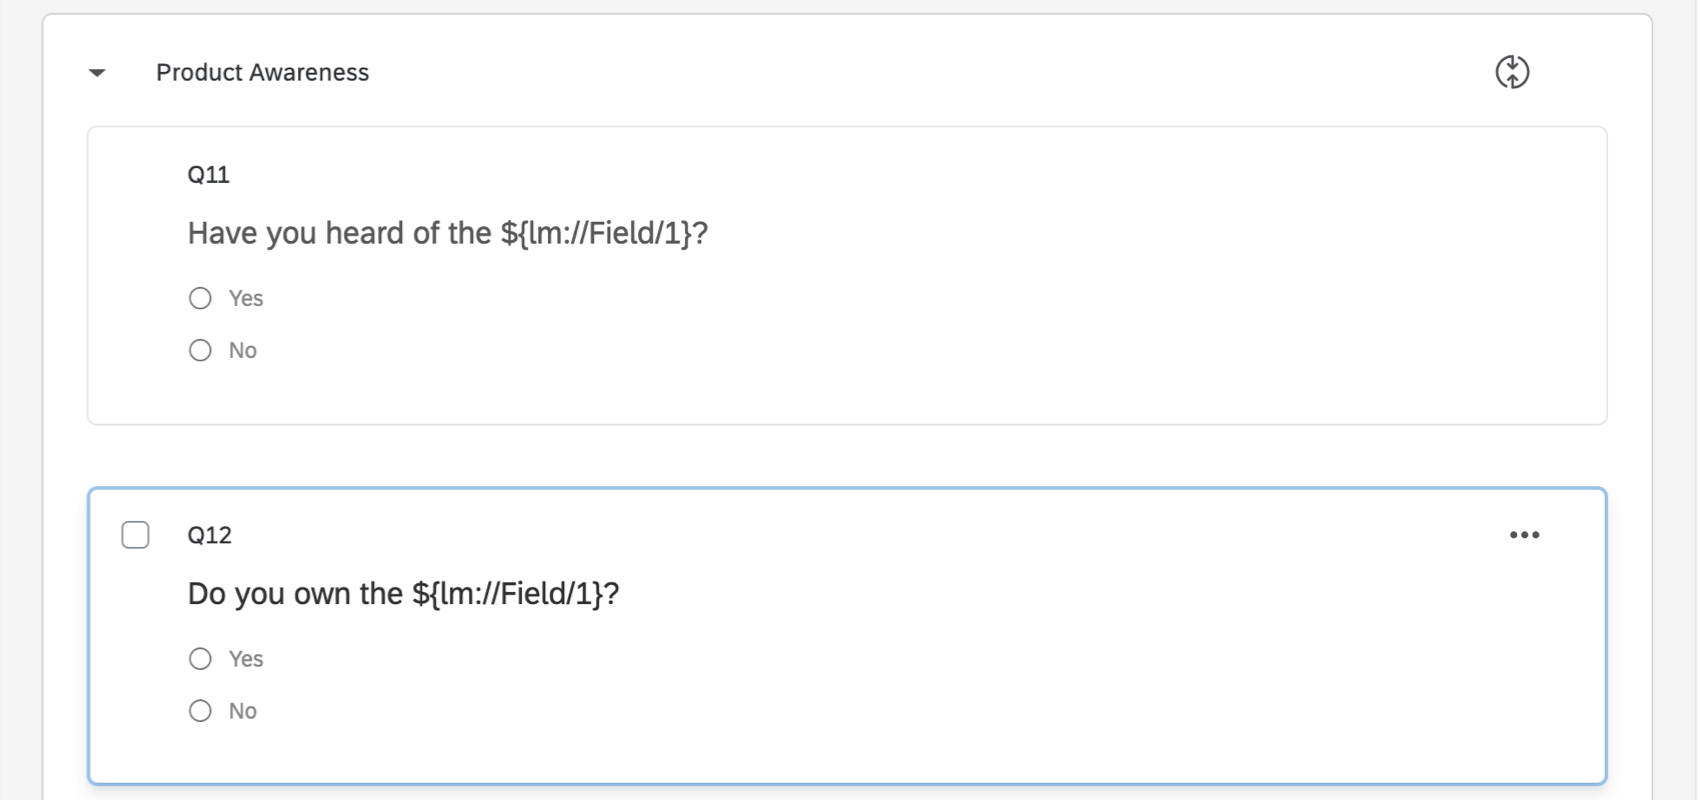
Using Loop Fields
Within the loop & merge block, you can use these fields to customize each loop with piped text. Piping in Field 1 will display the Field 1 text for the loop, and piping in Field 2 will display the Field 2 text.
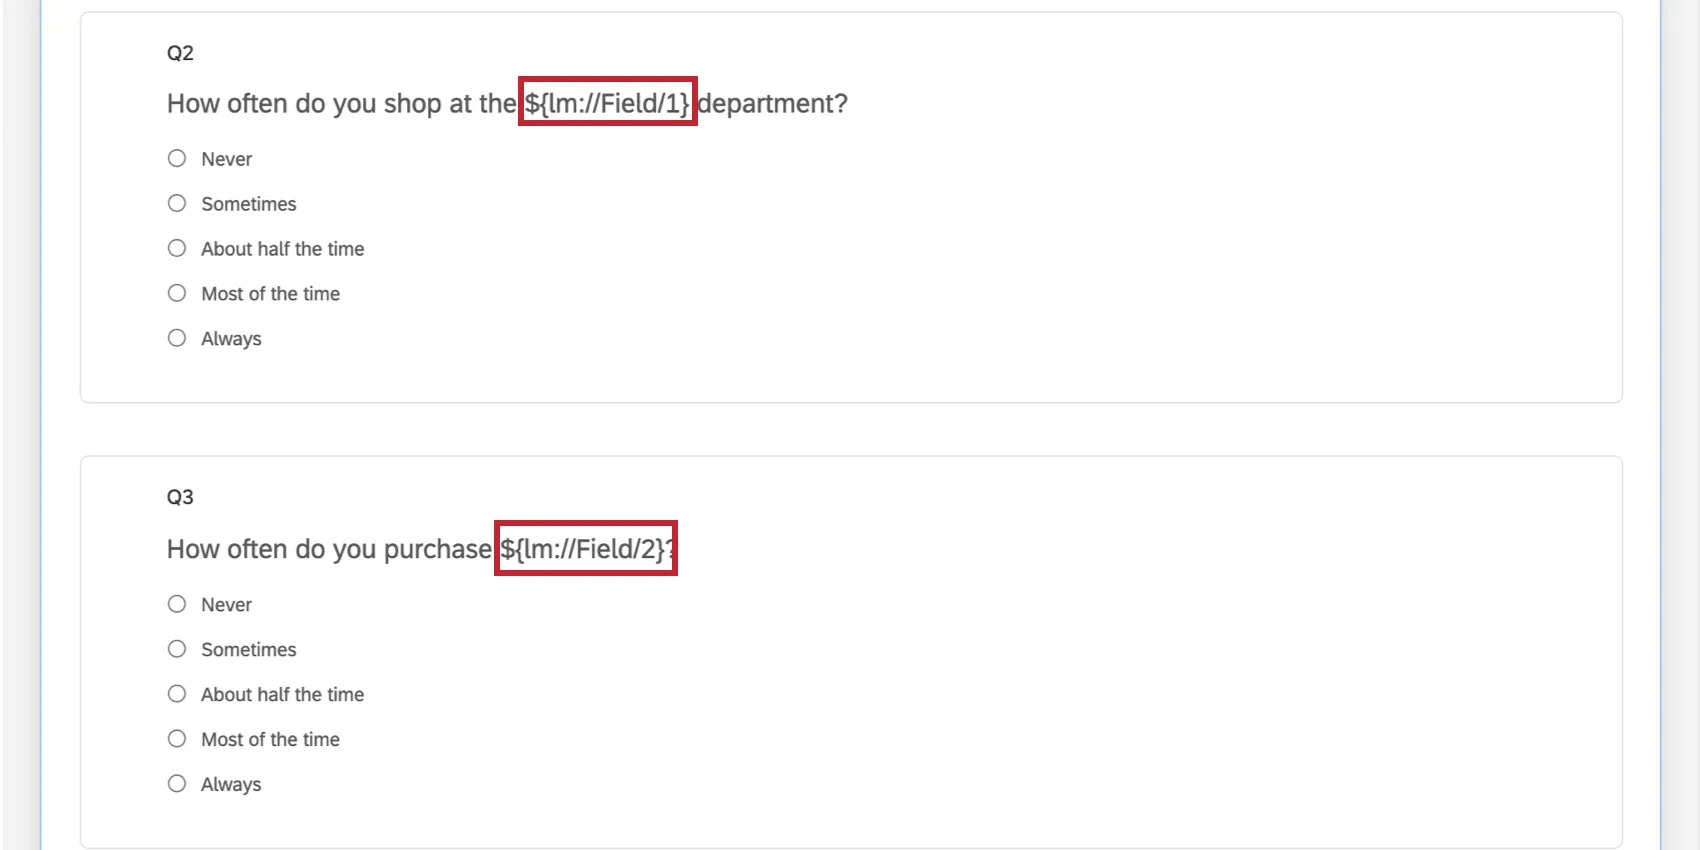
When a respondent is in the Women’s Clothing loop, the first question will read, “How often do you shop in the Women’s Clothing department?” The second question will read, “How often do you purchase Shorts?”
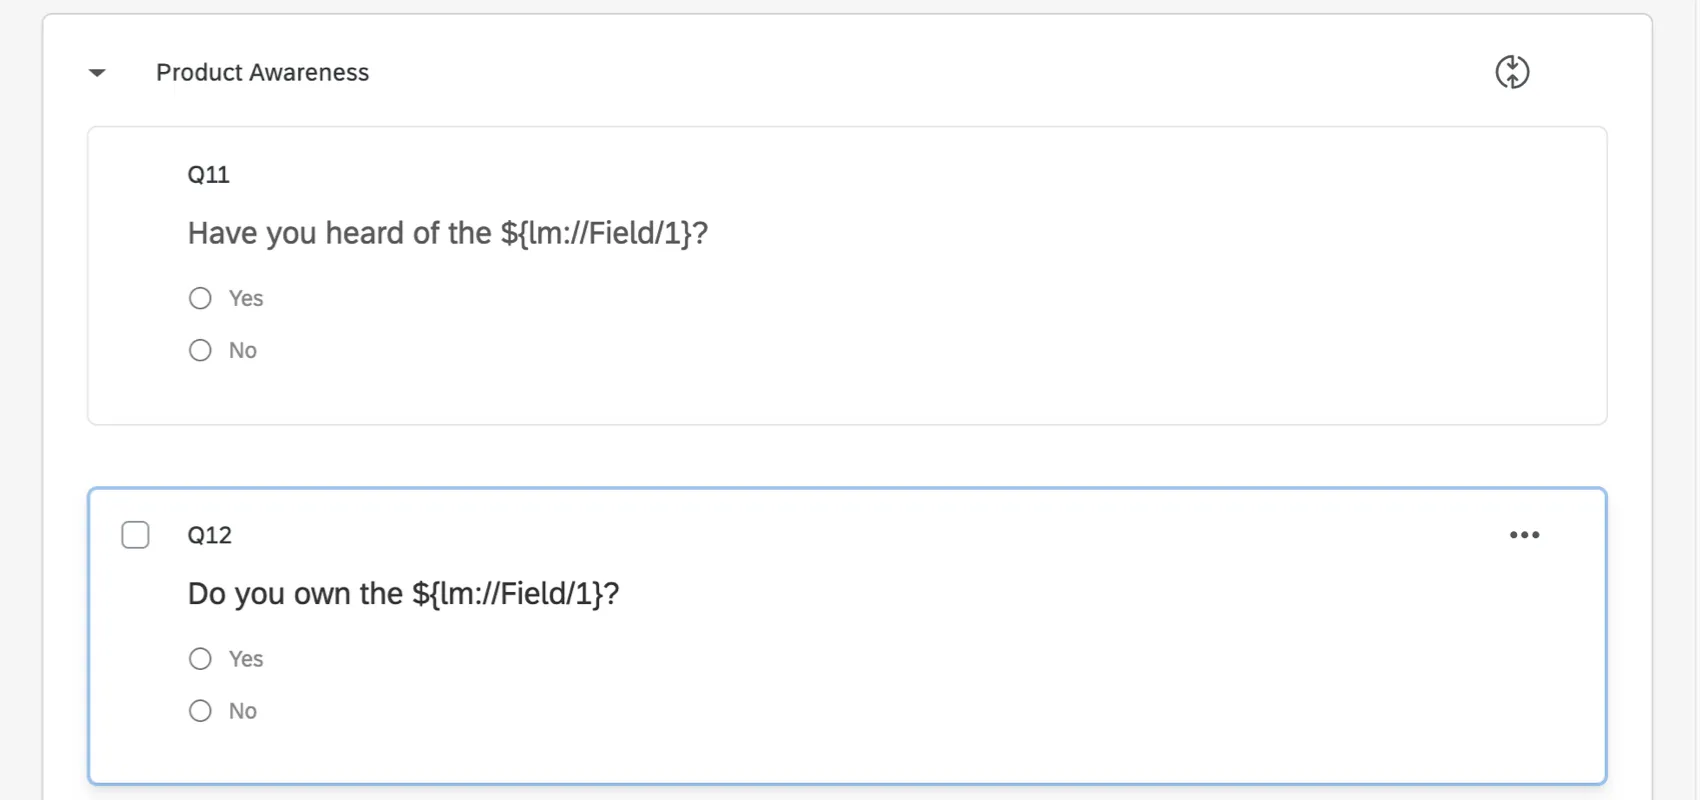
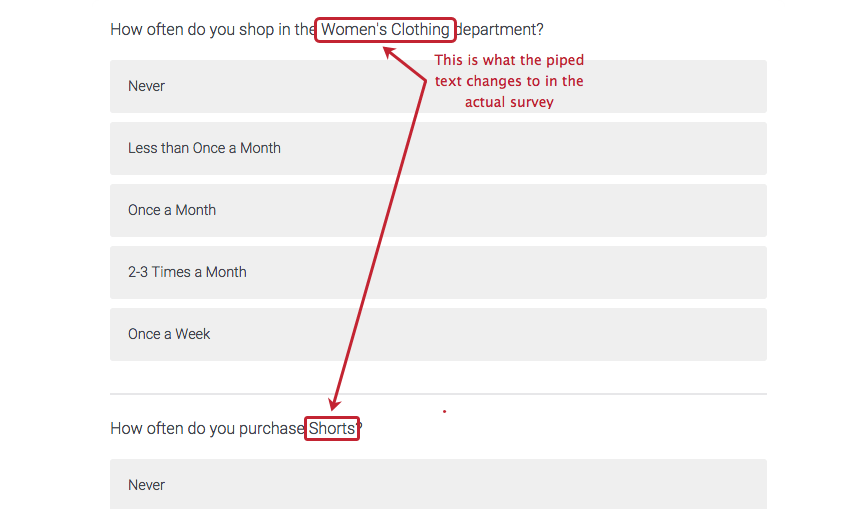

This is how the respondent will see Field 1 and Field 2 when they’re in the Women’s Clothing loop.
Qtip: For more information on piping loop & merge fields into questions, view Piping Text from a Loop & Merge Field.
Qtip: If you know HTML, you can paste the HTML for an image into Field 1, then pipe Field 1 into the question for the image to be displayed to the respondent. Our support team does not offer assistance or consultation on custom coding, but you can always try asking our community of dedicated users instead.
Randomizing Loop Order
Attention: You cannot export the order each loop was presented to each respondent. You will only know the answers respondents provided for each specific field.
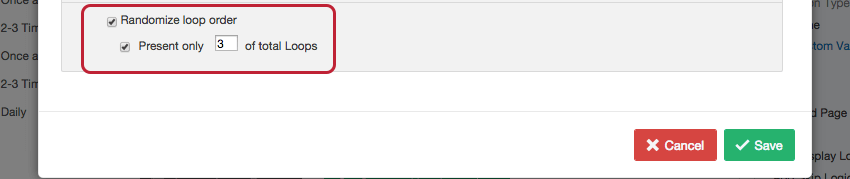
Within a loop & merge block, you can display the loops in a randomized order and limit the number of loops that are displayed to each respondent.
To turn on loop randomization, select Randomize loop order. If you want to limit the number of random loops shown to each respondent, select Present only __ of total Loops and type a value into the text entry box.

Understanding Loop and Merge Data Exports
When viewing or exporting your data, each loop is treated as a separate set of questions with their own columns in the file. For example, if you have 5 possible loops of a block that has 3 questions, you’ll get 15 columns of data. Even if a respondent isn’t shown all of the loops, all possible loops have their own columns in the data export.
Attention: Loop & merge data is not supported in dashboard datasets.
Loop & Merge Example Data
The question “How often do you shop in the ${lm://Field/1} department?” from our example survey will output raw data that will look similar to this in a CSV file:

You’ll notice that each column name starts with the departments we added in Field 1. In this image, we see the “Men’s clothing” results. (The other departments are repeated in this file, too. You can see the “women’s clothing” results on the right.)
Questions are also numbered according to fields. “Men’s clothing” is our first loop in Field 1, so its questions are numbered “1_Q#.” “Women’s clothing” is second, so its questions are numbered “2_Q#.”
However, other fields are not called out by name in the data, because they vary by loop. Instead, we see [Field-2] and [Field-3]. Open your loop and merge fields to match each field to a name.
Example: In our field setup, field 2 is “shorts” for men’s clothing, and field 3 is “shirts.”
Qtip: For randomized loops, the data is also recorded in the original choice order. However, you cannot export the loop order, so you won’t know what order respondents saw the loops. You will only know the answers they provided for each field.
Using Logic in Loop & Merge Blocks
In loop & merge blocks, you can base display logic off of which loop the respondent is currently in. You can use this feature to hide a question during certain loops.
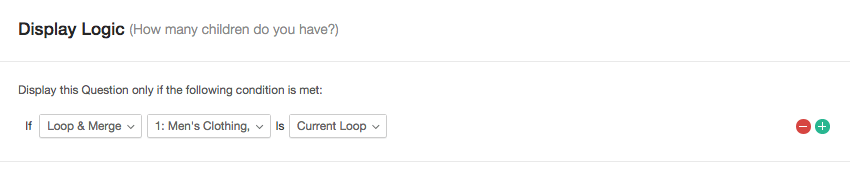
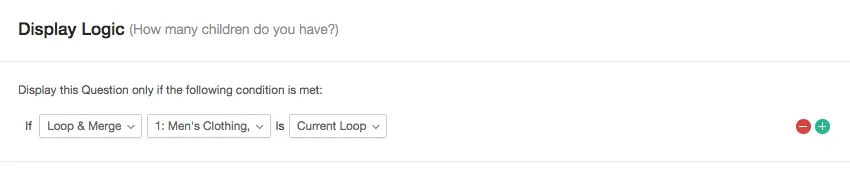
This question will be displayed only during the Men’s Clothing loop.
For more information on how display logic based off loop and merge works, see the linked support page.
For more information on how display logic based on questions in a looped block works, see the linked section, Questions in Looped Blocks.
Turning Off Loop & Merge
You can deactivate the loop & merge settings on a block. Respondents who take your survey after the deactivation will move through the block only once (i.e., the block will behave normally).
Warning: If you turn off loop & merge after having collected data, you will lose the associated loop data in your Data & Analysis tab. See Testing & Editing an Active Survey.
Warning: Be sure to update or correct any piped text or display logic that might be based on loops or fields!
Loop and Merge in Different Project Types
Depending on your license, you might have access to several project types. Loop and merge is only available in a few types of projects, including:
Loop and merge is not available in any Employee Experience projects.
FAQs
Can I get data from different loops to appear in the same data columns / visualizations in reports?
Can I get data from different loops to appear in the same data columns / visualizations in reports?
If you are willing to create a new survey just for report-making purposes, you can combine the different columns of data when you import the data back to Qualtrics. See Combining Responses.
If you use CX Dashboards, you can combine the columns in your data file and upload it directly to your dashboard for reporting.
That's great! Thank you for your feedback!
Thank you for your feedback!