-

Qualtrics Platform -

Customer Journey Optimizer -

XM Discover -

Qualtrics Social Connect
Online Panels
About Online Panels
A panel is a group of participants who have been recruited to provide feedback on a research topic. You can define targeting criteria and launch your research study to this audience. For example, let’s say you’re launching a product designed for pet owners and would like to gather feedback on the early concepts. You can use a panel to send your survey to only pet owners, enabling you to quickly collect accurate and relevant feedback without the hassle of finding these individuals yourself.
Video Walkthrough
Need help getting started with online panels? Check out this 2-minute video walkthrough:
Preparing a Survey for Online Panels
Follow the below steps to get your survey ready for distribution via an online panel:
- Make sure your survey is 100% completed in terms of the questions you want to ask, your survey look and feel, etc.
- Do not configure any screeners or demographic questions that you plan on using with quotas, since these are automatically set up by the online panel.
- Make sure you’ve added any custom screening questions (for example, asking if a customer has used your product recently).
- Publish your survey.
Creating a Quantitative Panel
A quantitative panel is a great option when you’re looking to recruit certain demographics from commonly sampled segments of the population for a specific survey or study. You can build your quantitative panel demographics from scratch, or use a customizable template to get started.
The high-level process to launch a panel includes:
- Defining your target audience
- Specifying your study’s needs
- Confirming the panel’s feasibility and cost
- Launching the panel
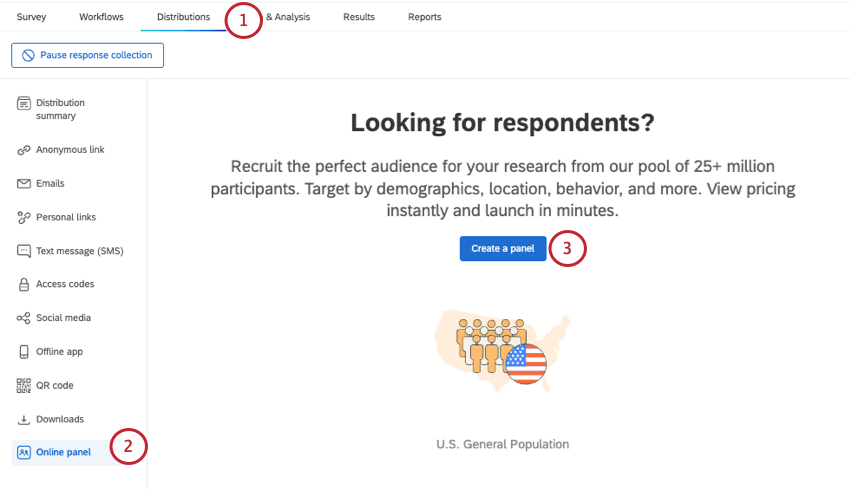
- Go to the Online panel section of the Distributions tab.
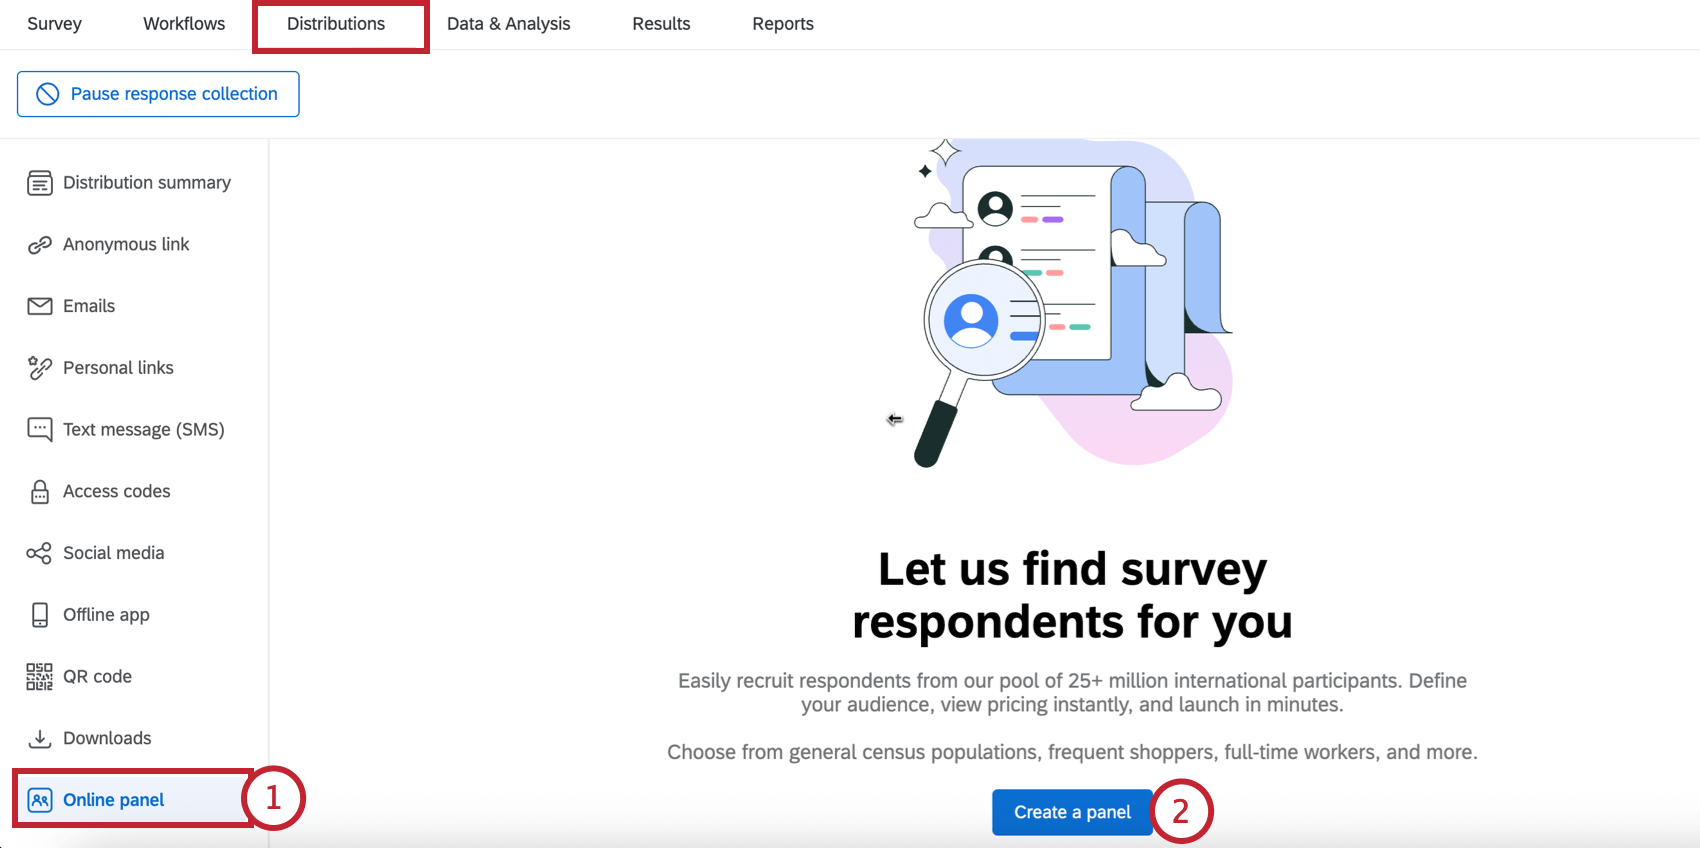
- Click Create a panel.
- If you’d like to define your panel’s demographics yourself, select Start a Quantitative panel from scratch.
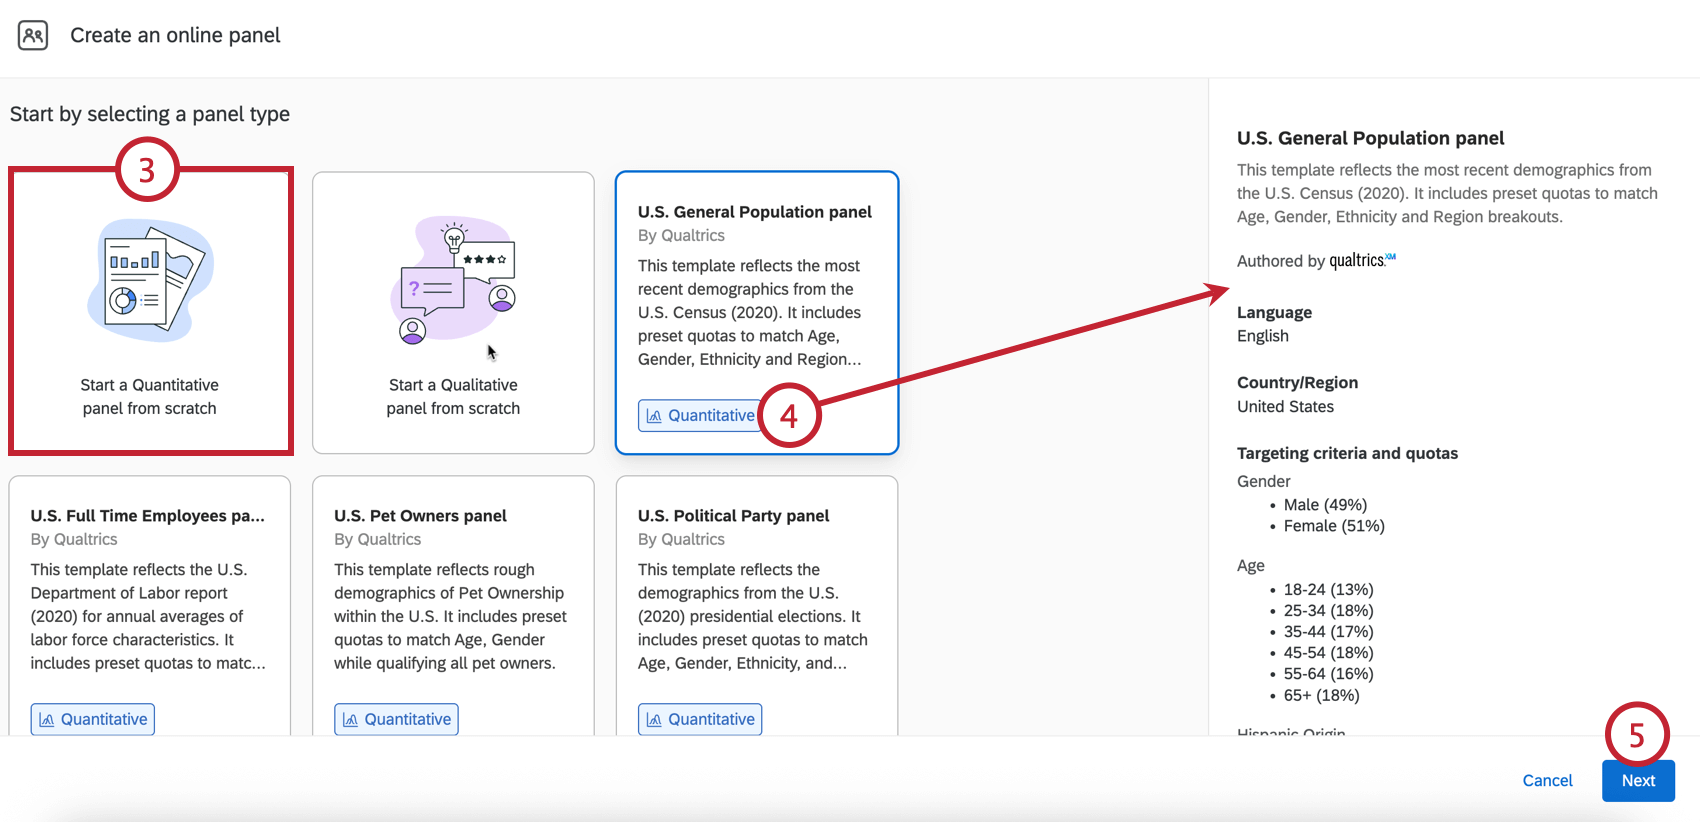
- Alternatively, to use a preconfigured template, select any of the Quantitative panels and review the panel’s makeup on the righthand side of the screen.
Qtip: You can customize the template in the steps that follow. These customizations include editing and removing quotas, including or excluding screening criteria values, or removing screening questions entirely.
- Click Next.
Qtip: You can click Save and exit at any step in the setup to save your panel as a draft.
- Name your panel.
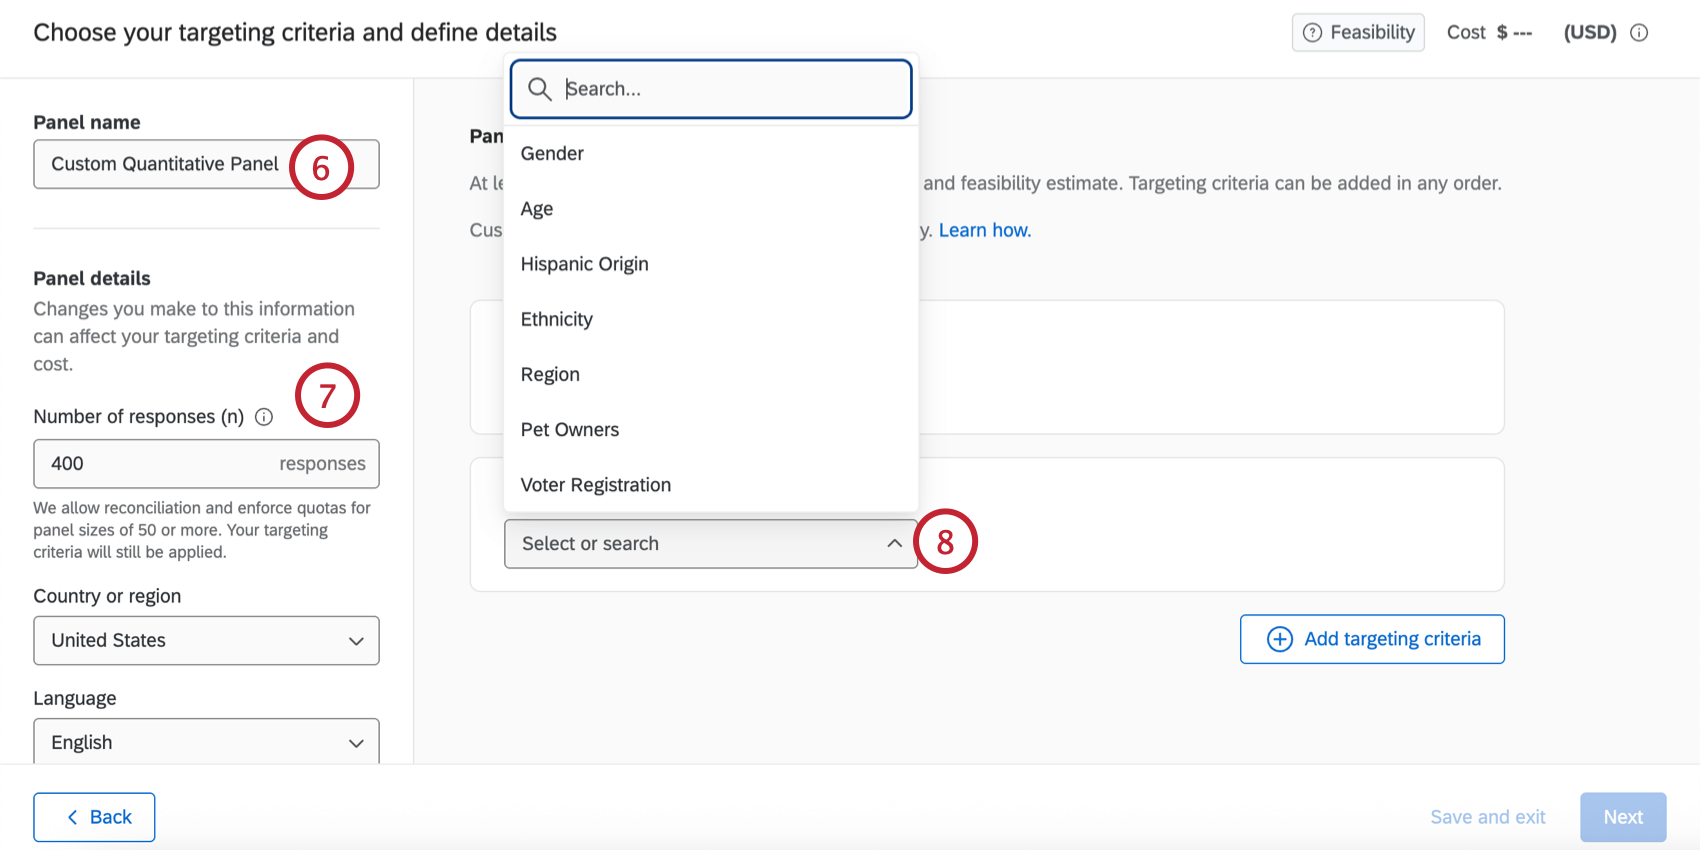
- Configure your Panel details, which includes the following:
- Number of responses: The number of responses you’d like collected for your research. You can collect between 50 to 10,000 responses per panel.
Qtip: When determining this number, you should consider the analyses you want to perform on your collected data. For a 95% confidence interval ±5, the general guidance is ~350 responses per cut of the dataset. For example, if you plan to review male versus female data separately, you would want 700 responses (350 per group). See the Sample Size Calculator for help determining your sample size.Qtip: You can collect as low as 5 responses, but Qualtrics does not enforce quotas or allow data reconciliation when you collect less than 50 responses.
- Country or region: The country or region the respondent should be from. The available targeting criteria varies by country.
- Language: The language the respondent should speak.
Attention: When using a panel template, the quotas and questions are based on the template’s default country and language. If you modify the country or language, please make the appropriate adjustments to the remaining quota and question criteria to ensure the panel is valid and feasible.
- Survey length (LOI): The amount of time it takes to complete your survey. This should be between 1 to 60 minutes.
Qtip: ExpertReview can tell you your survey’s predicted length.
- Incidence rate (IR): The target percentage of panelists who complete the survey after starting it. See Calculating Incidence Rate for help determining your incidence rate.
- Time to collect responses: The number of days the panel will be open for responses. This should be between 1 to 20 days.
Attention: Changing any of these fields except for panel name may affect your panel’s cost and feasibility. See Panel Cost and Feasibility for more information. - Number of responses: The number of responses you’d like collected for your research. You can collect between 50 to 10,000 responses per panel.
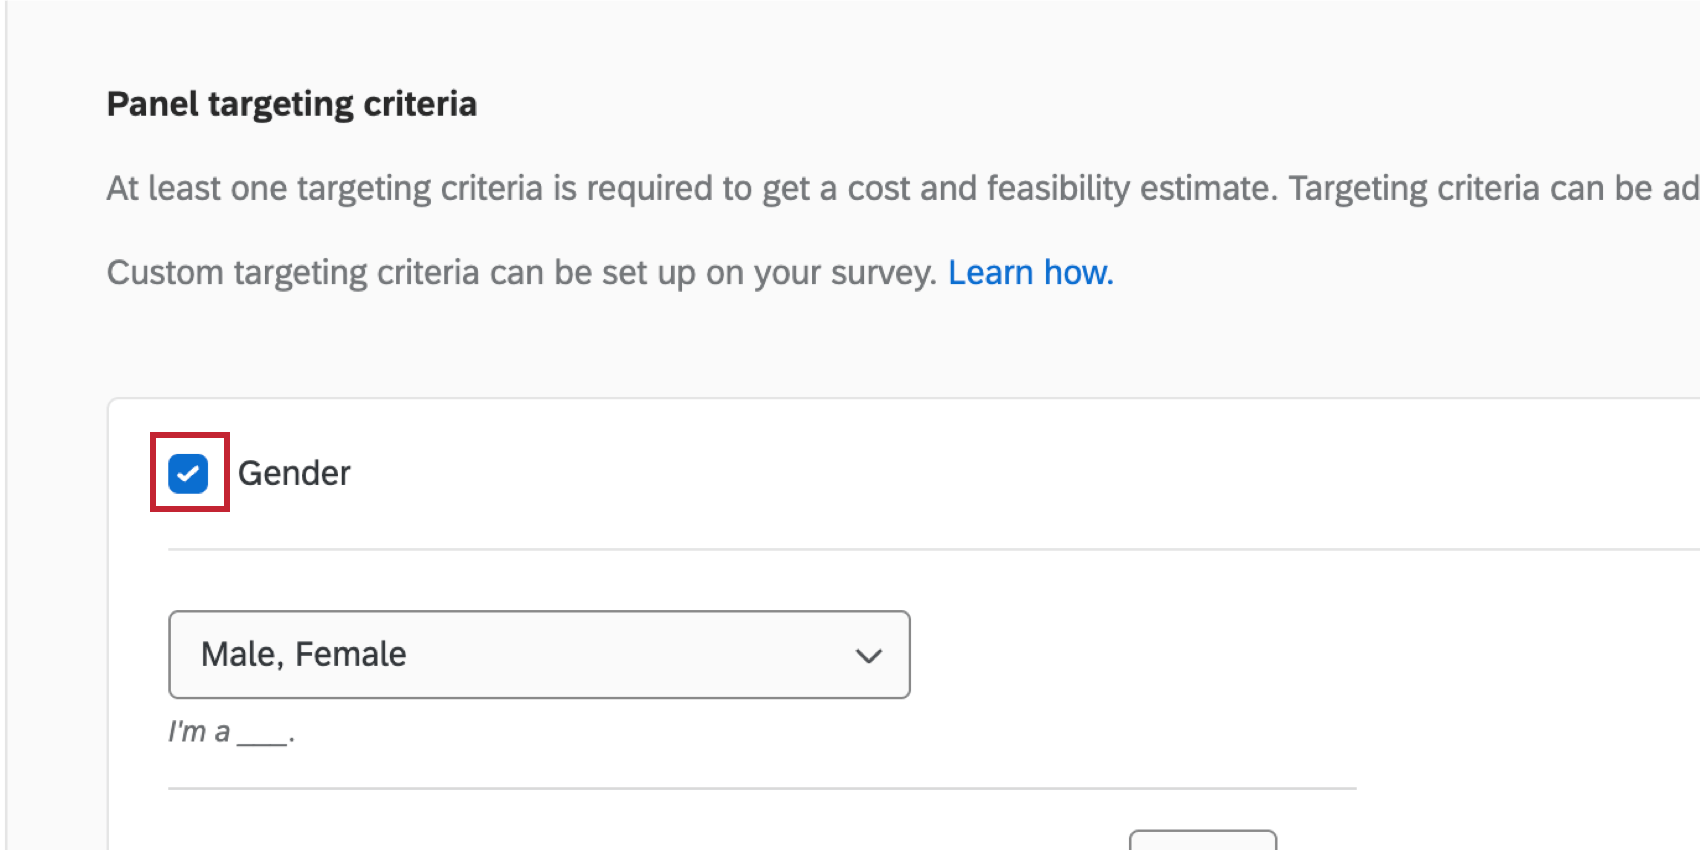
- Choose a targeting criteria, which determines the demographic makeup of your panel and adds screening questions to your survey. The values of the screening questions are stored in your survey dataset as embedded data fields.
- After choosing a targeting criteria, you can customize which values will pass your screening question (for example, if you’d only like to survey respondents from a certain region of your country).
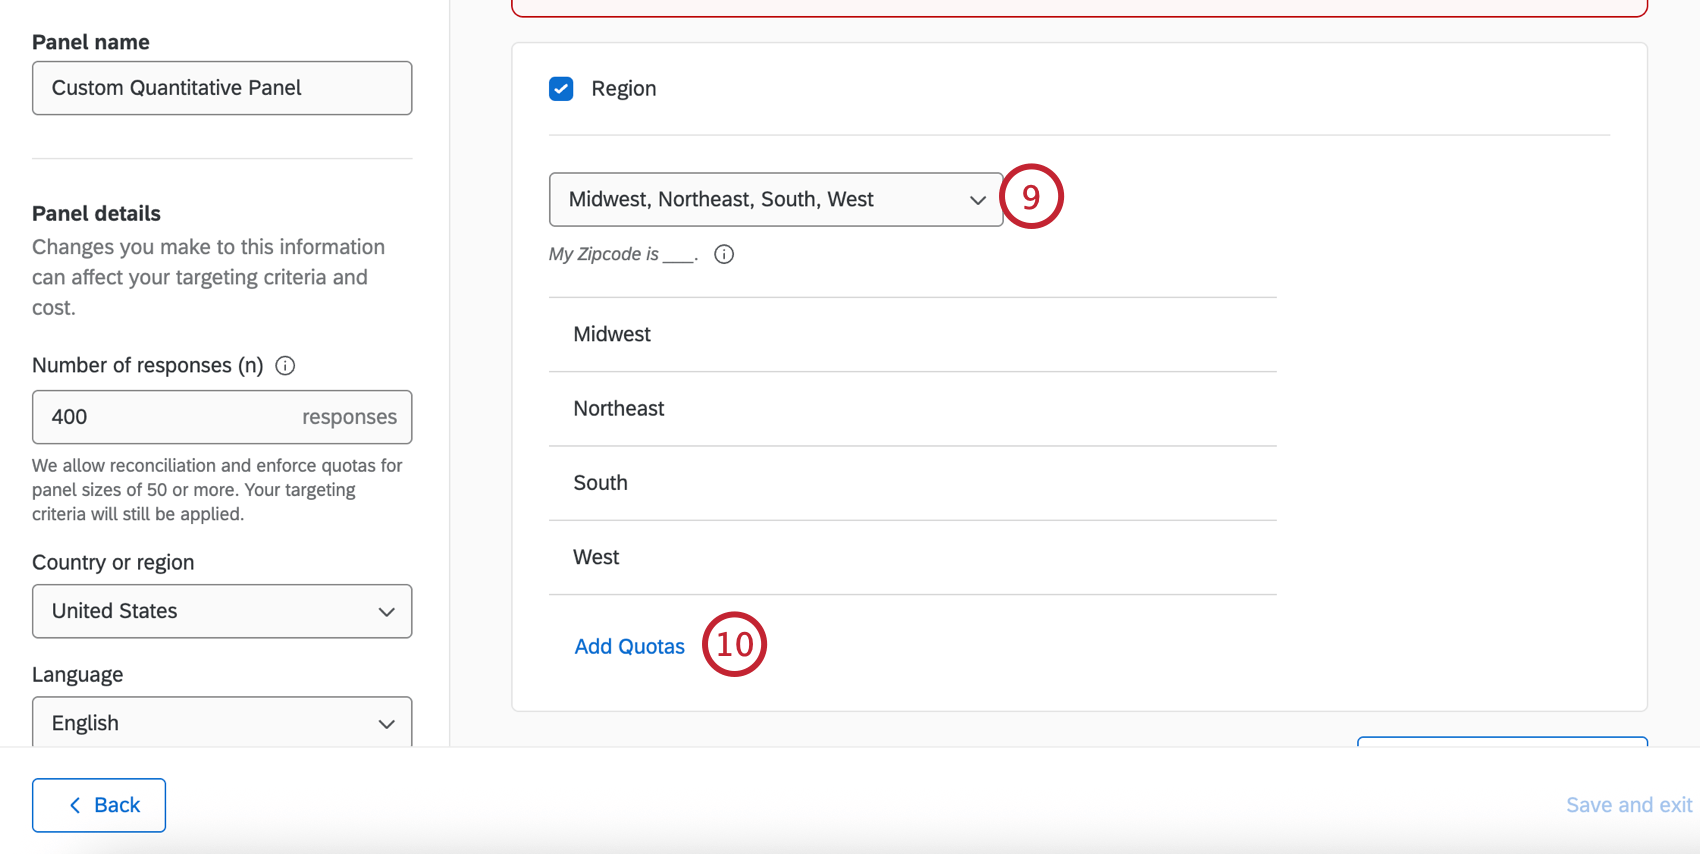 Qtip: The question text that is shown to respondents is displayed below this menu.
 - Click Add Quotas to set limits on each demographic. You must have at least one quota set in your panel.
Qtip: Items with quotas can only sum to 30 across all criteria (e.g., Male 49%, Female 51% would be 2 items with quotas). There is no limit to items without quotas.
- Adjust the percentage makeup for each demographic group. Your quotas must equal 100%.
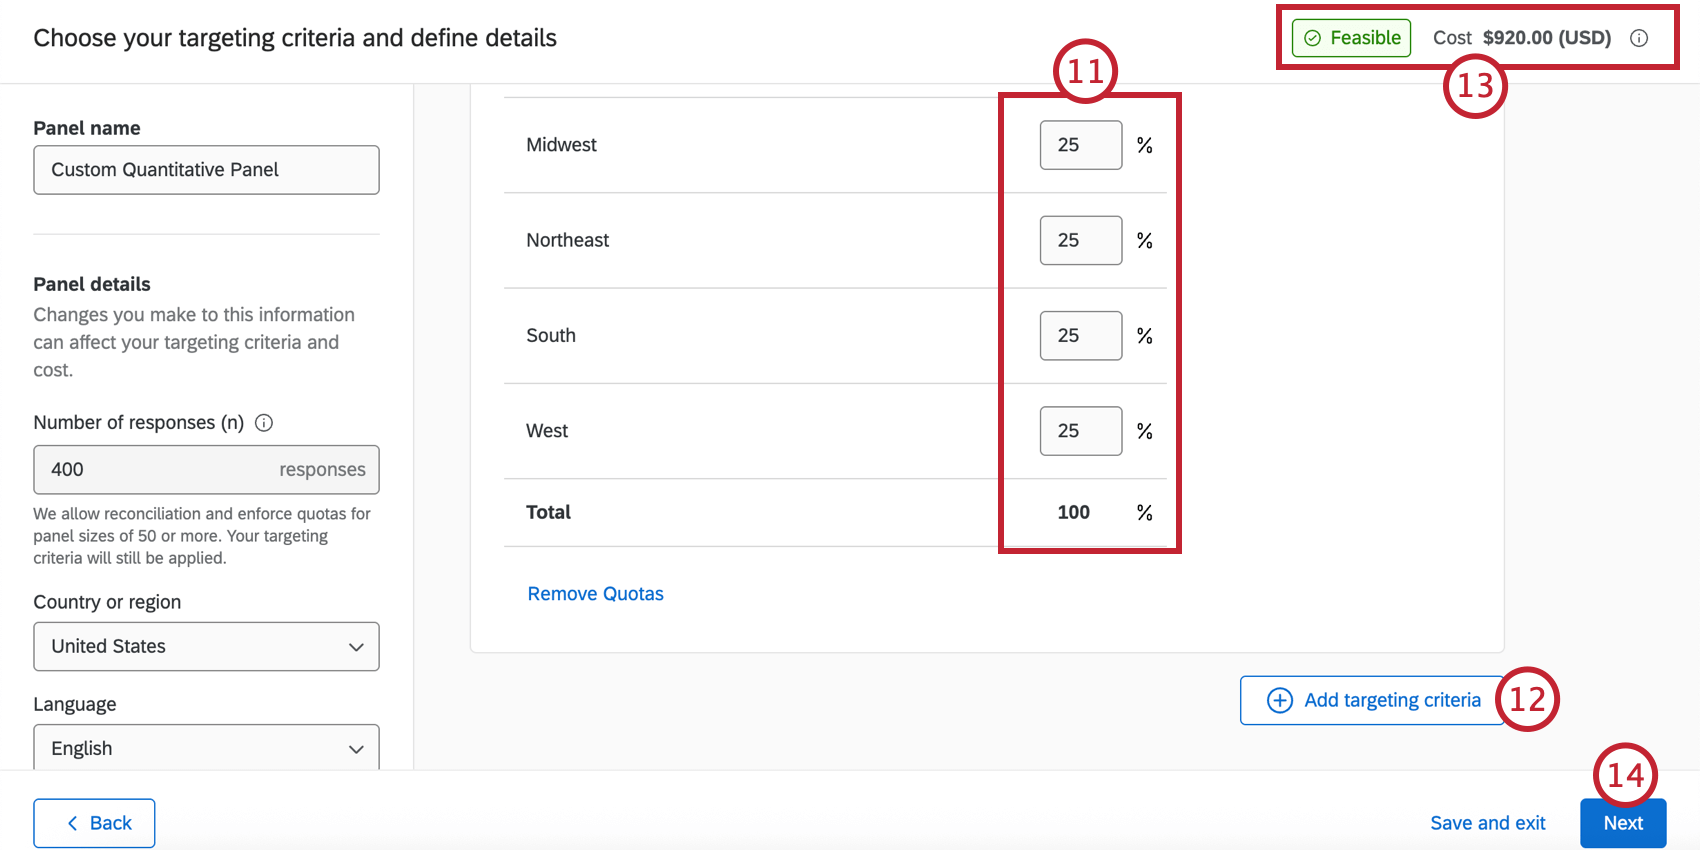 Qtip: Respondents who are screened-out by the screener questions are not recorded and they do not count as auditable responses.Qtip: Click Remove Quotas if you want to ask the question of your panelists but not require certain quota targets to be met.
 - To add another demographic screener, click Add targeting criteria and repeat the above steps to define the demographics. The number of targeting criteria you can add and what criteria is available is dependent on your selected country.
Qtip: To remove targeting criteria, uncheck the box next to the demographic name.
 If needed, you can revert all changes you’ve made to the panel by clicking Reset all panel details and targeting criteria.
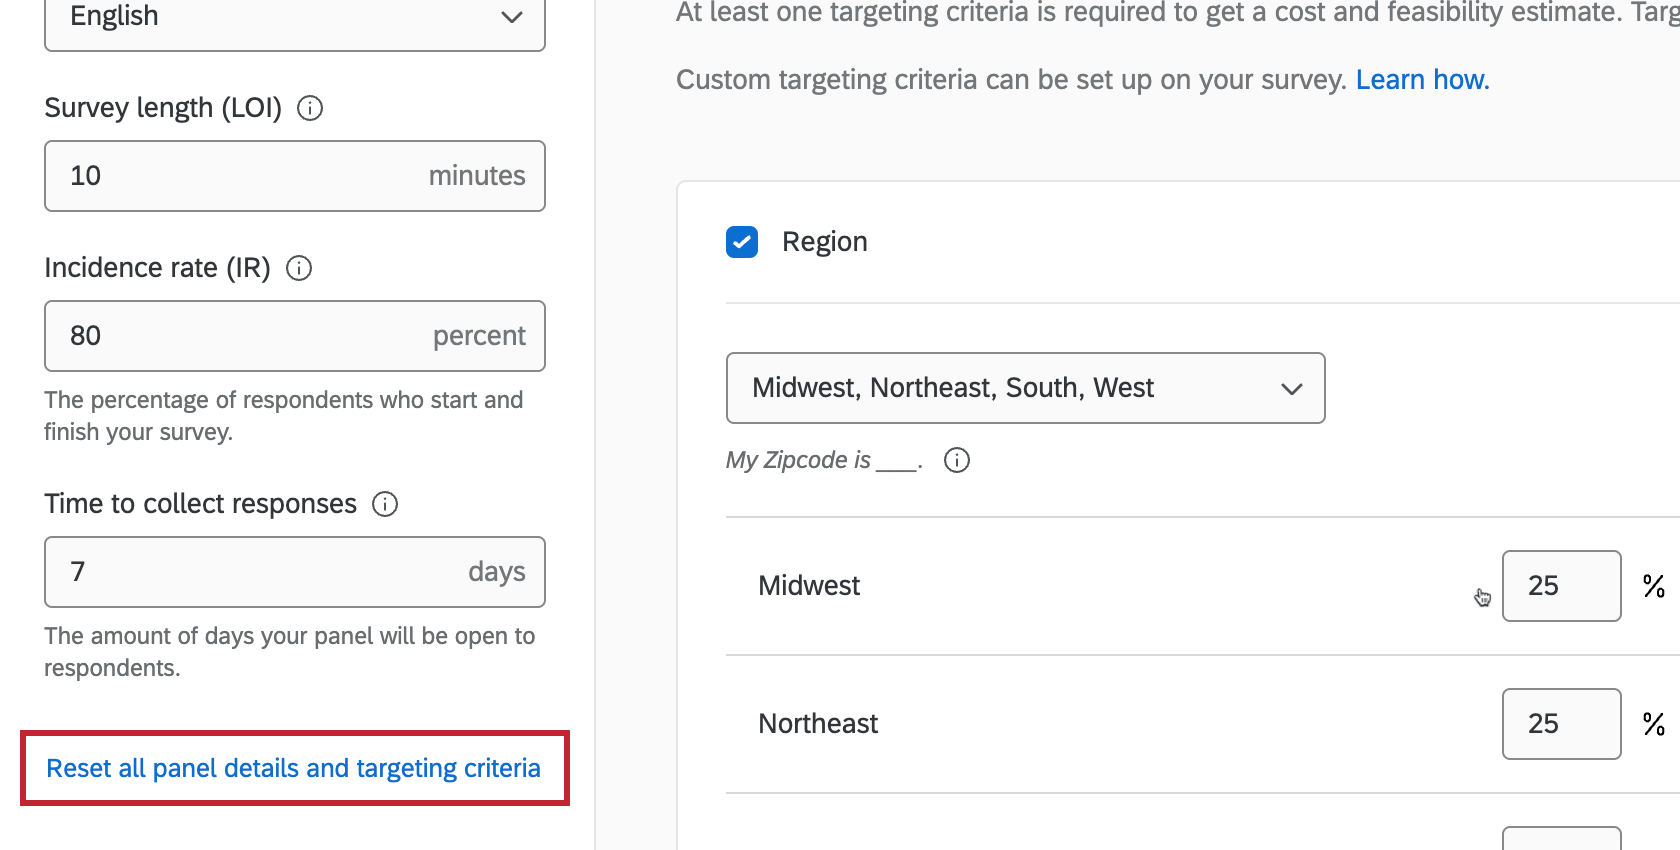
- Changes to your panel’s demographics may affect your panel’s cost and feasibility, which are displayed in the upper right corner. See Panel Cost and Feasibility for more information.
Qtip: If your panel is not feasible or the cost is too high to purchase in the platform, you can reach out to your Qualtrics Research Services representative. If you do not have a research rep or you’re unsure of their contact information, reach out to your Account Executive.
- Click Next.
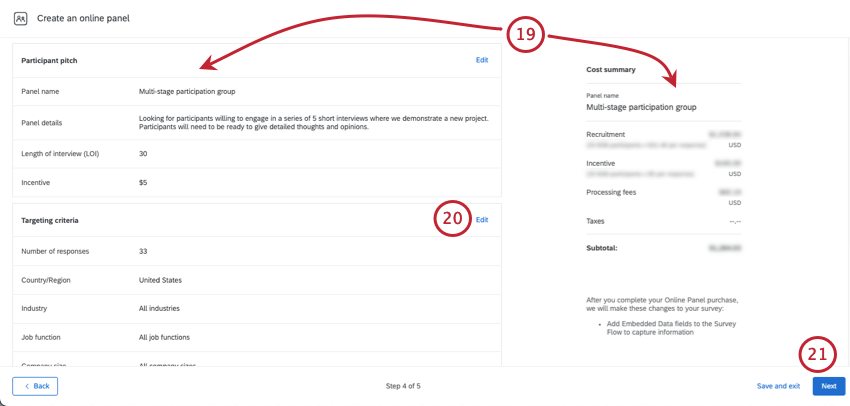
- Review your panel makeup and cost.
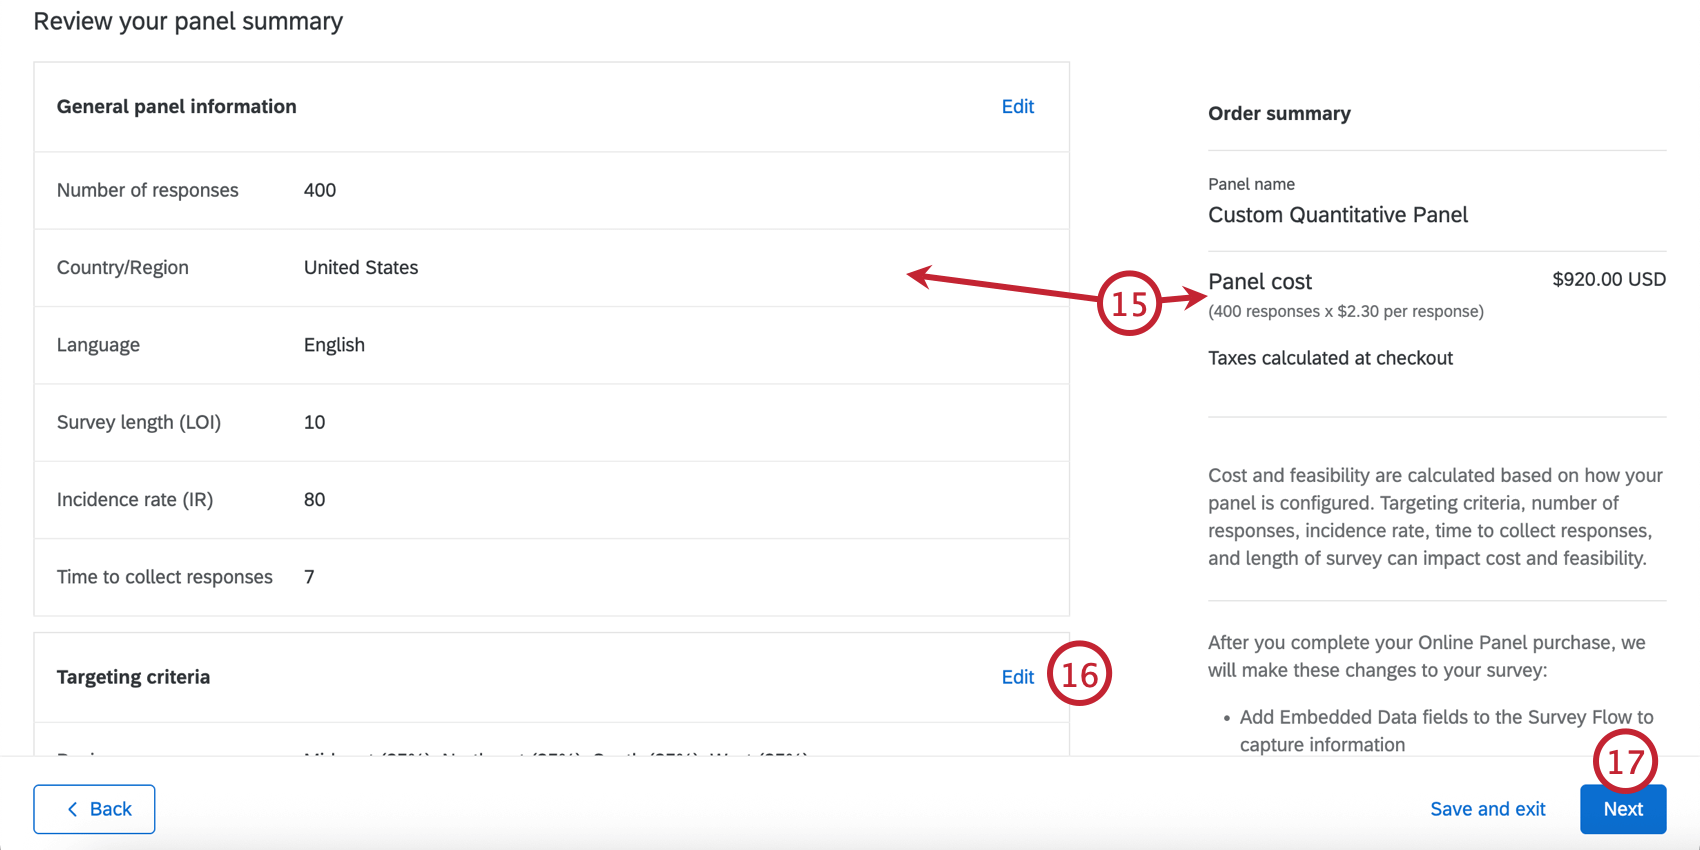
- If you’d like to change your panel details or targeting criteria, click Edit to return to the setup screen.
- When you’re ready to continue with your panel, click Next.
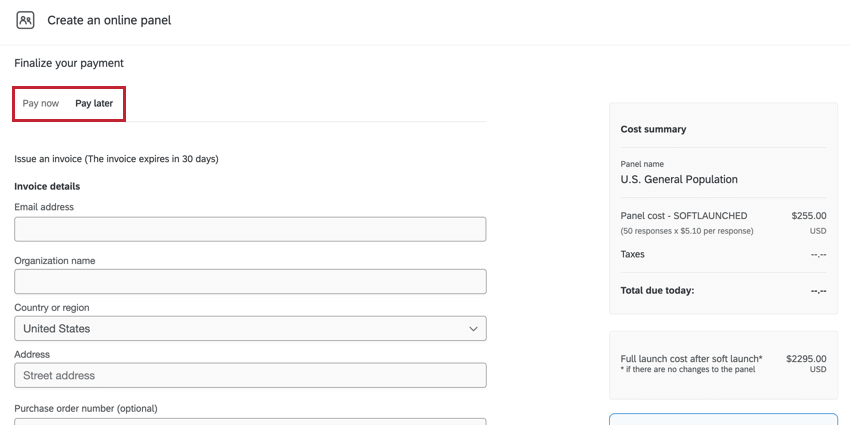
- Select when you’d like to pay and fill out your payment details. See Payment Options for more information.
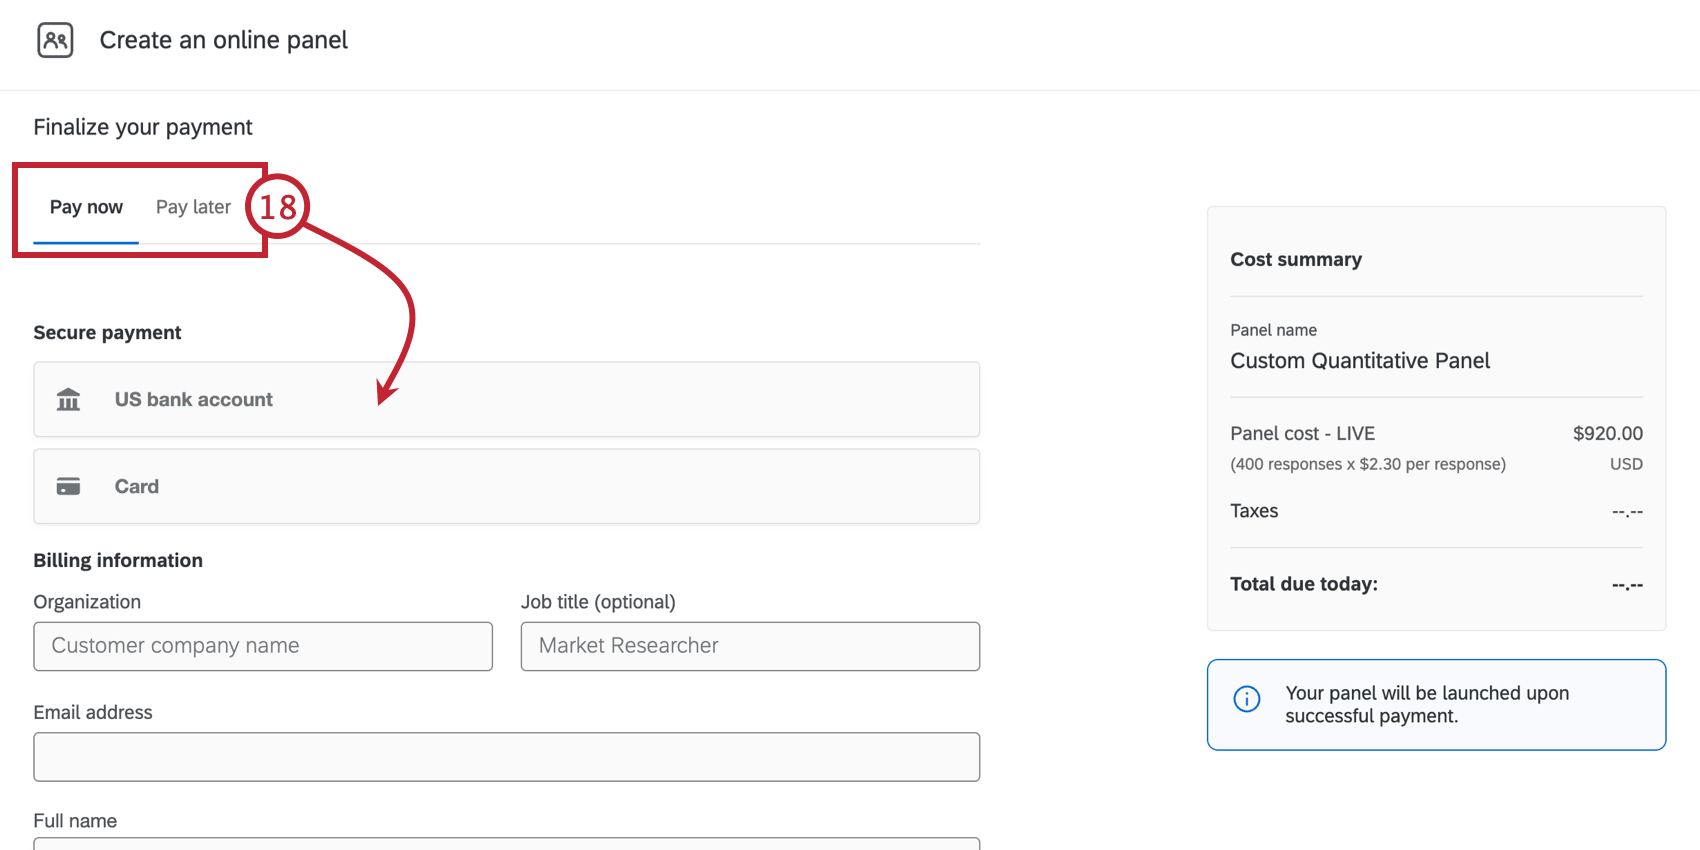
- Pay now: Enter your payment details (credit card only).
- Pay later: Issue an invoice.
- Accept the Terms of Services.
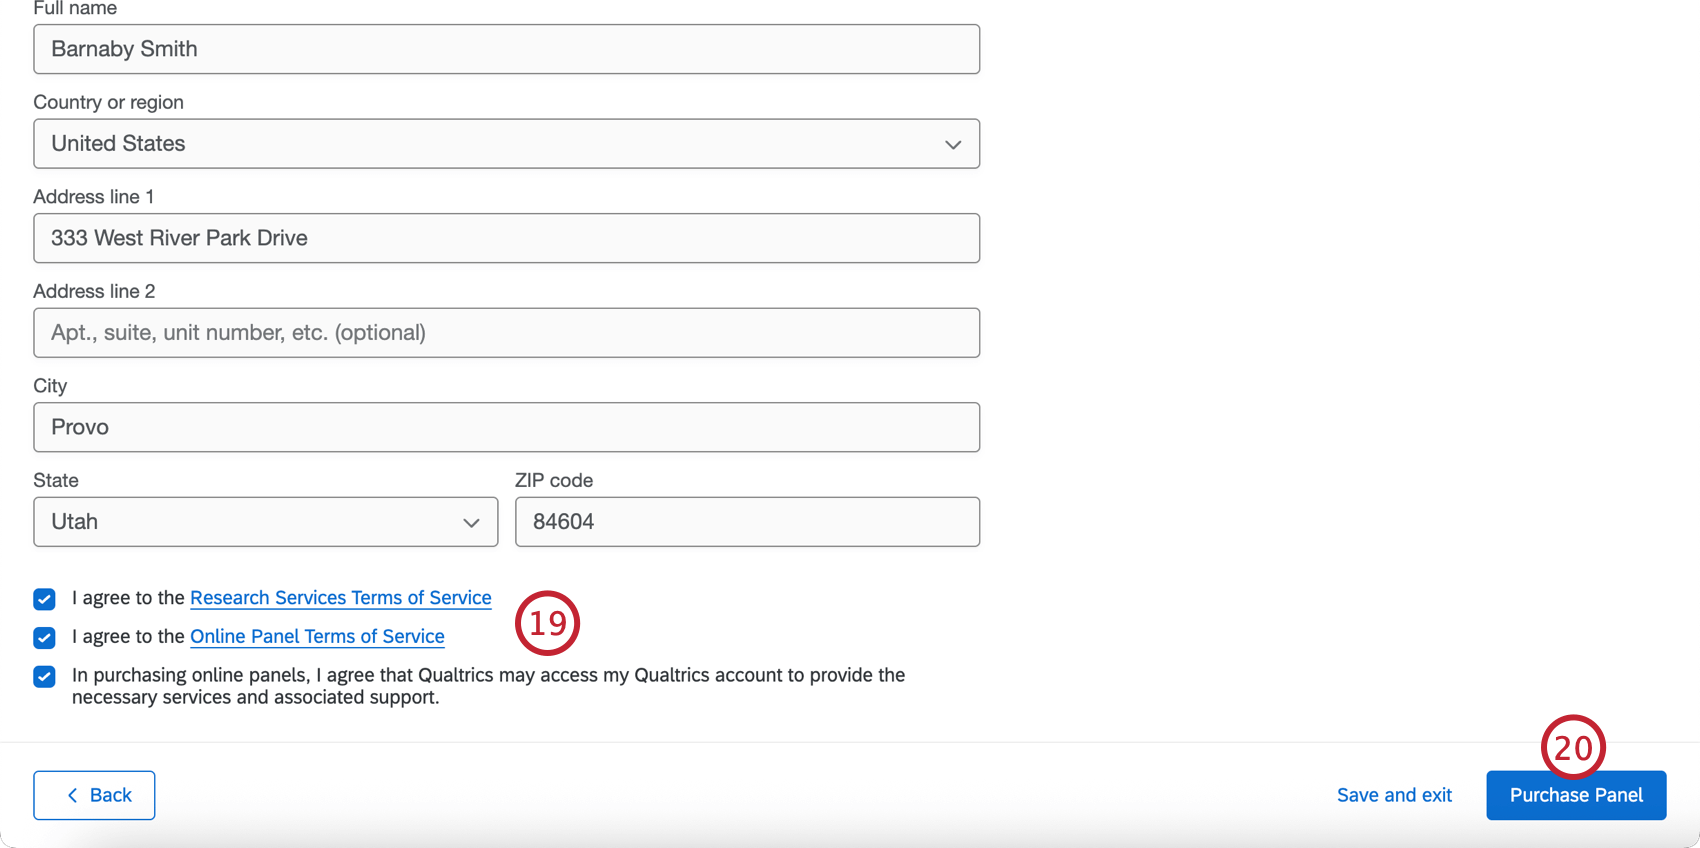
- Click Invoice Panel or Purchase Panel.
Creating a Qualitative Panel
Qualitative panels are often used for studies that go beyond a simple survey, such as those requiring screen-sharing or multiple rounds of feedback. The purpose of qualitative panels is to find participants comfortable engaging in these exercises while giving detailed feedback. The participants will not be anonymous, coming with a profile of information attached as embedded data.
- Go to the Distributions tab of your project.
- Go to Online panel.
- Click Create a panel.
- Select Start a Qualitative panel from scratch.
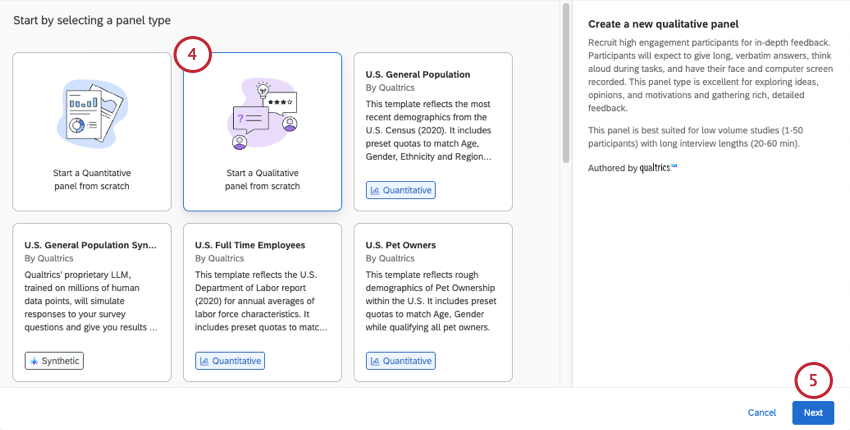
- Click Next.
- Name your panel.
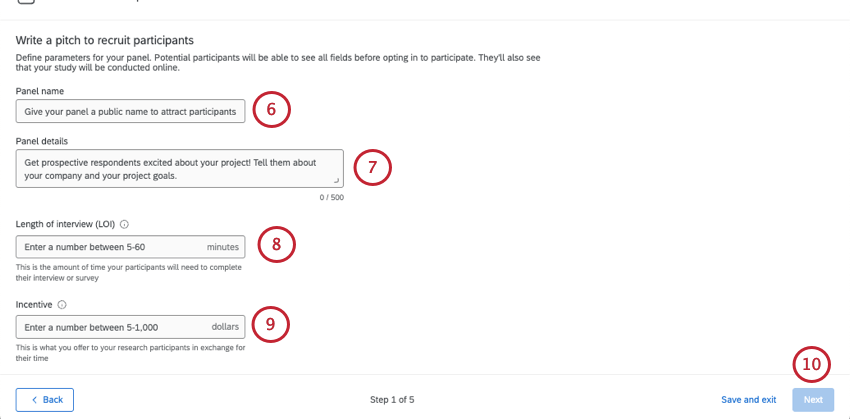
- Under Panel details, write a pitch to recruit participants. Explain the project and what participants will be expected to do.
Qtip: The panel details have a maximum of 500 characters.
- Under Length of interview (LOI), enter how long the interview should be in minutes.
Qtip: This field can be anywhere from 5 to 60 minutes. This is to keep recording limits for video questions in mind.
- Under Incentive, add the incentive for the study in United States dollars.
Qtip: This field can be anywhere from 5 to 1000 dollars.
- Click Next.
Qtip: You can also save your changes and come back to them later using Save and exit.
- In Required Criteria, enter the target number of participants. This is a max of 50.
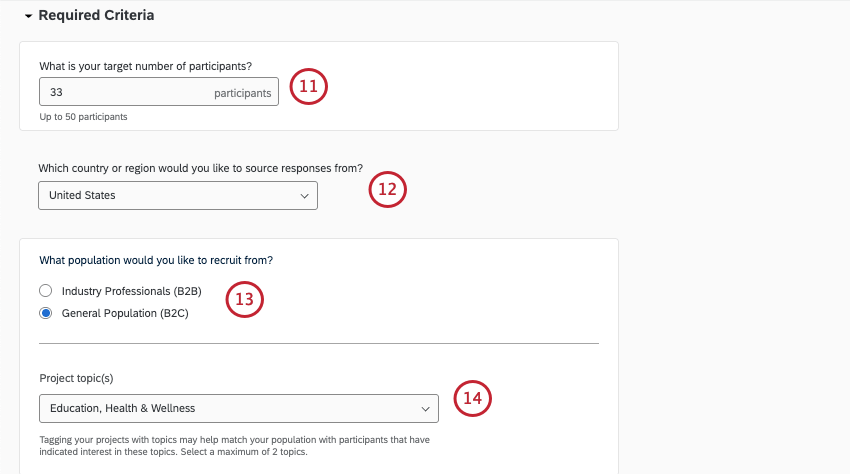
- Choose the country or region participants should come from.
- Choose the population you want to recruit from:
- Industry professionals (B2B)
- General population (B2C)
- From there, narrow down the other industry criteria you have. This will vary based on whether you chose B2B or B2C.
- The Demographic criteria section is optional. Here, you can specify what gender, age, and ethnicity of respondents you’re targeting. You can only choose 1 option for each.
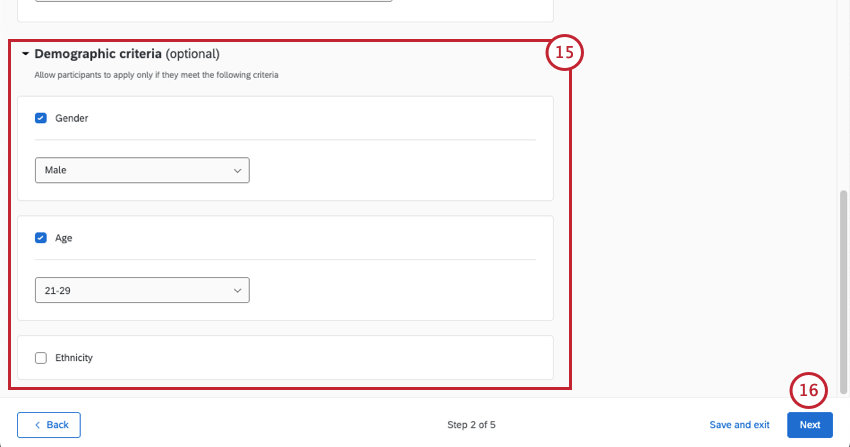 Qtip: Respondents who are screened out by the screener questions are not recorded, and they do not count as auditable responses.
 - Add at least 2 screener questions that will go out with your qualitative panel. This can help you disqualify candidates before the review process.
 Example: You are running a UX study on a software that is replacing your old checkout system. However, you don’t want to include participants who know the old system well, and want to only focus on how new users might react. Asking respondents if they know the old system can help you remove candidates accordingly.Qtip: Screener questions can only be multiple choice questions. Both single and multiple answers are supported.Qtip: Use Number of choices in the editing panel to adjust the number of choices. You cannot use delete and enter key commands to add and remove choices like in the survey builder.
 - When your questions are written, click the down arrow next to an answer choice to indicate:
- Single select questions:
- Qualifies: Respondents who choose this answer can still proceed to the next step in the recruitment process. This is selected for answer choices by default.
- Disqualifies: Respondents who choose this answer cannot still proceed to the next step in the recruitment process. Even choosing just 1 disqualified answer is enough to remove a candidate from the running.
- Multiple select questions:
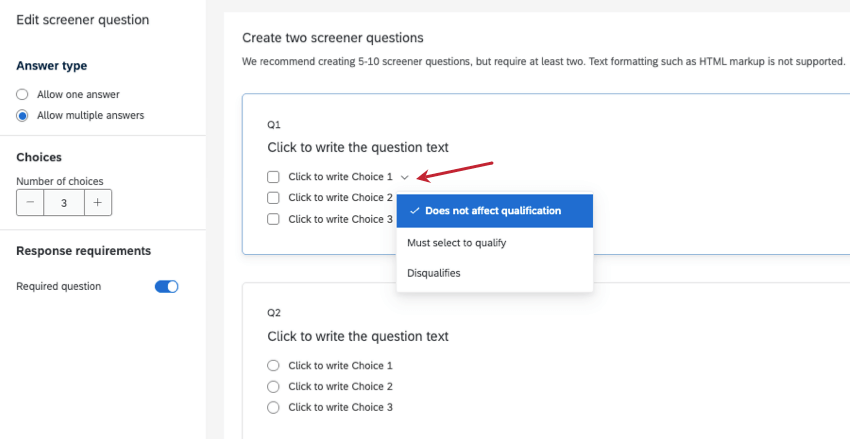
- Does not affect qualification: The default choice. These options do not affect the respondent’s qualification.
- Must select to qualify: If a respondent does not choose this answer, they will be disqualified from the panel.
- Disqualifies: No matter what other options the respondent selected, this option will disqualify them if they select it. Respondents that choose this option will even be disqualified if they selected a different, qualifying answer at the same time.
- Single select questions:
- Click Next.
- Review your panel makeup and cost.
 Qtip: If your panel cost is too high to purchase in the platform, you can reach out to your Qualtrics Research Services representative. If you do not have a research rep or you’re unsure of their contact information, reach out to your Account Executive.
 - If you need to edit your panel, click Edit to be brought to that step in the setup.
- Click Next.
- Select when you would like to pay. For more information, see Payment Options.
- Accept the Terms of Services.
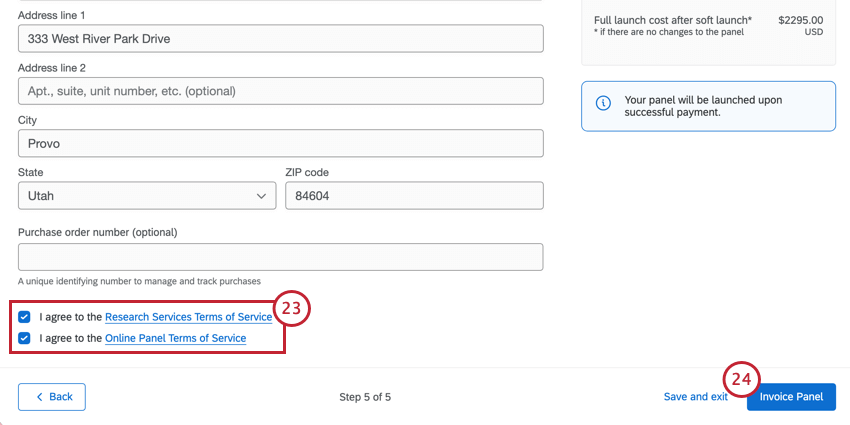
- Click Invoice Panel or Purchase Panel.
- As suitable participants are identified, you have the chance to choose which candidates you want to use. Look through the candidates, invite the ones you want to participate, and then review responses as they come in.
Attention: You must invite candidates before you can collect data in your survey from panelists.
Inviting and Managing Qualitative Panel Candidates
As suitable participants are identified for your qualitative panel, you can choose which candidates you want to officially invite to participate in the study. Look through the candidates, and invite the ones you want to participate. Only invited participants receive the survey. From there, you can choose to either approve or reject the participants’ responses.
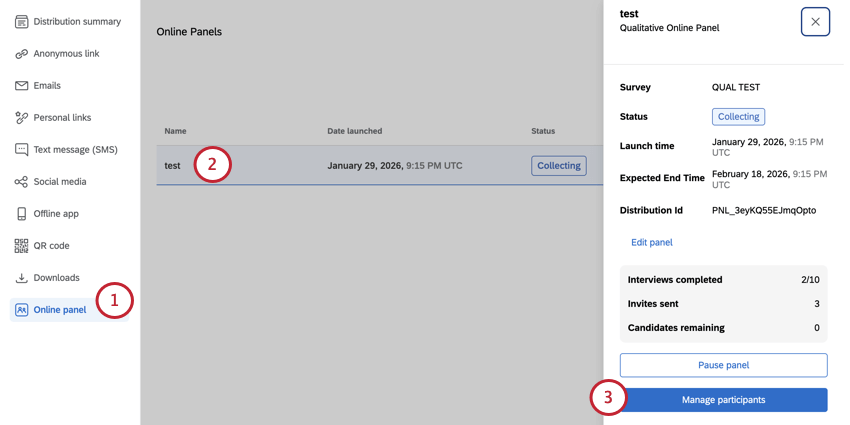
- Go to the Online panel section of your project’s Distributions tab.
 Qtip: The panel status will be Collecting while candidates are gathered and once responses start coming in. See more about panel statuses.
 - Click your qualitative panel.
- Select Manage participants.
- On the top, you’ll see the number of:
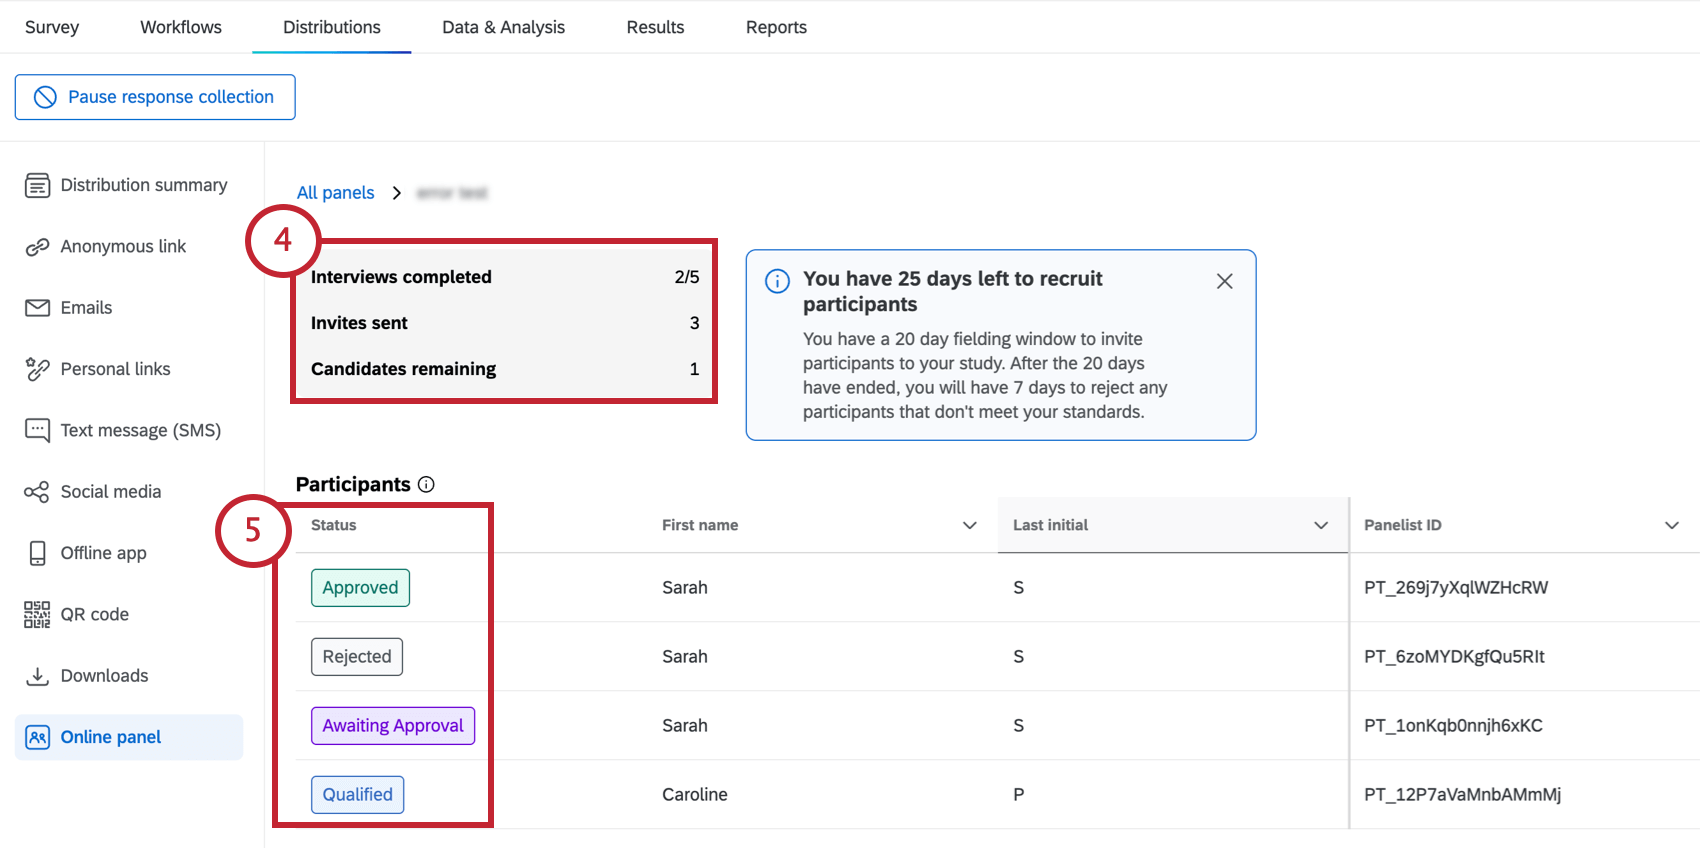
- Interviews completed: The number of responses collected from invited participants.
- Invites sent: The number of qualified participants you’ve invited to the study.
- Candidates remaining: The number of candidates in the list of potential participants who haven’t been invited or rejected yet.
Qtip: If there aren’t any participants in the panel yet, there will be a message letting you know to come back and check later.
- For each participant, you’ll see one of the following statuses:
- Qualified: The candidate has been identified as qualified for this study. They have not been invited yet.
- Invited: The candidate has been invited to take the study. They have not provided a response yet.
- Awaiting Approval: The candidate has provided a response. Their response has not been approved yet.
- Approved: Either the candidate provided a response that you explicitly approved, or the candidate was “Awaiting Approval” when the panel closed.
Attention: Once a participant is approved, their incentive is distributed to them and you cannot receive a refund for that response. - Rejected: The candidate’s response has been rejected for this study. They will not receive an incentive and their corresponding response will be deleted from Data & Analysis. If the fielding window is still open, you can invite another qualified participant in their place.
- Click a qualified candidate to learn more about them. On the right, you’ll see their demographic data, employment details, and screener data.
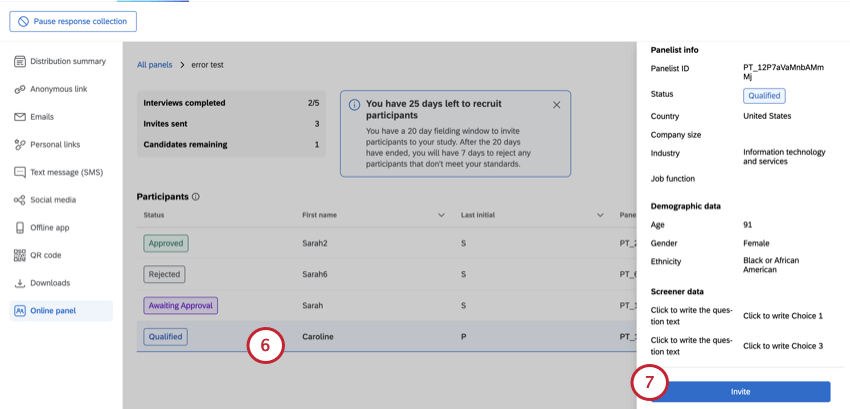
- If you want to invite the candidate, click Invite.
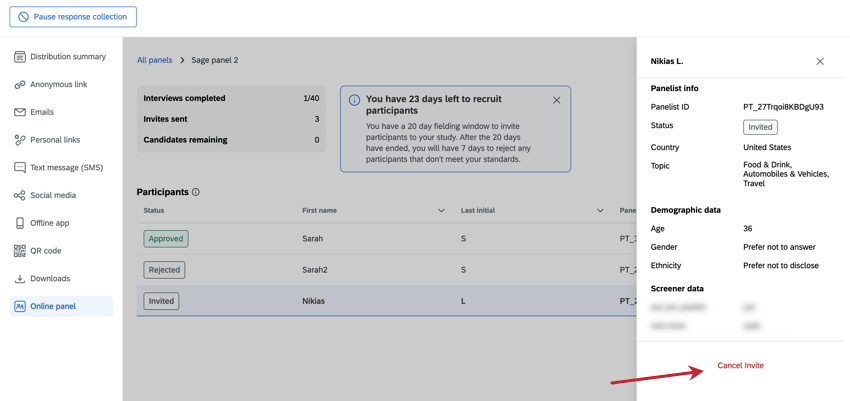
Qtip: You can ignore candidates you are not interested in.Qtip: You can cancel an invite at any time before the participant’s response is submitted.
- Click a participant who is awaiting approval to view their response.
- Click Approve if you want to keep the response and send an incentive to the participant.
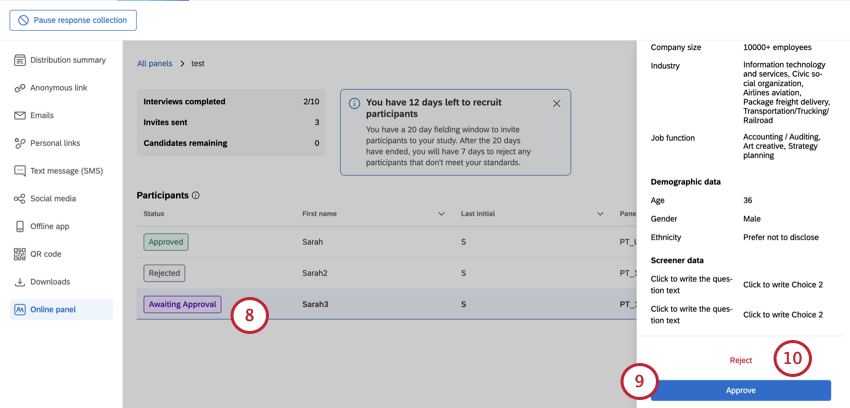
- Click Reject to reject the participant and delete the response.
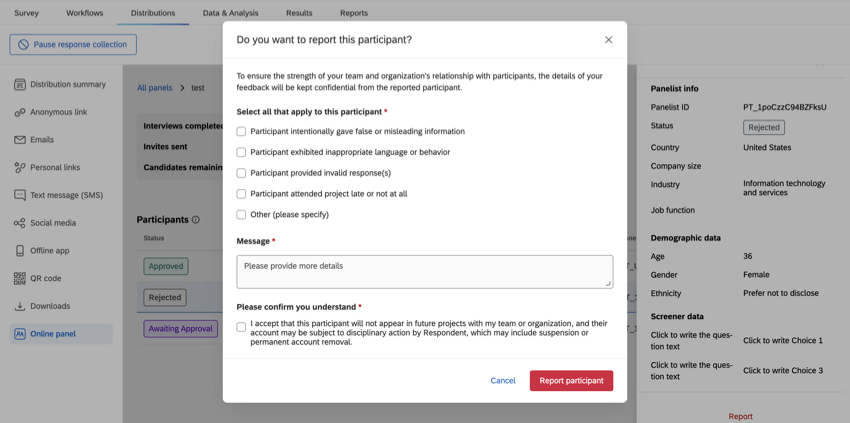
Qtip: If a rejected or approved participant did something you feel should disqualify them from future studies, you can report them. Keep in mind that you should only report participants in severe cases. You can only report a limit of 5 total participants across your entire Qualtrics brand (i.e., license).
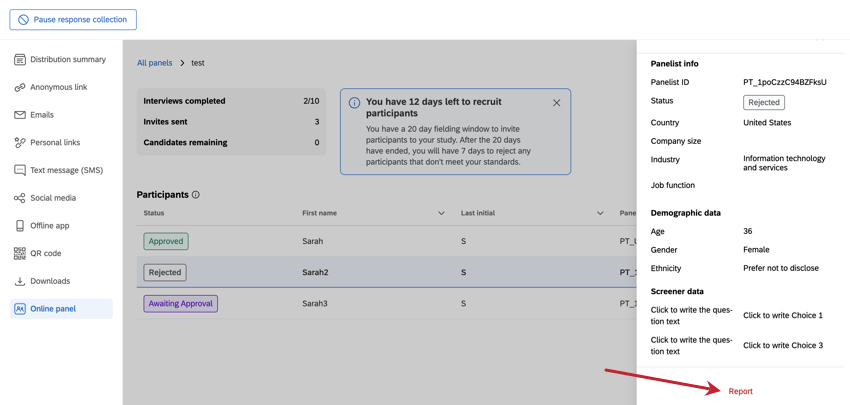
When you report a participant, you must provide details why.
Synthetic Panels
Synthetic panels are powered by a first party proprietary AI model developed here at Qualtrics. Our synthetic panel is trained on thousands of responses from a variety of demographic backgrounds in order to more accurately predict how certain populations would respond to a survey.
To learn more, see our Synthetic Panels page.
Payment Options
You can enter payment details to pay for your online panel immediately, or you can choose to generate an invoice and pay later.
Pay Now
If you’re paying immediately and not generating an invoice, there are 2 available payment methods:
- US bank account: Set up an electronic transfer of funds from your bank account. This method uses Automated Clearing House (ACH) payments. For more information, see ACH Payments.
Attention: ACH payments can take 1-3 business days to process. Your panel will not launch until the payment is processed.Qtip: This payment method uses Stripe for verification.
- Card: Pay using a credit or debit card.
Pay Later
In the Pay later tab, enter the information of the company or person that you would like to send the invoice to.
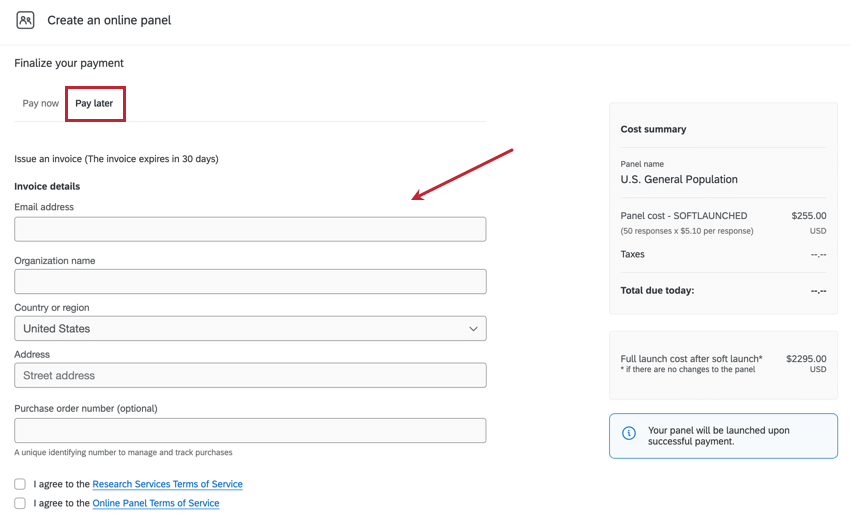
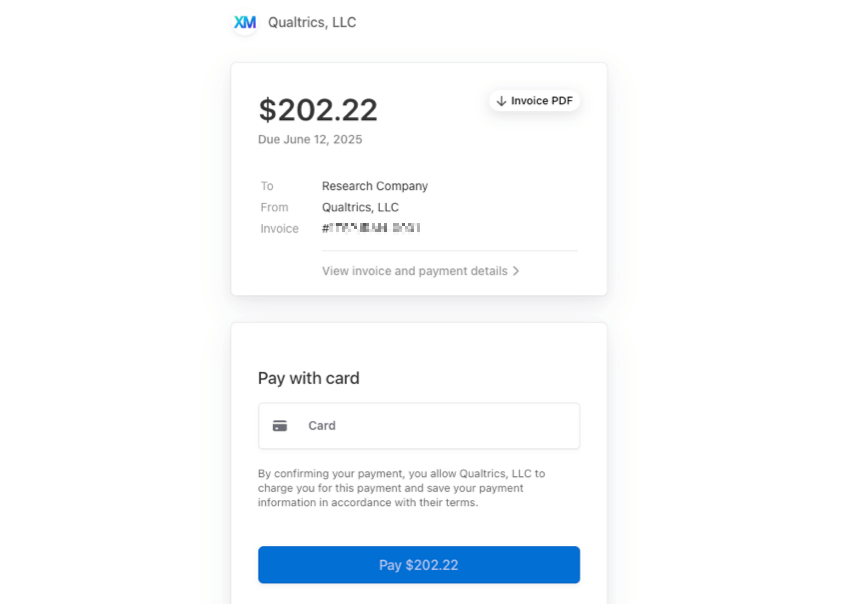
Once generated, a PDF of the invoice and a private payment URL will be sent to the email address that was entered. This email will come from Stripe. Click Pay this invoice to pay your invoice on Stripe. You can also share the payment URL with another party.
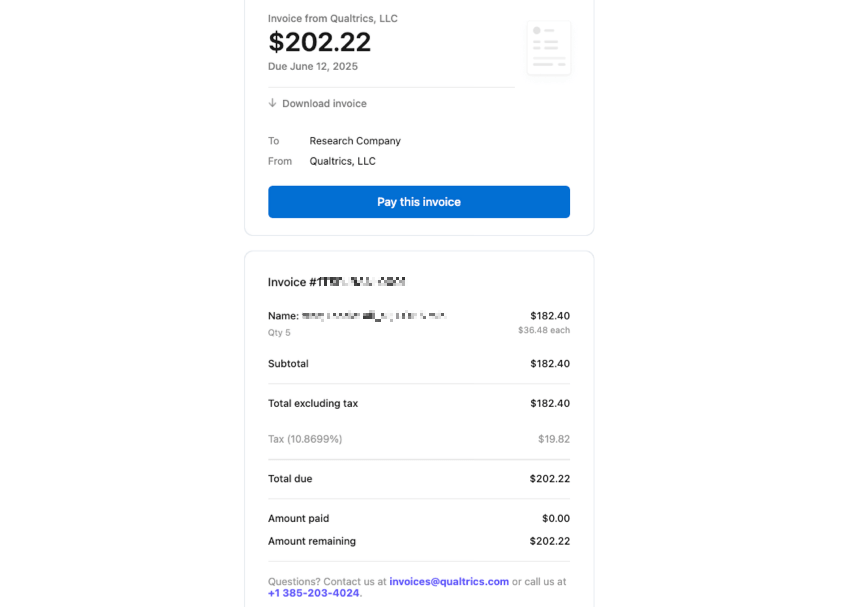
Enter your payment information on Stripe and select Pay. Your panel will be launched after successful payment.
Subscription Credits
Subscription credits – also known as Edge Audiences – offer a way for you to set a budget for panels without having to get separate panel purchases budgeted and approved. Instead, you buy all the credits you need at once, to use at your leisure. You can also add more credits as needed.
You can only purchase subscription credits from your Account Executive.
Subscription credits can be used to pay for any type of panel, human or synthetic. They are the only way to purchase synthetic panels.
Qtip: Subscription credits are shared across the organization (brand). Credits cannot be allocated to individual users, but you can always limit which users have access to online panels with the Access Online Panels user permission.
Qtip: Brand Administrators can track their organization’s subscription credit consumption using the subscription credit admin report.
How Panels Change Your Survey
Once you purchase a panel, your survey will be automatically updated to make sure your panel’s data is collected correctly. These changes happen in your project’s survey flow.
After creating a panel, you’ll notice the following additions to your survey flow:
- A new branch called “Online Samples API – All Fields” at the top of the survey flow, which includes the panel embedded data used to track respondent data from the panel supplier.
- A new security branch at the bottom of the survey flow to ensure panel security.
- When the panel is closed, the security branch will automatically be deleted from the survey flow. The “All Fields” branch will remain so that you can use the embedded data fields in your analysis.
- If you launch another panel on the same survey, any new fields will be added to the existing “All Fields” branch. The security branch will also be re-added while the new panel is active.
Qtip: Existing fields are not duplicated. Only new fields are added.
Managing Panels
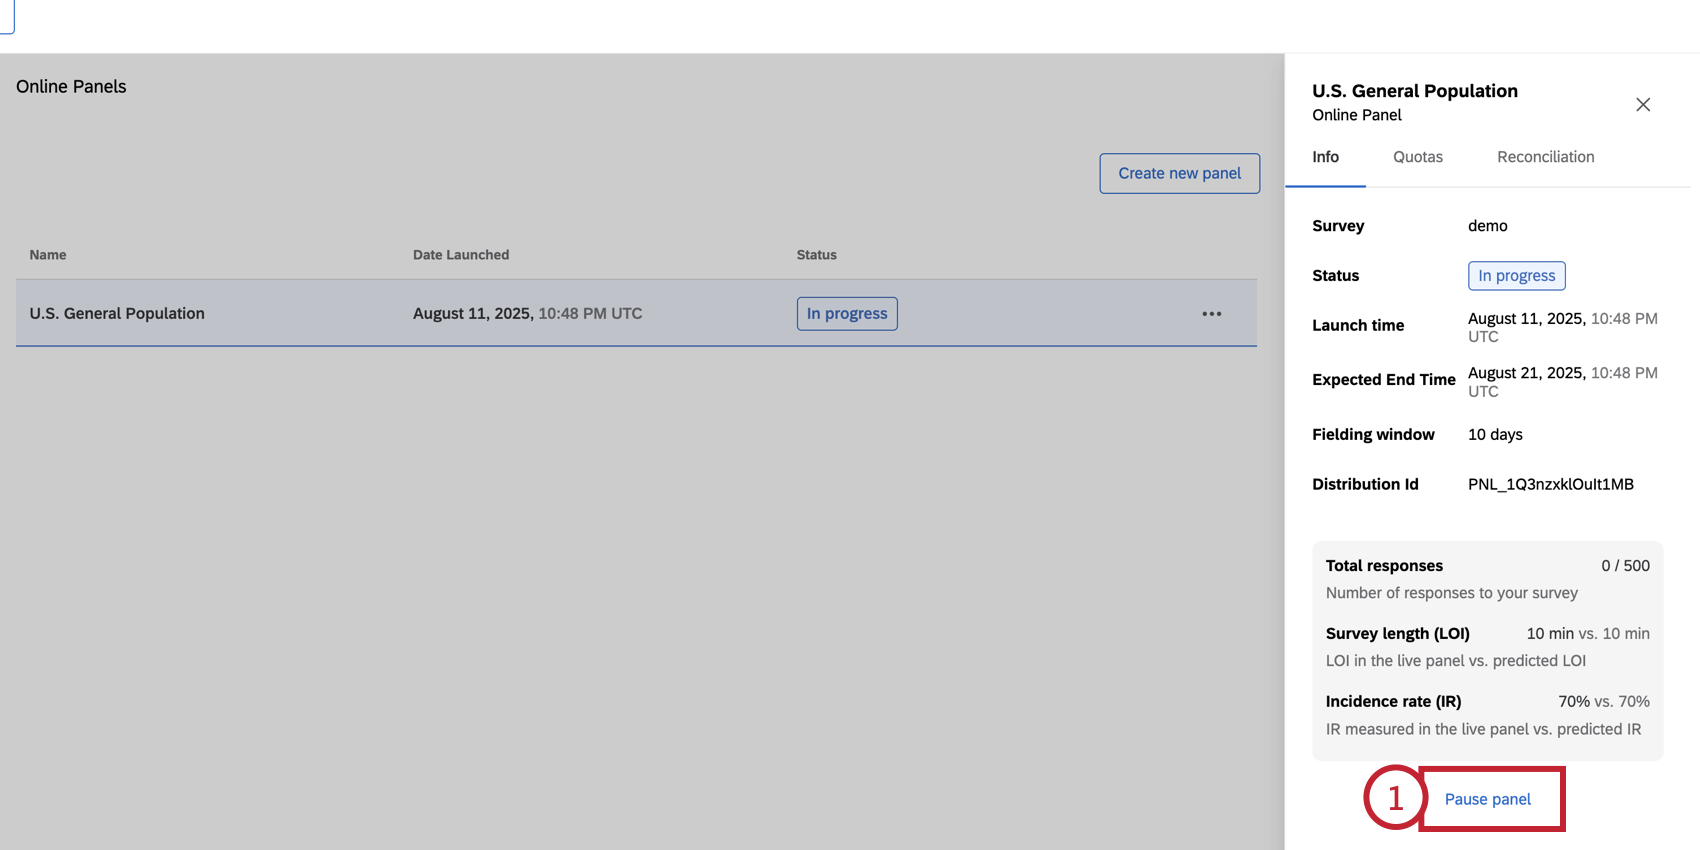
After you’ve requested the panel and your payment is processed, your panel will be created. You can then click on the panel to view more information about the panel’s status, expected end time, number of collected responses, and more.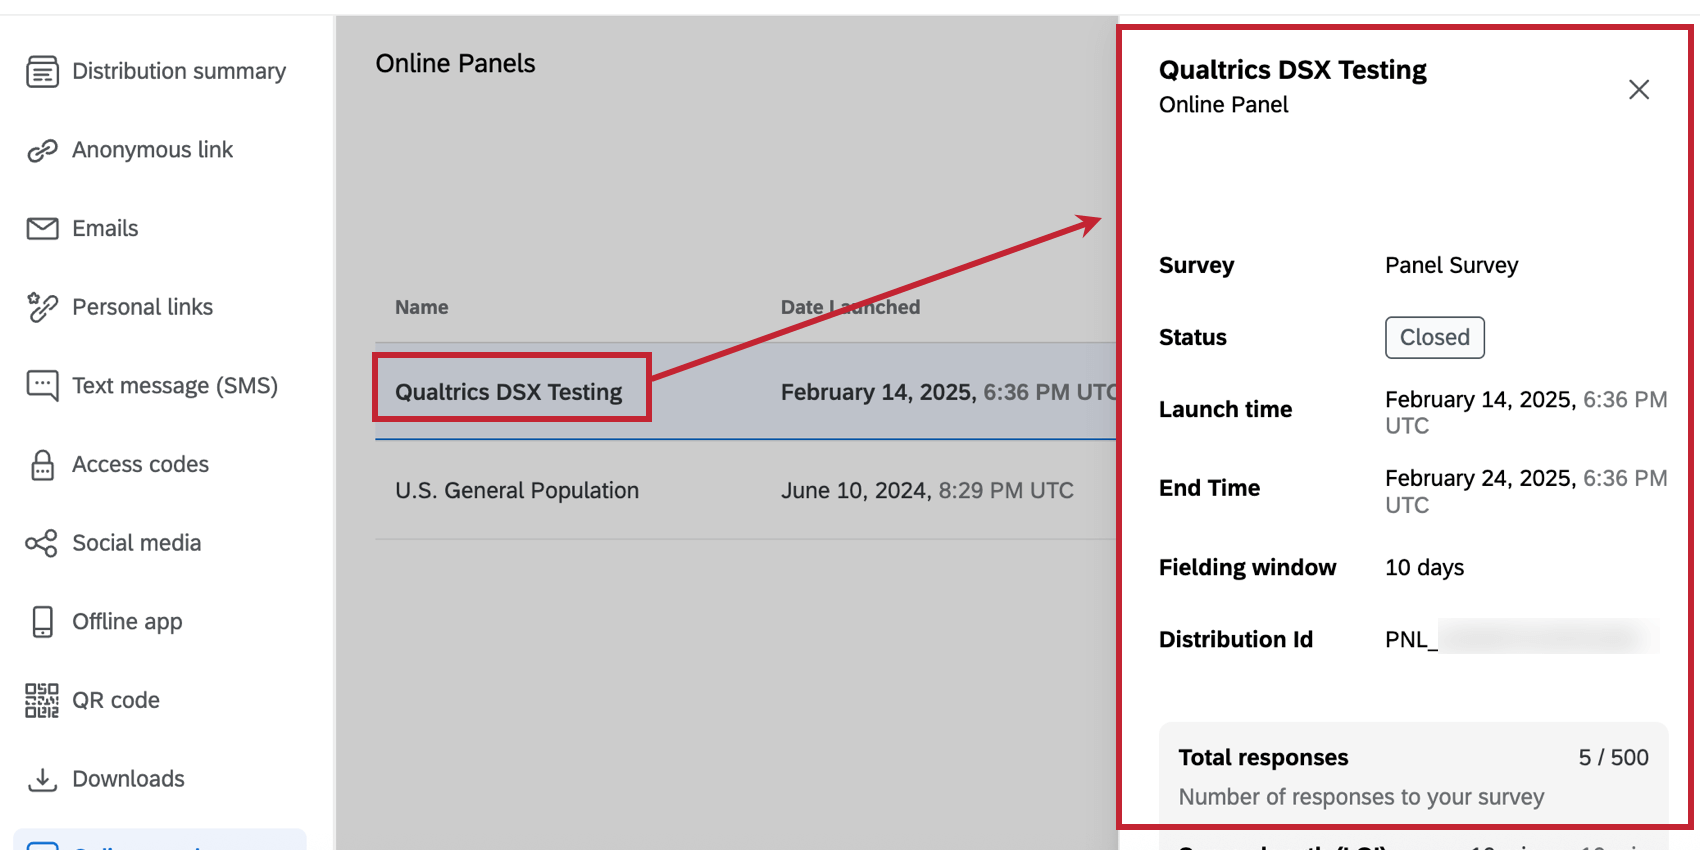
After selecting the panel, a window will open that displays the following information about your panel:
- Survey: The name of the survey being used for this panel.
- Status: The panel’s status. Possible statuses include:
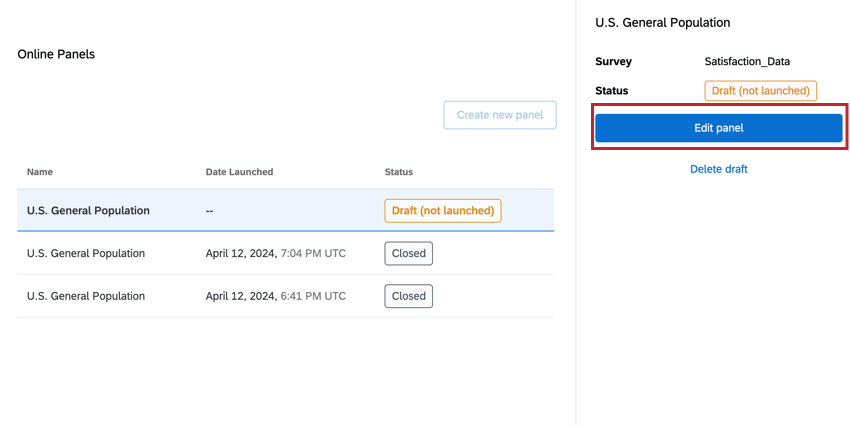
- Draft (not launched): The panel has not yet been created because it is not fully set up.
Qtip: If your panel is a draft, click the Edit panel button to edit it.
- Collecting: The panel is currently open and fielding new responses.
- Collection ended: The panel is complete and has stopped collecting responses.
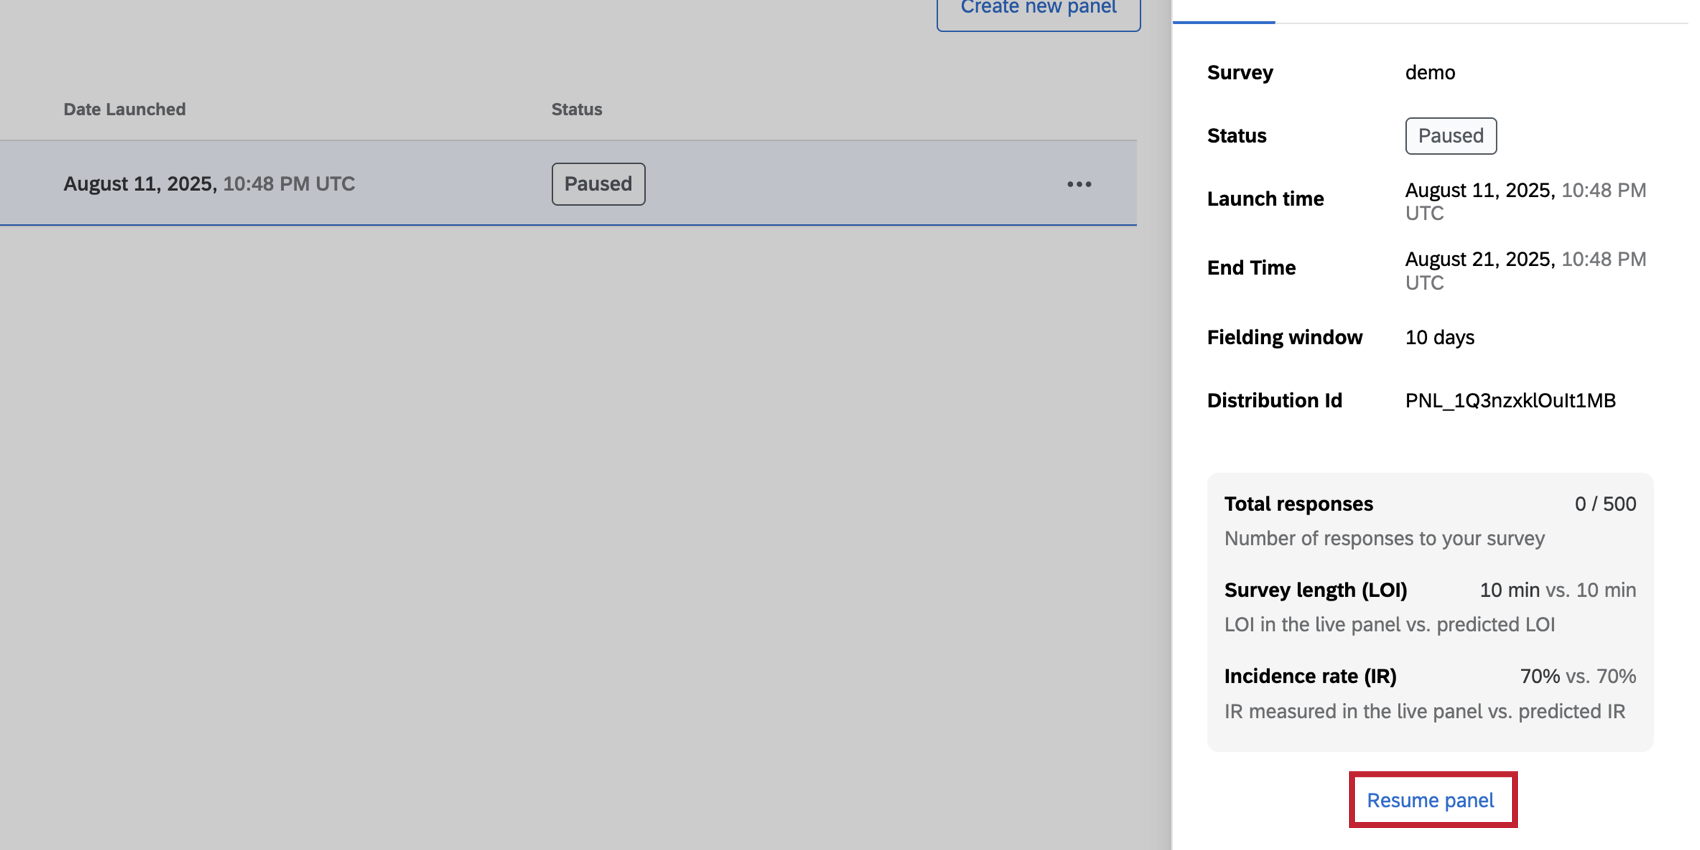
- Paused: The panel is not currently collecting responses but can be resumed.
Qtip: Pausing a panel does not extend the fielding window. The panel will stop collecting responses 20 days after launching.
- Collection ended: The panel was not able to collect all responses within 20 days and has stopped collecting responses.
Qtip: This status may also appear if the panel supplier has closed response collection. In that case, a banner will appear telling you to contact technical support.
- Closed: The panel is closed and no new responses can be collected via the panel.
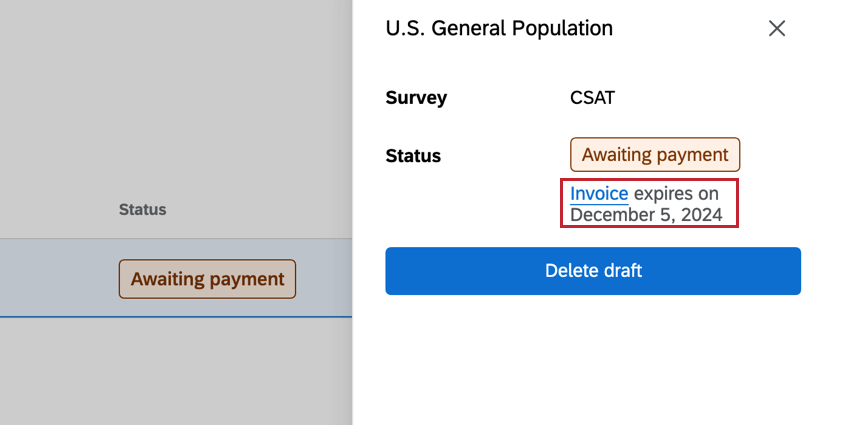
- Awaiting payment: The invoice for the panel has been sent but has not been paid yet. The expiration date and link to the invoice are provided underneath the status.
- Payment failed: The invoice link has expired or the payment submitted from the invoice link has failed. You can click the invoice link underneath the status to re-submit the payment, or you can delete the panel and start over with a new invoice.
- Launch failed: The payment was successful, but the panel failed to launch. We recommend reaching out to Qualtrics Technical Support.
- Draft (not launched): The panel has not yet been created because it is not fully set up.
- Launch time: The date and time that the panel was created.
- Expected end time: The requested date and time for the panel to be completed (i.e., when the goal number of responses is collected).
Qtip: While the expected end time is the target, it is possible that the panel may not complete within this timeframe. The panel will remain open for a maximum of 20 days to attempt to collect all responses.
- Fielding window: The number of days between the launch time and expected end date.
- Distribution Id: The ID of the distribution. This value will also appear on your purchase receipt.
- Total responses: The number of responses collected and the goal number of responses.
- Survey length (LOI): The observed survey length measured in the live panel compared to the predicted survey length.
- Incidence rate (IR): The observed incidence rate measured in the live panel compared to the predicted incidence rate.
Qtip: If your observed LOI and IR are performing worse than predicted and your panel collection looks unlikely to collect all responses, we recommend pausing response collection and creating a new panel with updated parameters to get new costs and feasibility.
Quotas Tab
You can view the quotas set for your panel even before response collection is complete. Using this method, you can see the progress that’s being made to meet your demographic quotas.
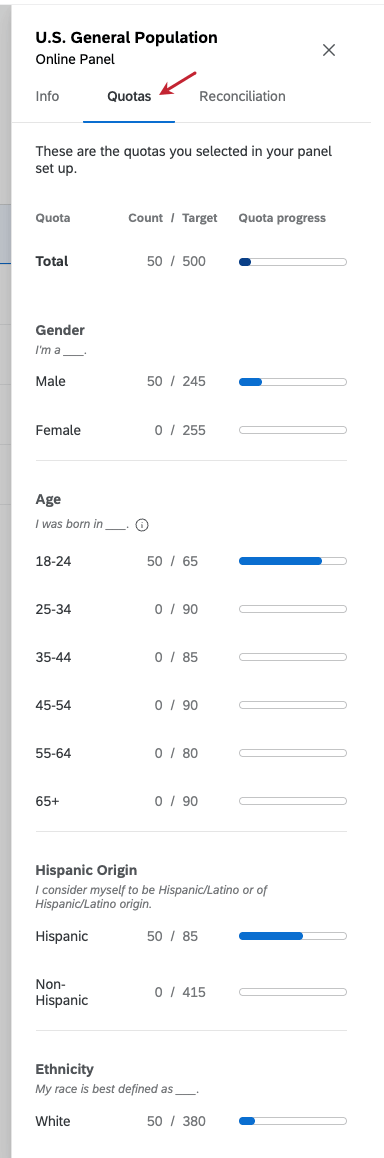
- Count: How many responses fitting this quota have been collected so far.
- Target: How many responses should be collected for the quota by the end of the panel.
Data Reconciliation
Reconciliation is the process of identifying low quality panel responses (such as fraudulent and spam responses) and rejecting them from your dataset. After responses have been identified for reconciliation, Qualtrics will try to replace them (or refund them if they cannot be replaced).
Attention: Data reconciliation is not available in the following cases:
- If the panel has less than 50 participants: These are considered test launches where the user is experimenting with survey/panel design and the collected responses are not expected to be high quality.
- If the panel is closed: Once the panel is closed, panel participants have already been paid for their time and all financial accounting records are closed.
- If you’ve reconciled 25% of your purchased number of completes: You can reconcile up to 25% of the purchased responses for a panel. You can do these in smaller batches (for example, reconcile 10% one day and then 15% another day), but the total number cannot exceed 25%. If you are reconciling responses in multiple batches, then you must wait for one batch to finish before you start the next one.
- If you’ve already deleted the responses from Data & Analysis: Responses are deleted from Data & Analysis after they’ve been reconciled. If a response has already been deleted, it can no longer be reconciled and replaced (since its record no longer exists to match up with our panel providers).
- If the fielding window has closed and you’ve already reconciled once since closure: You can reconcile responses only 1 time after your field window has closed but before the panel closes entirely.
To reconcile your responses:
- In the Online panel section of the Distributions tab, click on the specific panel you’d like to reconcile responses for.
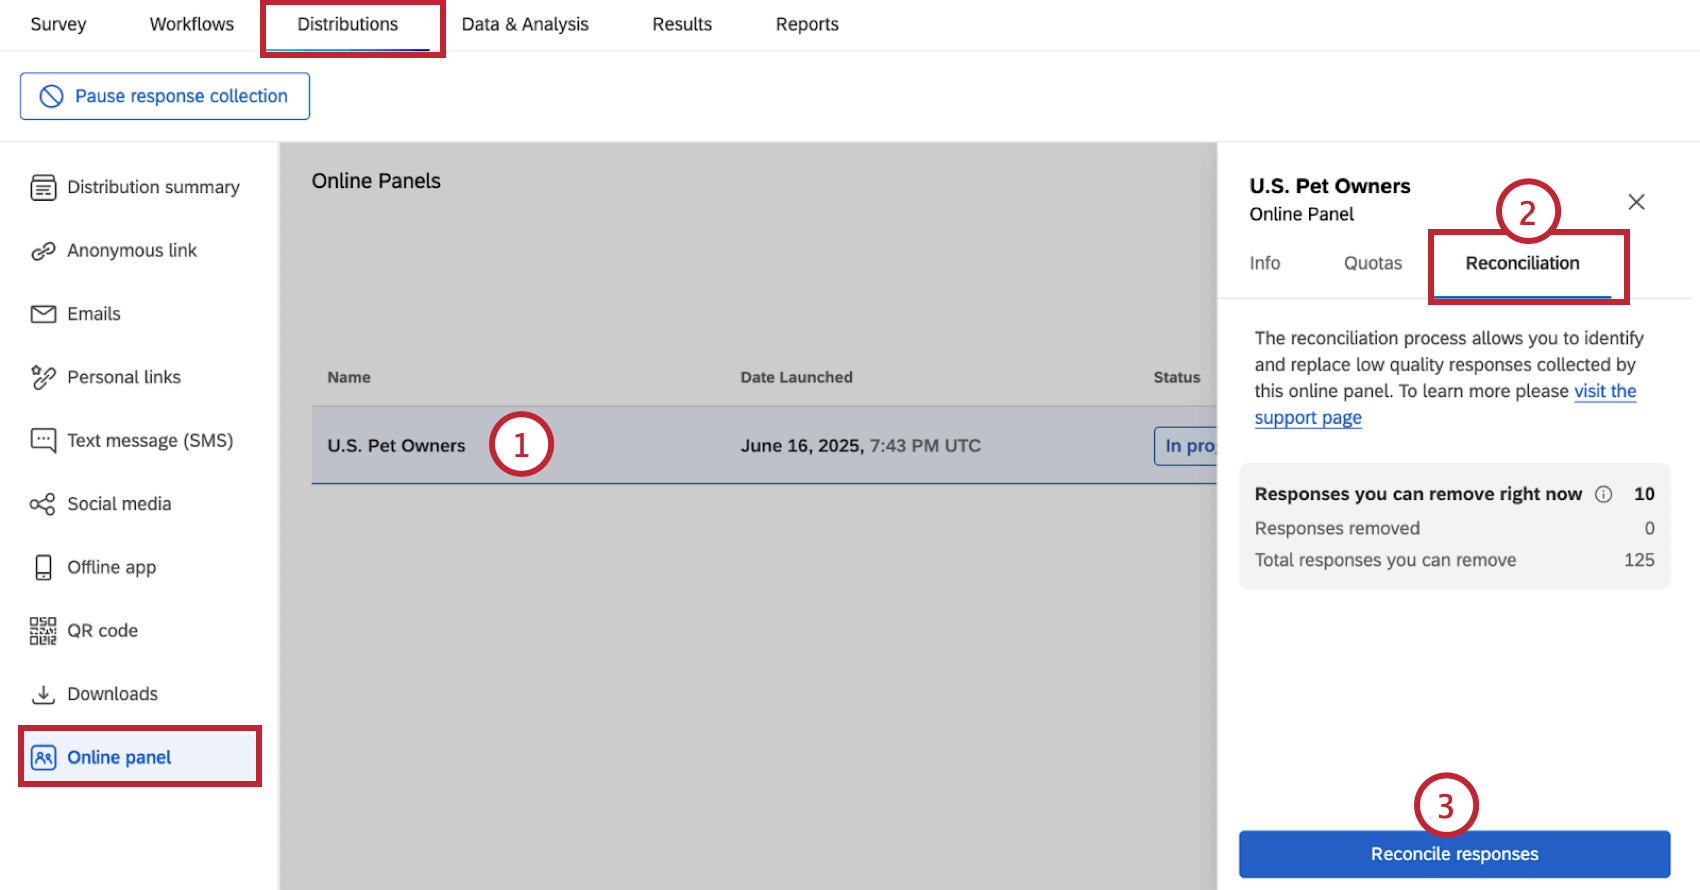
- Go to the Reconciliation tab. This tab displays the following information:
- Responses you can remove right now: The number of responses that have been collected and can be removed via reconciliation.
- Responses removed: The number of responses that have already been removed via reconciliation.
- Total responses you can remove: The total number of responses you are able to remove via reconciliation.
- Click Reconcile responses.
Qtip: If this button is grayed-out, then the panel does not meet the requirements for reconciliation. See the “Attention” at the top of this page for more information about what makes a panel ineligible for reconciliation.
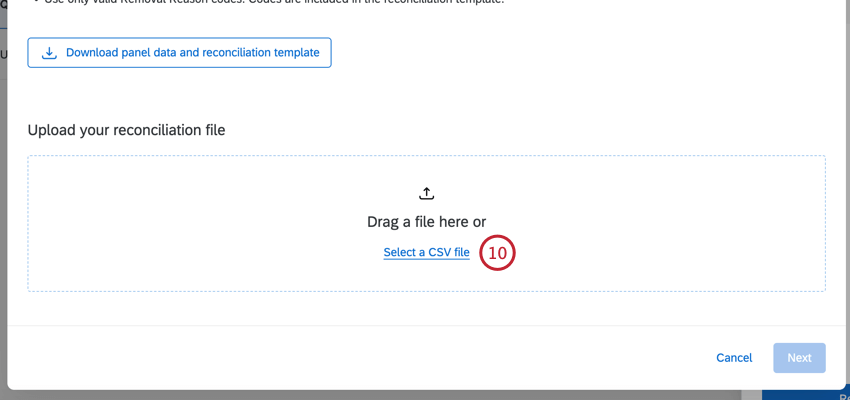
- Click Download panel data and reconciliation template.
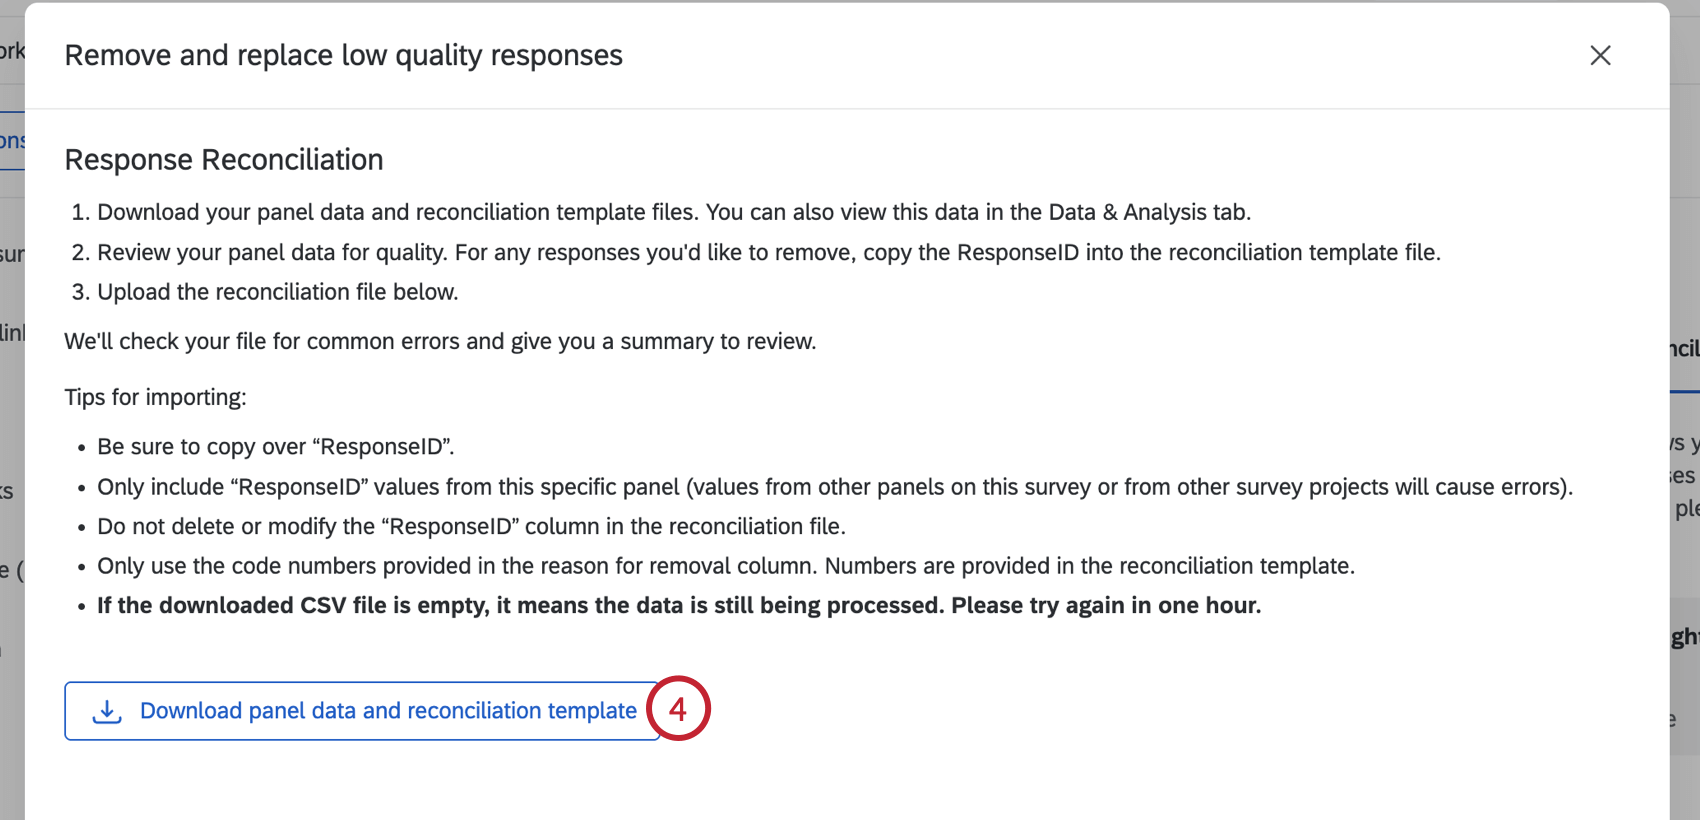
This will download 2 files to your computer:- The first file is an export of the responses that are associated with the panel.
- The second file is a template file.
Qtip: Pop-up blockers can prevent the files from downloading, so make sure to allow pop-ups on the page if necessary.
- Open the file that contains your responses in a spreadsheet editor on your computer. For any responses you’d like to reconcile, copy the Response ID.
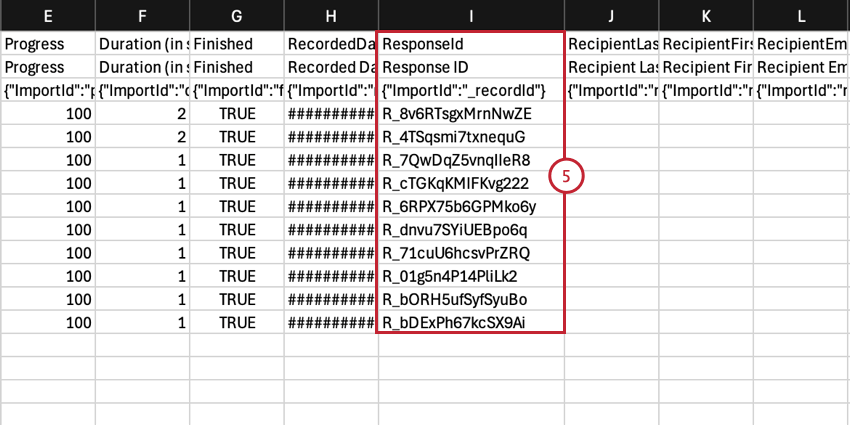 Qtip: Check out Qualtrics’ response quality features to help you identify low quality responses you’d like to reconcile.
 - Open the template file in a spreadsheet editor.
- In the Response ID column (A), add the response IDs you copied in step 5. Each response ID should be on its own row in the file.
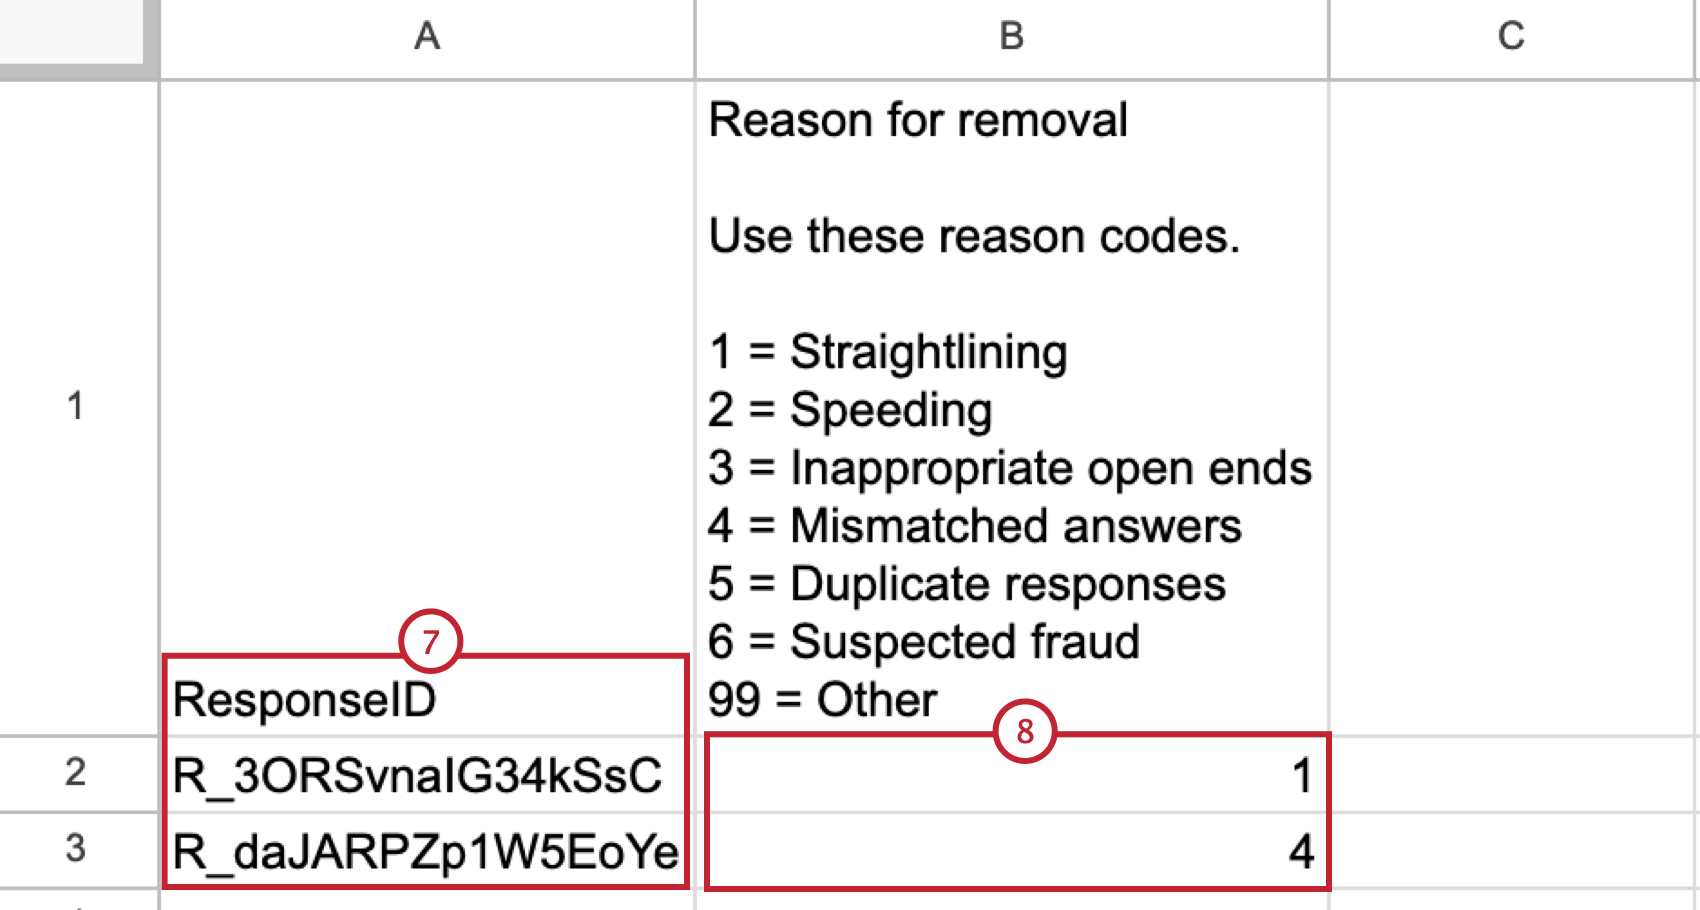
- In the Reason for removal column (B), add a code that represents why you’re removing the response. Use the key at the top of the file as a guide. These codes are optional unless you’re removing a sizable portion of your responses.
Qtip: If you’ve reconciled 10% or more of your total purchased responses, you must provide a removal reason for all ResponseIDs. This threshold applies across all reconciliation requests for the panel.
- Save your file as a CSV.
- In Qualtrics, click Select a CSV file and choose the file you saved in step 9.
- Your file will be evaluated for any errors. If there are any errors, correct the issue described in the error message and then upload a new file.
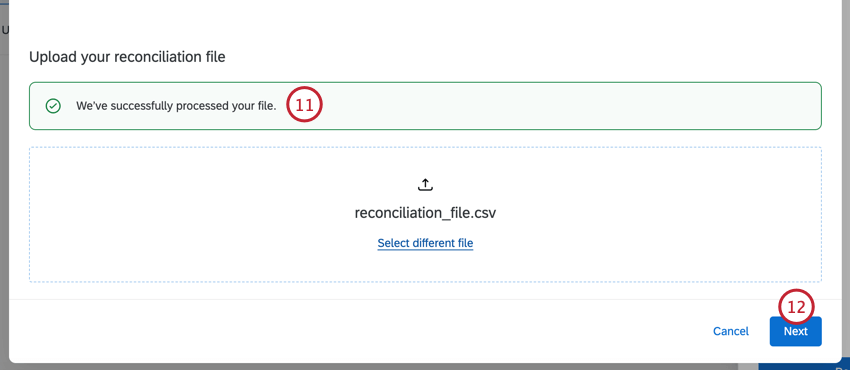
- Click Next.
- Review the responses you’d like to reconcile. If you need to make any changes, you can click the Upload a different file link which will return you to the previous screen to upload a different file.
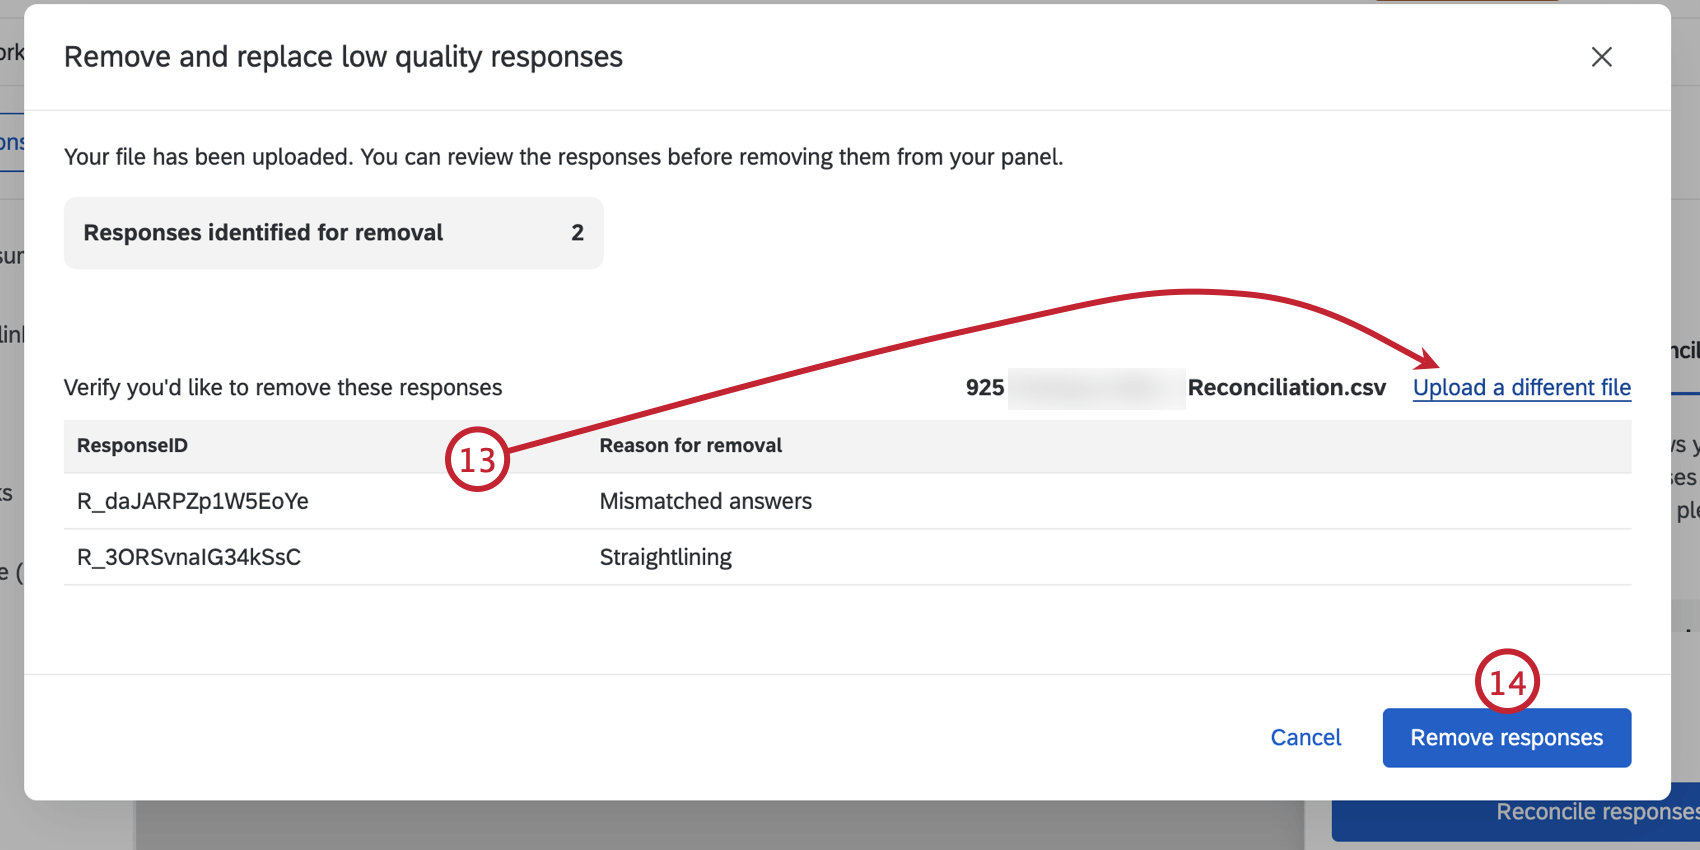
- Once you’re sure you have the responses you’d like to reconcile, click Remove responses.
- Click Confirm.
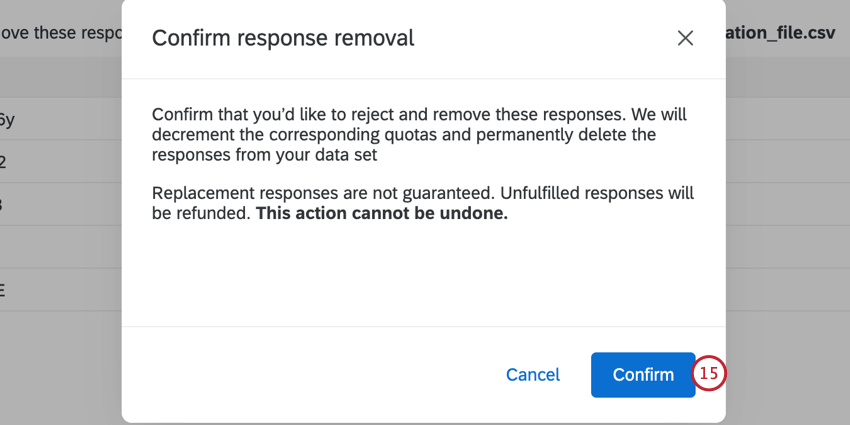
Once you confirm the action, the following will happen:
- Reconciled responses are deleted from the dataset and are removed from the “total responses” count for the panel.
- Any quotas that were affected by the reconciled responses will be decremented.
Qtip: This only affects quotas that are created as part of the panel setup. Any custom quotas will need to be manually corrected by deleting the response and choosing to decrement quotas.
- New participants will be recruited to the panel to fill the reconciled responses. If participants cannot be found, then you will be refunded the responses that could not be filled.
Pausing a Panel
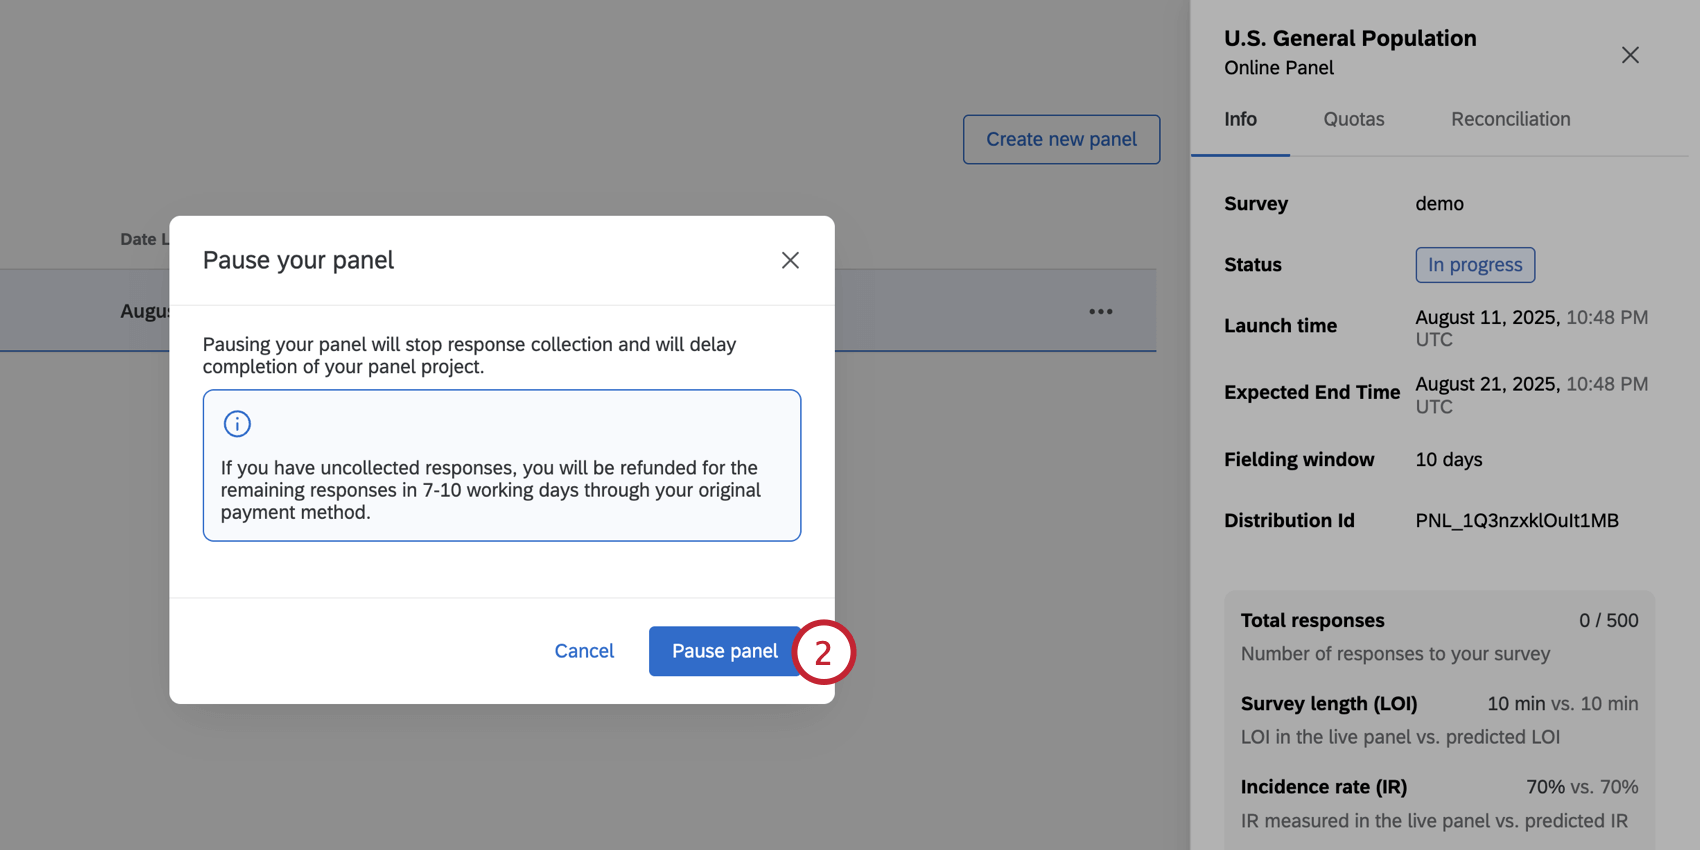
You can pause response collection for an open panel at any time. This does not immediately close the panel; it simply stops new responses from being collected. If the fielding window is still open, you can resume response collection for the panel.
- At the bottom of the panel information window, click Pause panel.
- Click Pause panel.
- To resume response collection (if the fielding window is still open), click Resume panel.
Panel Cost and Feasibility
Panel cost and feasibility are 2 important metrics when setting up your panel. This section covers both metrics and how customizing your panel can impact these values.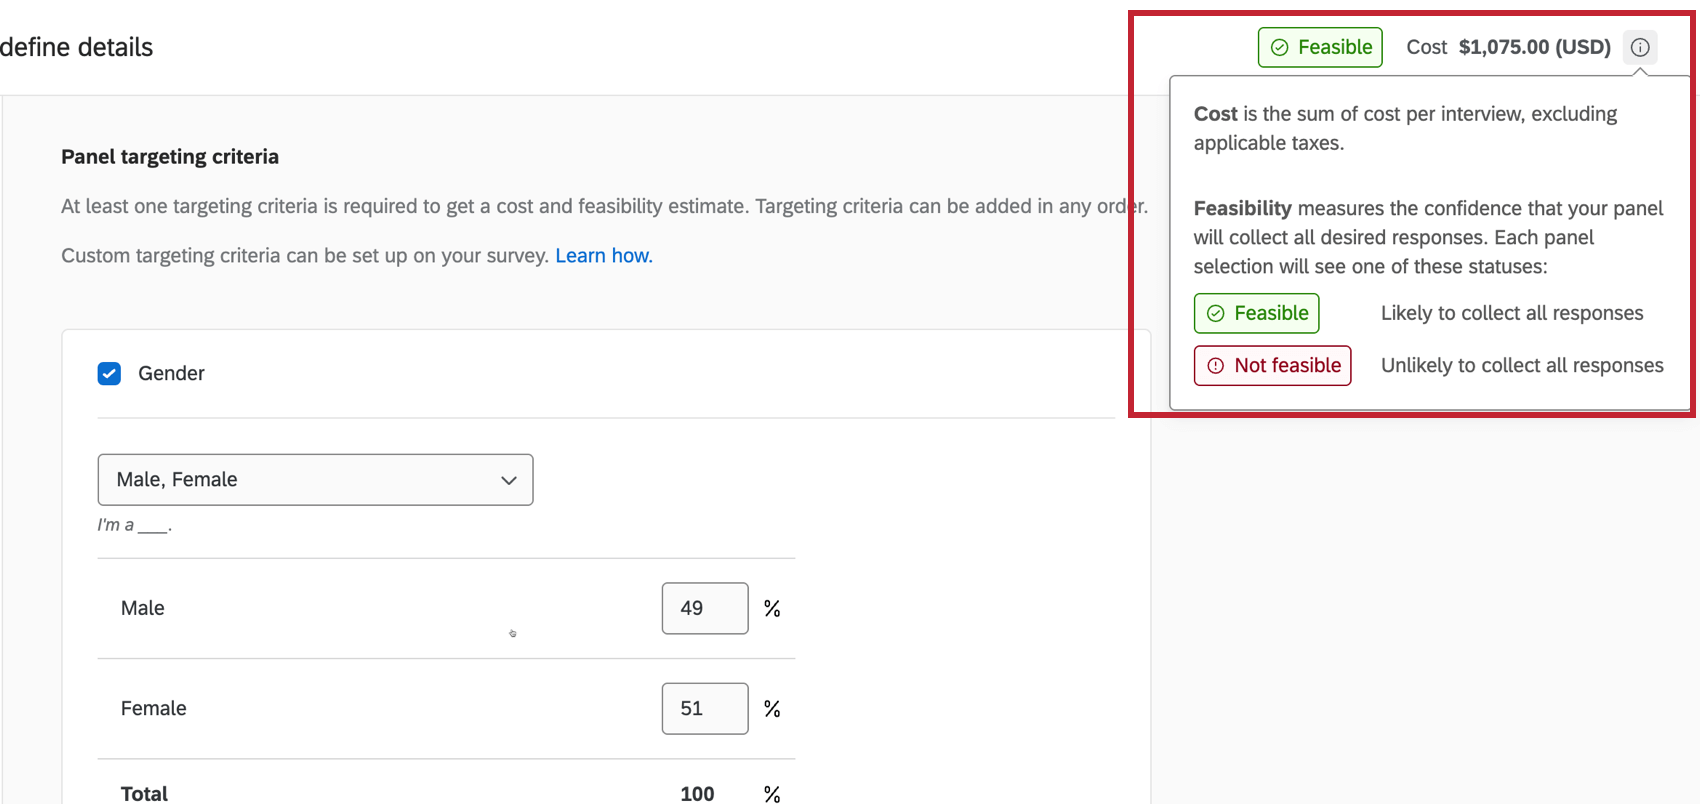
- Cost: Cost is calculated based on your survey length, incidence rate, time to collect responses, selected template, and number of responses. Changing these values will change the panel price.
- Feasibility: Feasibility measures the confidence that your panel will collect all desired responses. Your panel can either be Feasible or Not Feasible depending on your panel setup.
Qtip: You will not be able to launch your panel if it is “Not Feasible.”
In general, the more complicated your panel audience, the higher your panel will cost and the less likely you will be to find respondents who match your panel criteria. Generally, the following increase the cost and lower the feasibility:
- The more responses purchased (e.g., 5000 responses is harder than 500)
- The longer the survey is (e.g., 50 min survey is harder than a 5 min survey)
- The lower the incidence rate is (e.g., 20% IR is harder than 80% IR)
- The shorter the time to collect is (e.g., 1 day is harder than 10 days)
- The more specific your targeting criteria is (e.g., full time employees in agriculture are harder to find than general US citizens)
Calculating Incidence Rate
The incidence rate is the percentage of people from a target population that meet specific eligibility criteria to participate in your survey and who complete the survey. This section will cover how to estimate an incidence rate for your survey and how the incidence rate for your survey is calculated once you start collecting responses.
Estimating Incidence Rates
Estimating an incidence rate is important because it directly impacts the cost and feasibility of your panel. Follow the below steps to calculate your incidence rate:
- Define your target population: Start by clearly defining your target population, including specifying relevant demographic characteristics, geographic location, and any behavioral criteria that your audience should exhibit.
Example: Let’s say we want to survey the general American population who uses smartphones. We’ll continue using this example population for the remaining steps.
- Specify the eligibility criteria for your target population: Outline the exact criteria that individuals must meet to be eligible for the study survey. These criteria should become the basis for your panel definition and your survey screening questions
Example: Since we’re conducting a survey about smartphone usage, our eligibility criteria includes owning a smartphone and being within a specific age bracket (18-35, 35-54, and 55+). Additionally, we are only interested in surveying people who live in the United States.
- Collect relevant data about your audience’s prevalence: Utilize existing data sources to understand the size and characteristics of the target population. This information can come from sources such as government statistics and censuses, industry reports, or internal databases.
Example: Based on independent research, around 85% of Americans own smartphones. Additionally, US census data shows around 78% of Americans are above 18 years old.
- Calculate the estimated Incidence rate: Once you have data about the percentage of the population that fits your target, you can multiply your percentages together to find your target incidence rate.
Example: If 85% of Americans own smartphones and 78% of Americans are above 18 years old, then 66% of Americans are both above 18 and own a smartphone.
- Use a conservative estimated incidence rate for your panel setup: Online panels are not always distributed in the same ways as a general population and can have biased representation in some areas. For example, online panels tend to have increased representation of 35-54 year old females, and lower representation of harder to reach demographics like 18-24 Hispanic males. It is considered best practice to be conservative in estimating incidence at the start of the study to ensure pricing and feasibility are accurate for your project.
Example: Since our estimated incidence rate is 66%, we use 60% as our target incidence rate.
Additionally, the following survey design aspects can impact your survey’s incidence rate:
- Survey length: The longer a survey is, the more likely a respondent is to drop off, which decreases your survey’s incidence rate.
Attention: An attention check is a question designed to make sure the survey respondent is paying attention. Too many attention checks or too strict of attention checks can reduce the number of people who qualify for your survey.
- Complex quotas: When you have a lot of quotas, certain combinations may fill up faster than others. As a result, eligible participants may not qualify because those quotas have already filled up.
Observed Incidence Rates
As panelists respond to your survey, your survey’s incidence rate will be calculated to give you an overview of how respondents are progressing through your survey.
Incidence rate is calculated using the following formula:
Incidence Rate = (Number of Complete Survey Responses) / (Number of Valid Clicks)
In the above formula, the variables are defined as:
- Number of Complete Survey Responses: The number of qualified responses that have completed the full survey and have been validated by quality measures.
- Number of Valid Clicks: The total number of times the survey has been clicked, which is calculated by adding together the following values:
- Complete Responses: The number of qualified responses that have completed the full survey and have been validated by quality measures.
- Over-Quota Responses: The number of responses that were removed from the survey because they fulfilled a quota that was already full.
- Screened Out Responses: The number of responses that were removed from the survey due to failing the screening criteria.
- Dropped Responses: The number of responses that ended due to 24 hours of inactivity. A dropped respondent can be the result of survey programming errors, redirection issues, or a respondent losing interest in a survey and not completing it.
Creating Custom Screening Questions
If you want to add a screener that is not included in the current targeting options, you can set one up manually in your survey project. Follow the below steps before publishing your survey and setting up the online panel. Keep in mind that more screener questions can cause your incidence rate to be lower (since there are more chances for respondents to be disqualified).
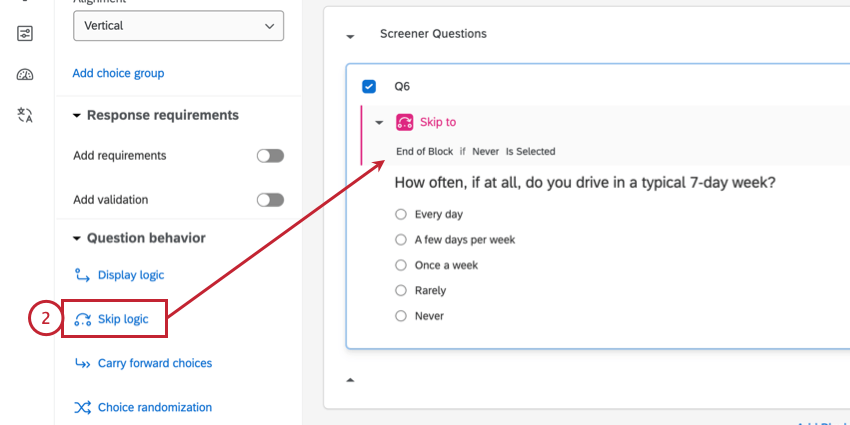
- In general, screening questions should be placed at the beginning of the survey. We recommend putting screening questions in their own block at the start of your survey.
- For the screen-out responses, add skip logic to send the respondent to the End of Block if that response is selected.
- Go to the Survey flow.
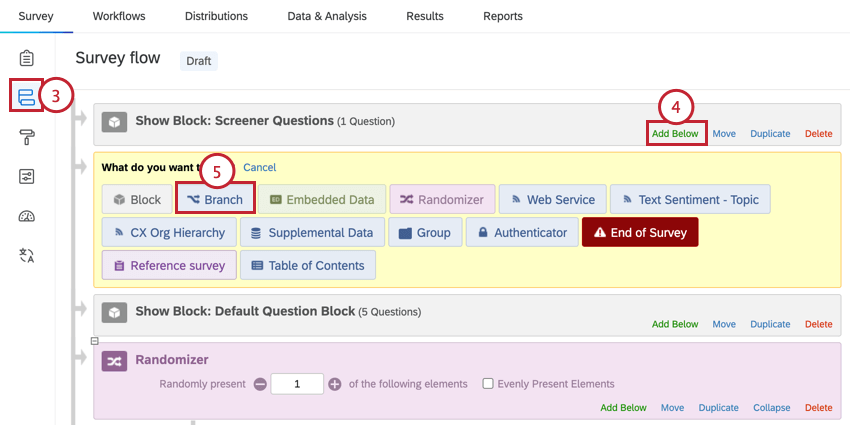
- In your screener question block, click Add Below.
- Select Branch.
- For the branch logic, build the same logic you did for the question skip logic in step 2.
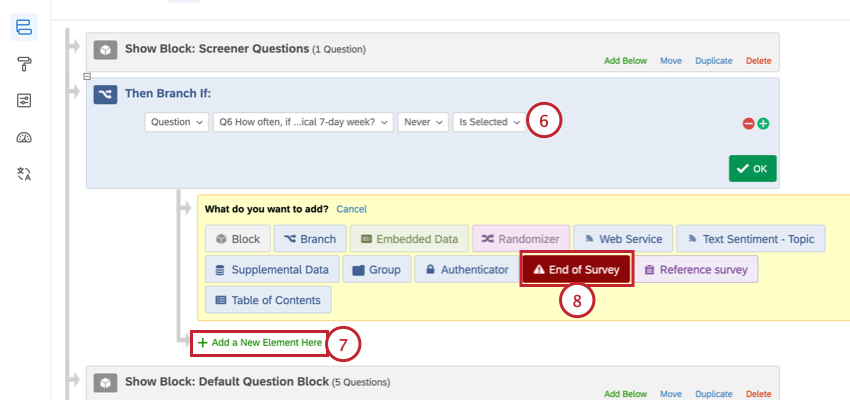
- Click Add a New Element Here below the branch.
- Select End of Survey.
- Click Customize on the end of survey element.
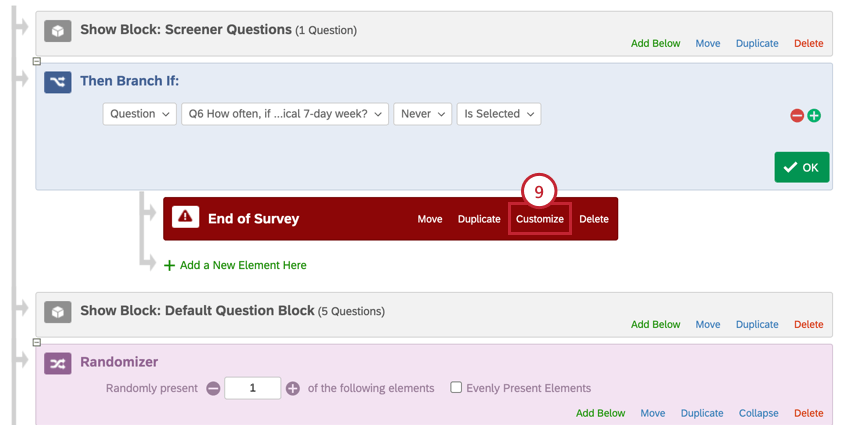
- Select Override Survey Options.
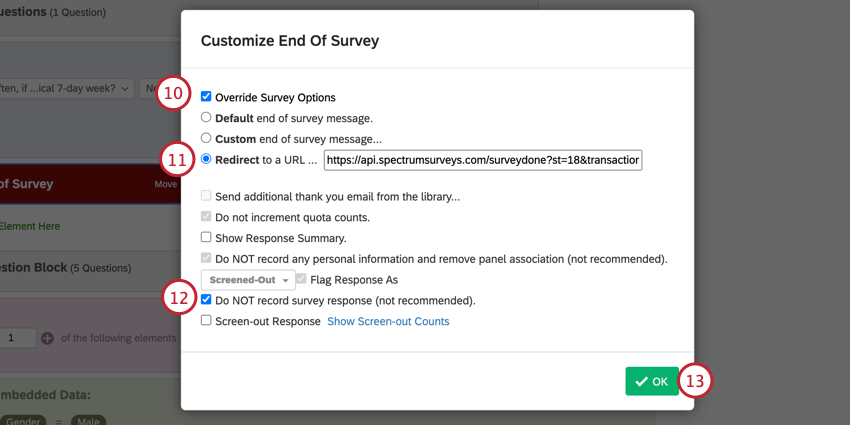
- Enable Redirect to a URL and enter the following URL:
https://api.spectrumsurveys.com/surveydone?st=18&transaction_id=${e://Field/transaction_id} - If desired, select Do NOT record survey response.
Warning: When you select Do NOT record survey response, screened out responses are not recorded, and there is no way to retrieve them. Only select this option if you are absolutely sure you do not want to record screened out responses at all.
- Click OK.
- Click Apply to save your changes.
Viewing Panel Data
You can view your responses by navigating to the Data & Analysis tab of your survey. Responses to screening questions are added to survey responses as embedded data. The embedded data field names use the naming scheme: “_os_api_variable.”
There are a few additional embedded data fields for every survey that uses online panels:
- _os_api_panel_id: The ID of the distribution. This will match your distribution ID for the panel project.
- _os_api_vendor: Third party panel vendor used to source the panel respondents.
- _os_api_participant_id: This field is only available for qualitative panels. This is a unique ID for each participant.
- gc: This stands for “good complete.” A value of “1” means the respondent fully completed the survey and will be paid for their time.
- psid: A unique value that the panel supplier assigns to the research participant to anonymously identify them.
- transaction_id: A unique value that the panel supplier assigns to associate the survey session with the research participant.
- pureSpectrumRedirectUrl: Research participants are redirected back to the panel supplier portal on completion of the survey. This field is only included for templated (quantitative) panels.
- pureSpectrumSignatureValue: A security measure to avoid fraud. This field is only included for templated (quantitative) panels.
Additional fields are available depending on the demographic criteria used for your panel:
- _os_api_gender: The respondent’s gender. Possible values include:
- Male
- Female
- Prefer not to say
- _os_api_hispanic: Indicates if the respondent is Hispanic. This field is only included for templated (quantitative) panels. Possible values include:
- Yes
- No
- _os_api_ethnicity: The respondent’s ethnicity. Possible values include:
- White
- Black or African American
- Asian
- Native Hawaiian or Other Pacific Islander
- American Indian or Alaska Native
- Other
- _os_api_region: The respondent’s region in the United States. This field is only included for templated (quantitative) panels. Possible values include:
- Northeast
- Midwest
- South
- West
- _os_api_age: The age range of the participant. Values include:
- 18-24
- 25-34
- 35-44
- 45-54
- 55-64
- 65+
- _os_api_industry: The industry the participant is in. This field is only available for qualitative panels and for quantitative (templated) panels that are relevant, such as job-focused ones.
- _os_api_job_function: The type of job the panelist has. This field is only available for qualitative panels.
- _os_api_company_size: The size of the company the panelist works for. This field is only available for qualitative panels.