-

Qualtrics Platform -

Customer Journey Optimizer -

XM Discover -

Qualtrics Social Connect
Salesforce Extractor
About the Salesforce Extractor Task
The Salesforce Extractor task can be used to import data from Salesforce for use in Qualtrics. The following data can be imported from Salesforce:
- Object records (such as Accounts, Contacts, and Opportunities).
- Emails connected to closed Cases.
- Report data.
On the first run, the task will import all specified records. On subsequent runs, it will pull in new or updated records since the last run.
Extracting Objects from Salesforce
This section covers how to set up this task to import object records (such as Accounts, Contacts, and Opportunities) from Salesforce.
- Create a new ETL workflow.
- Select Data source (ETL extractor).
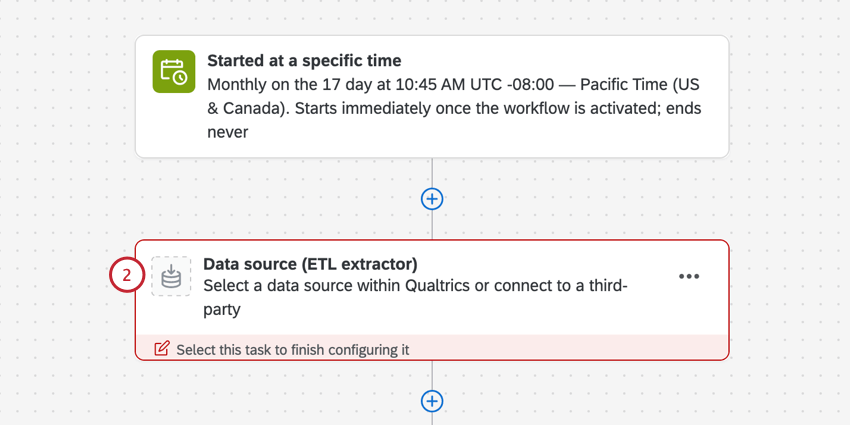
- Search for the Salesforce Extractor task.
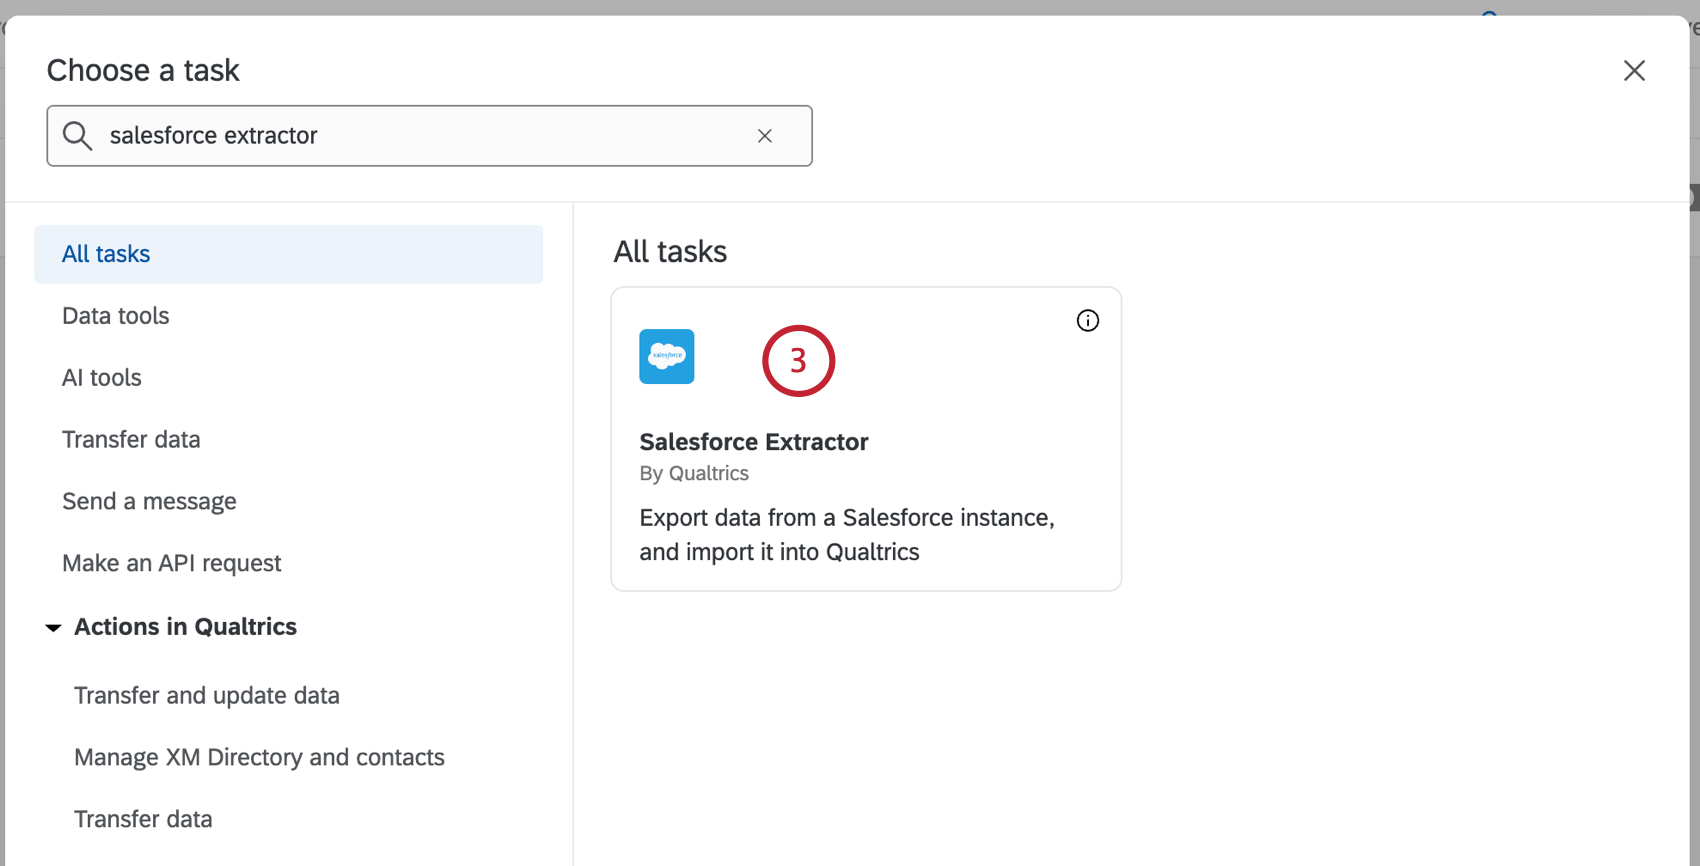
- Select Objects.
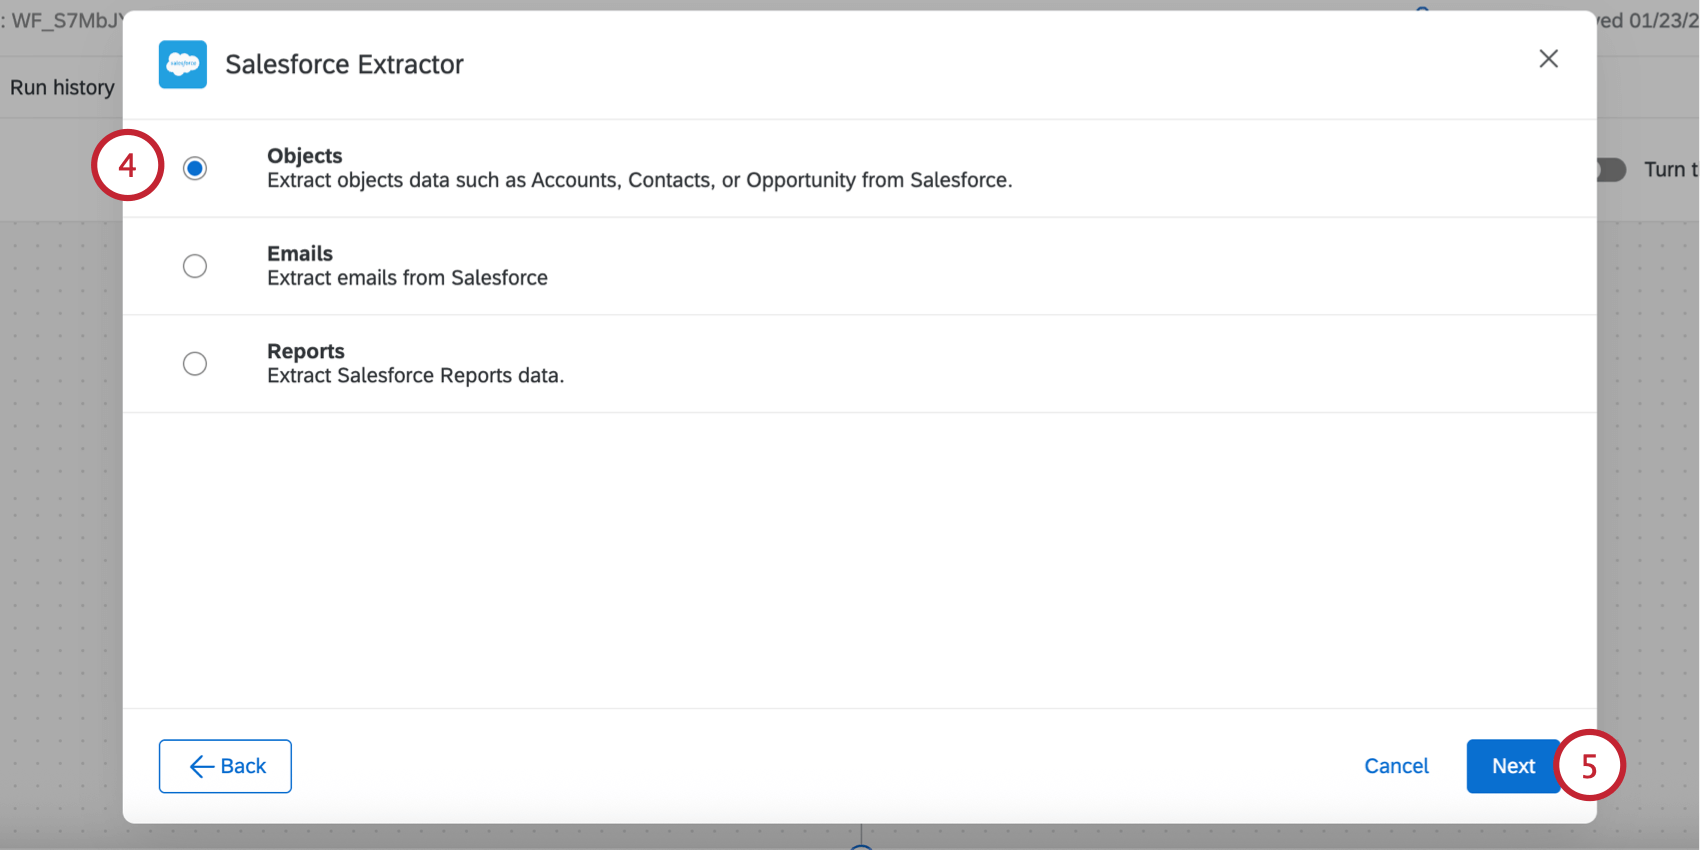
- Click Next.
- Select the Salesforce account to import data from.
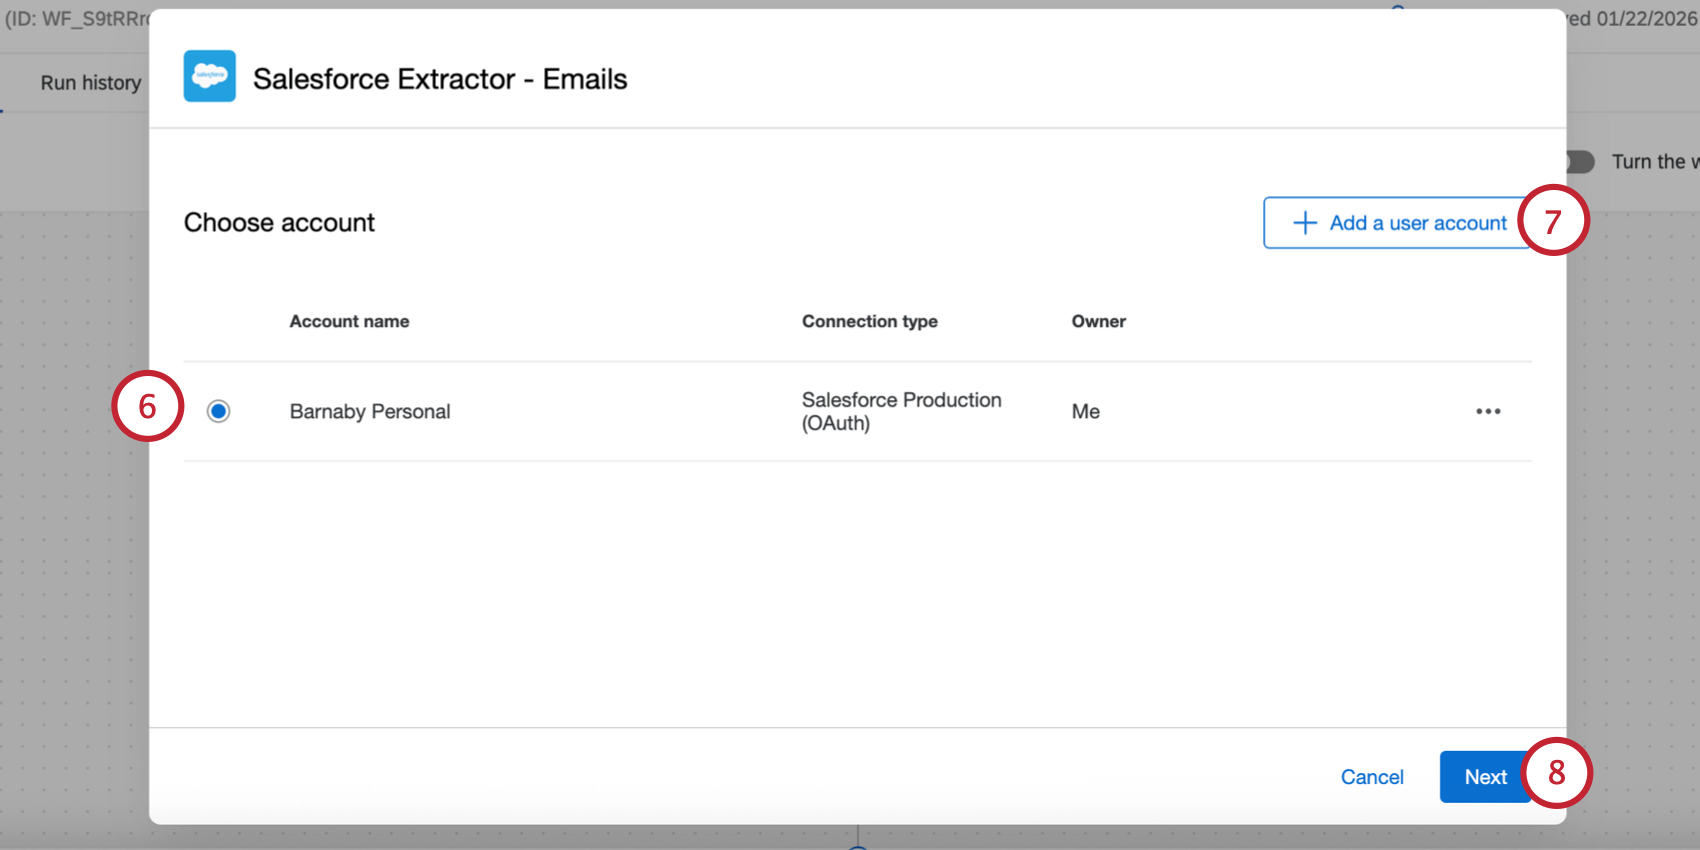
- If you’d like to add a new Salesforce account, click Add a user account. You can connect to a production or sandbox account directly, or set up a server-to-server connection. See Linking Qualtrics and Salesforce for more information about each authentication method.
Qtip: Any Salesforce accounts you’ve previously connected as well as accounts set up by Brand Administrators will be available here.Attention: You may have up to 5 external connections to your Salesforce account for this task. If you add more than 5 connections, the oldest connection will be severed.
- Click Next.
- Click Add object and choose the object you’d like to import. You can import multiple objects in the same extractor task.
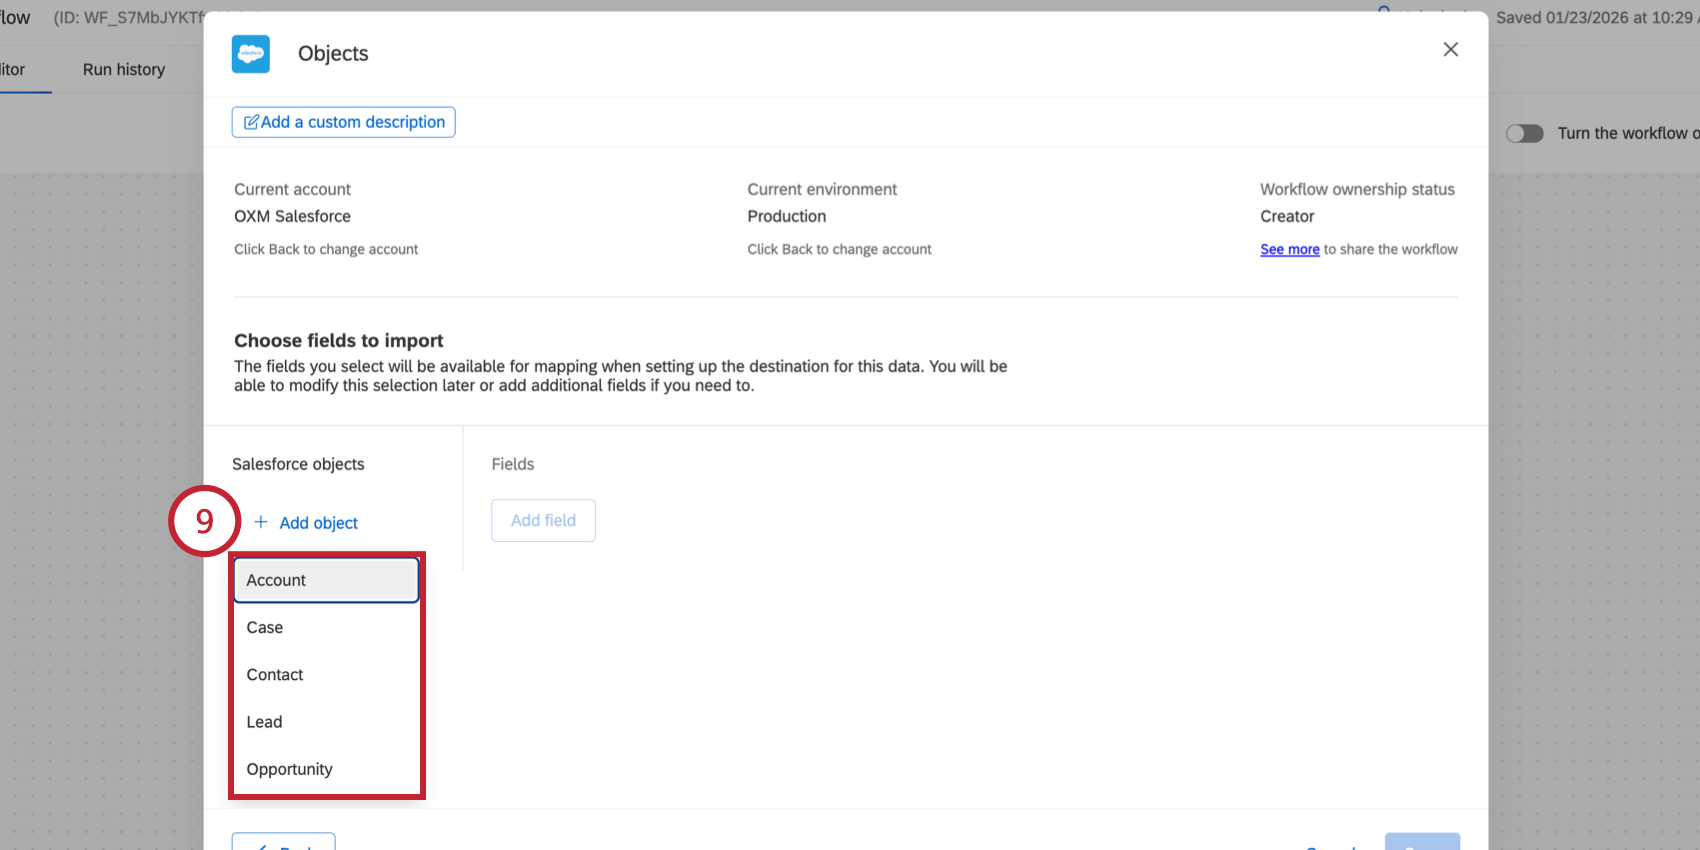
The following Salesforce objects available for import:- Account
- Case
- Contact
- Lead
- Opportunity
Qtip: If you don’t have any objects here, then the connection between your Salesforce account and Qualtrics is invalid or expired. Return to the account selection screen by clicking “Back” and then add a new Salesforce account.
- If desired, use the Salesforce list dropdown menu to limit which objects are imported based on the list’s filter criteria in Salesforce (called List View). If no option is selected, then all associated objects will be imported.
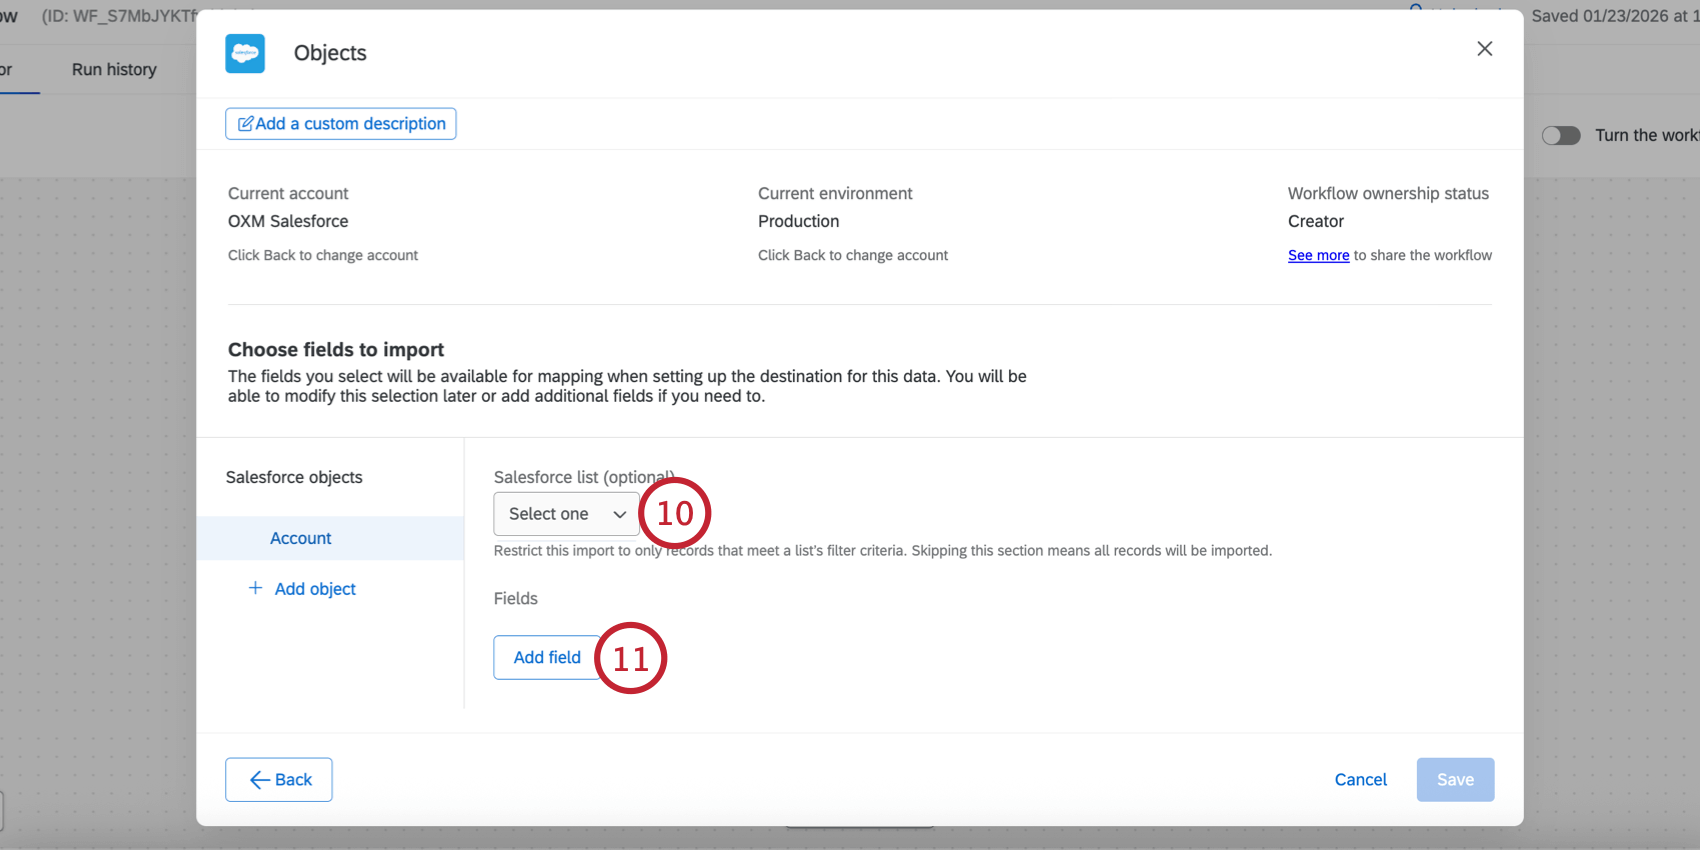
- Click Add field, which will add a dropdown menu for you to choose a field.
- Use the Select Field dropdown menu to choose a field to import from Salesforce.
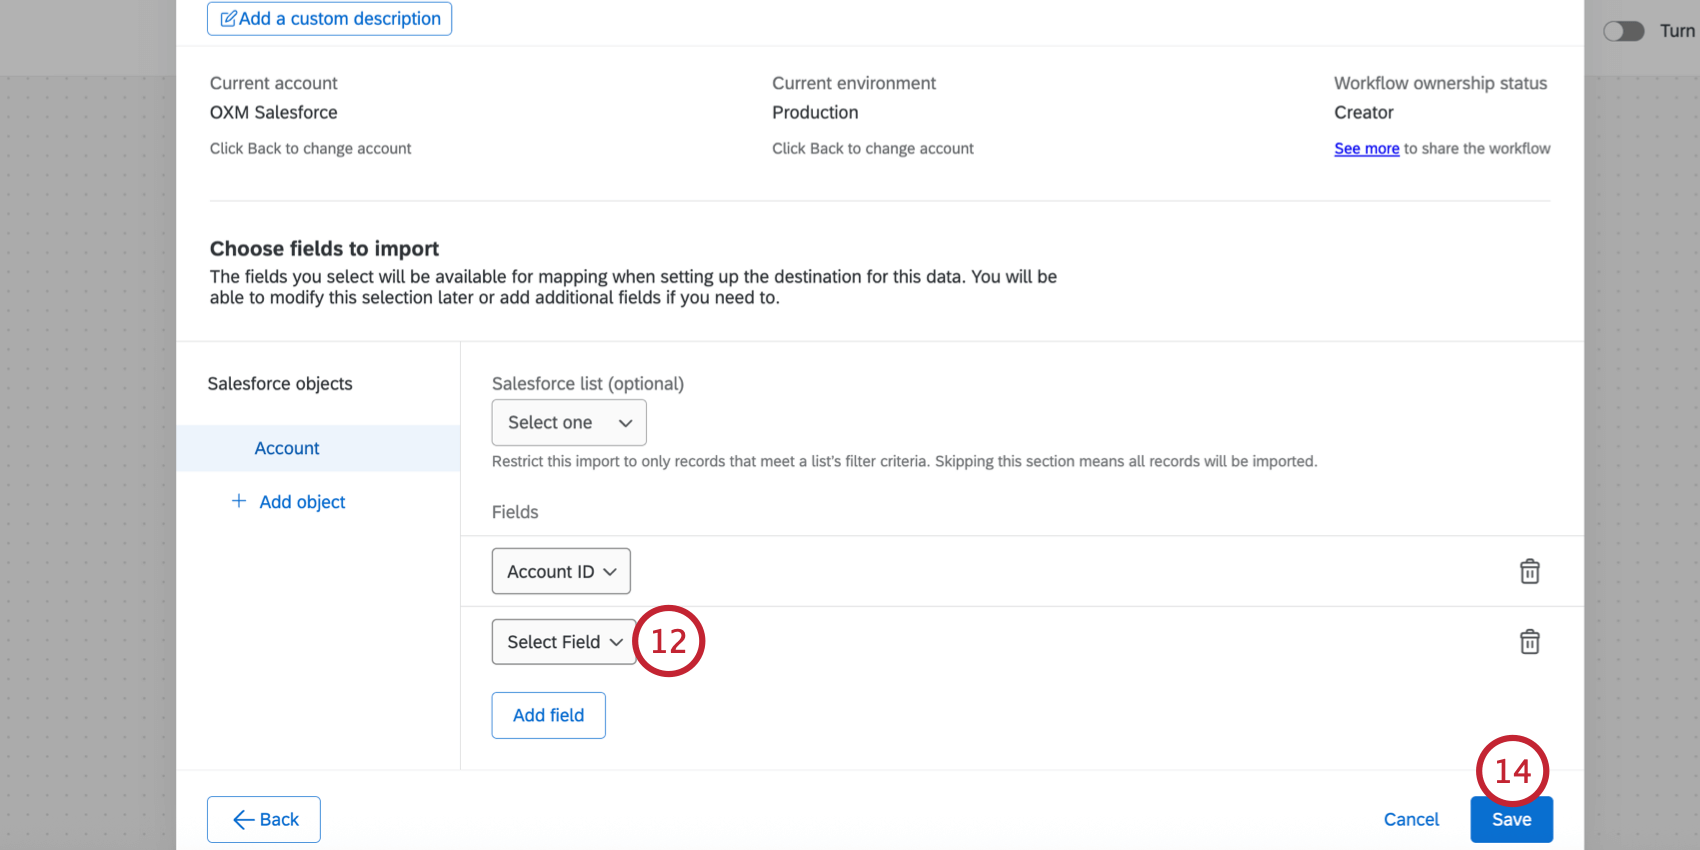
- Repeat the above steps to import additional fields for the selected Salesforce object.
Qtip: Click the trash can icon next to a field or object to remove it from the task.
- Click Save once finished.
- Next, you’ll need to save your data to Qualtrics using a loader task. Typically, this is the “Add Contacts and Transactions to XM Directory” task.
Troubleshooting Salesforce Object Imports
If your workflow fails to complete, head over to the workflow run history to get more information about the failure. Below are common errors and their resolutions:
- “Your credentials to Salesforce are invalid, please reconnect”
- The credentials used with the task are invalid and need to be re-entered. To fix this issue, edit the task that failed and choose another valid credential or add a new one.
- “ListView {{listviewId}} for sObject {{sObjectName}} does not exists”
- The list used in the task is not accessible to the user or has been deleted. To fix this issue, edit the task that failed and select the object that has an invalid list. Then, choose a new list to use. The {{listviewId}} field in the error message contains the list’s ID in Salesforce and the {{sObjectName}} field is the object’s name in Salesforce.
- sObject {{sObjectName}} does not exists
- The object used with the task is not accessible to the user or has been deleted. To fix this issue, edit the task that failed, remove the invalid object, and save the task. The {{sObjectName}} field in the error message contains the object’s name in Salesforce.
- Field {{fieldName}} in sObject {{sObjectId}} does not exists
- The field used in the task is not accessible to the user or has been deleted. To fix this issue, edit the task that failed, remove the invalid field, and save the task. The {{fieldName}} field in the error message contains the field’s name in Salesforce and the {{sObjectId}} field is the object’s ID in Salesforce.
- Could not determine data isolation
- If this error occurs, please contact Qualtrics support.
- Unexpected error occurred
- If this error occurs, please contact Qualtrics support.
- An error occurred with Sandbox
- If there are any errors with Sandbox, it is recommended to use a non-Sandbox version in order to resolve the issue. Sandbox environments are intended for testing purposes, and won’t always perform the same as non-Sandbox environments.
Extracting Emails from Salesforce
This section covers how to extract emails from Salesforce to use in an email data project (as part of omnichannel listening management).
- From the Workflows tab of your OXM project, create a new ETL workflow.
- Select Data source (ETL extractor).
- Search for the Salesforce Extractor task.
- Select Emails.
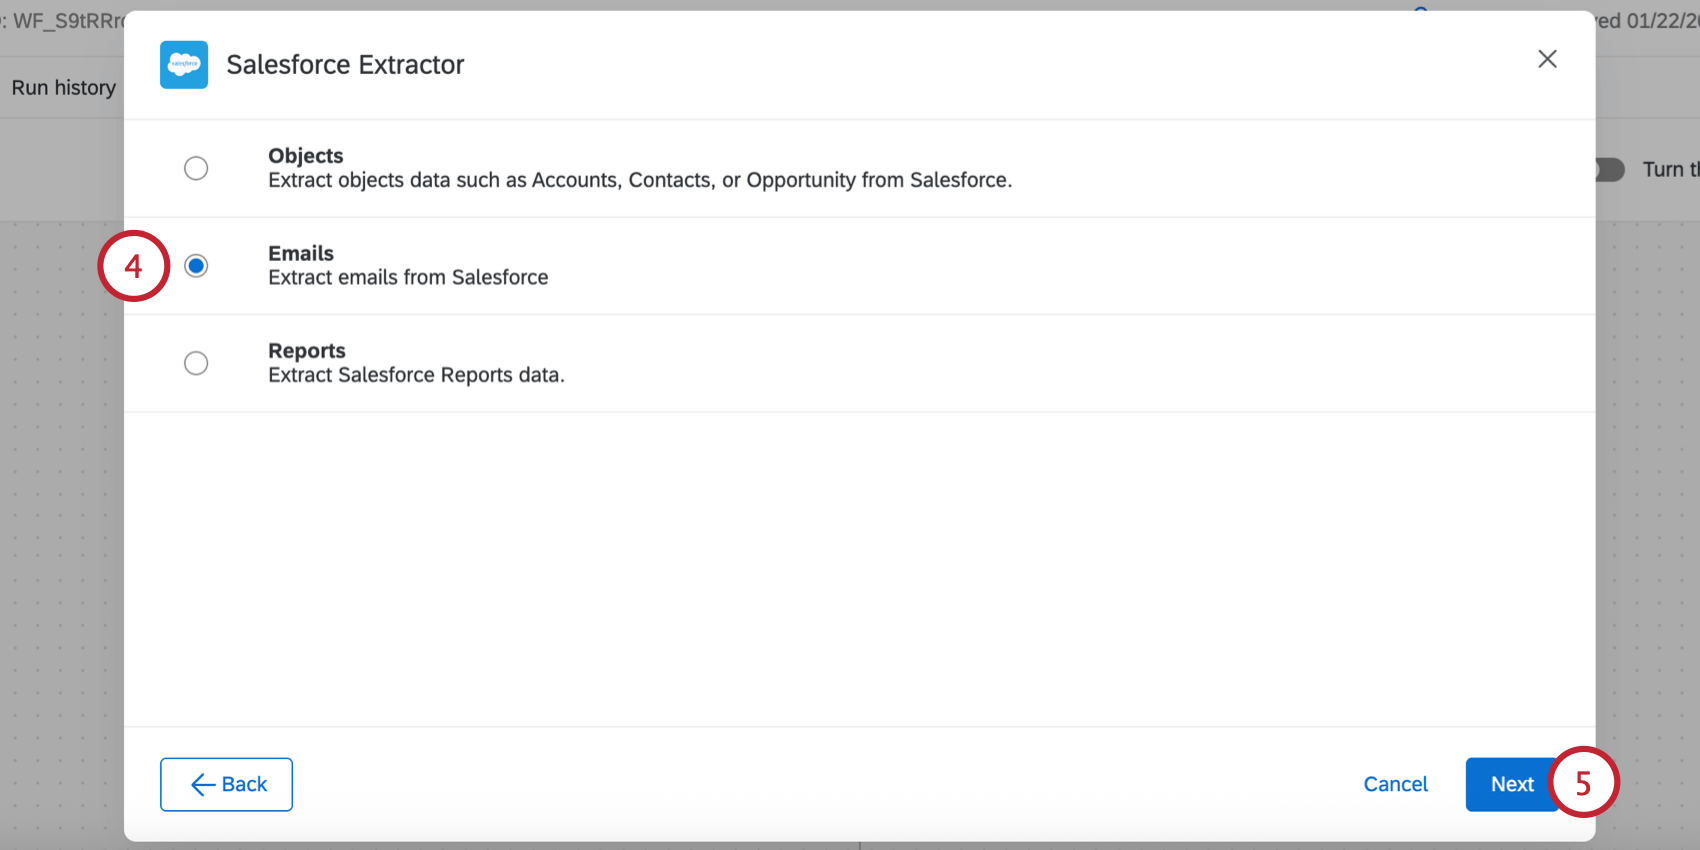
- Click Next.
- Select the Salesforce account to import data from.
- If you’d like to add a new Salesforce account, click Add a user account.
Qtip: Any Salesforce accounts you’ve previously connected as well as accounts set up by Brand Administrators will be available here.Attention: You may have up to 5 external connections to your Salesforce account for this task. If you add more than 5 connections, the oldest connection will be severed.
- Click Next.
- Select the Salesforce Case status you’d like to import. You can select more than 1 status.
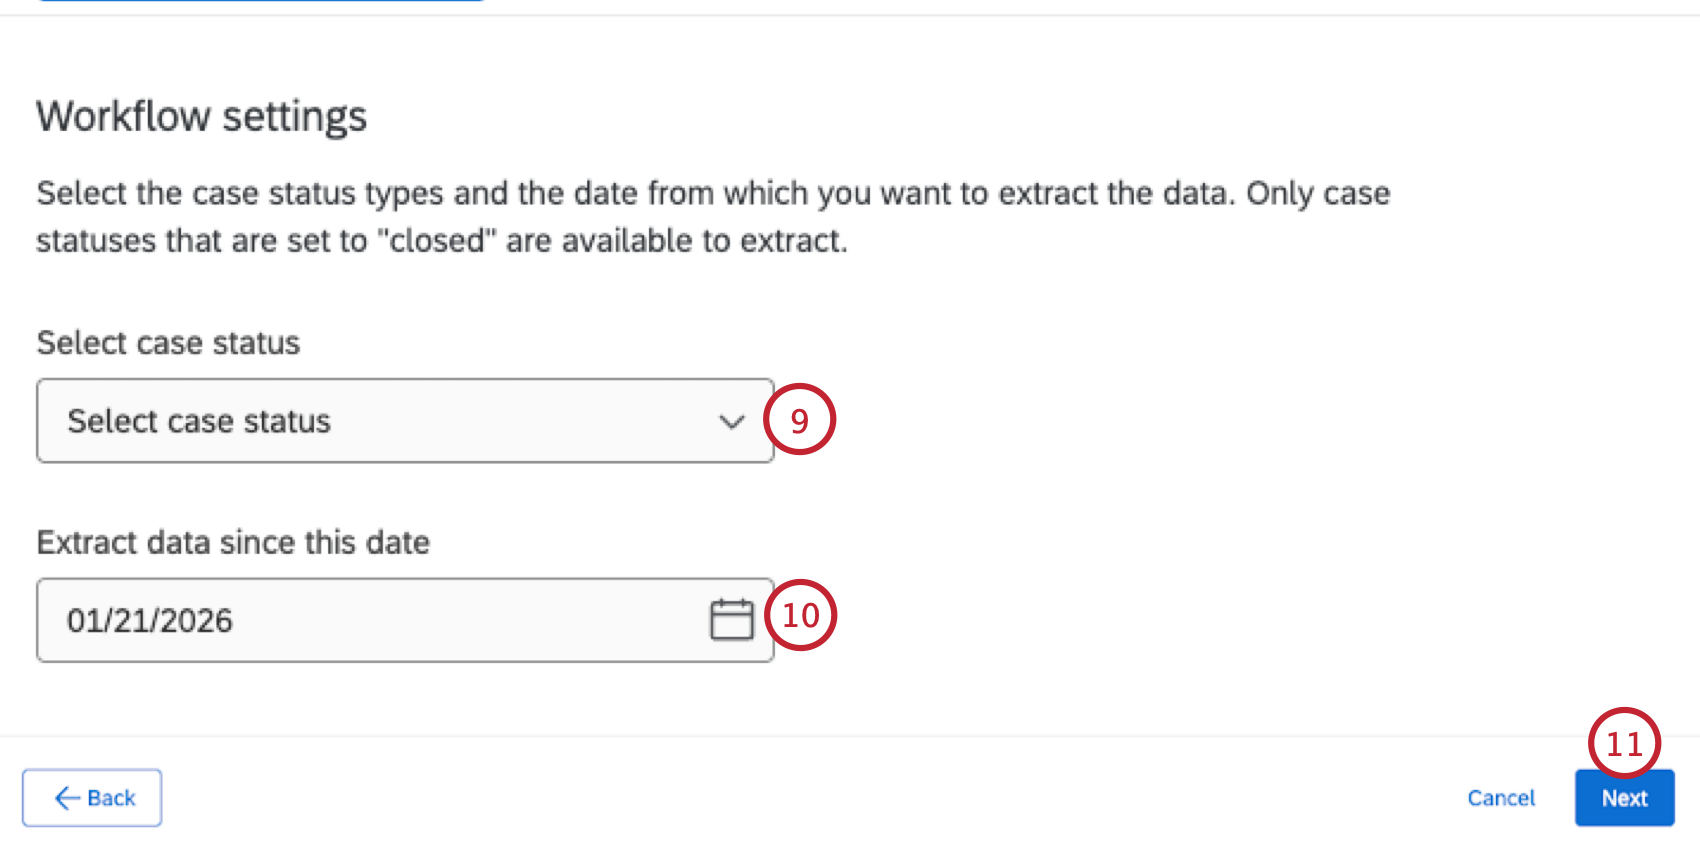 Attention: You can only select case statuses that are considered “closed” in Salesforce. The default “Closed” status is one of these, and you may have additional custom statuses that are also “closed,” which is set by an Administrator in Salesforce.
 - Choose the date to determine which emails are extracted. The first time this task runs, it will extract emails that have their case “Closed Date” between your selected date and first task execution date (which is set by the schedule when you build the ETL workflow).
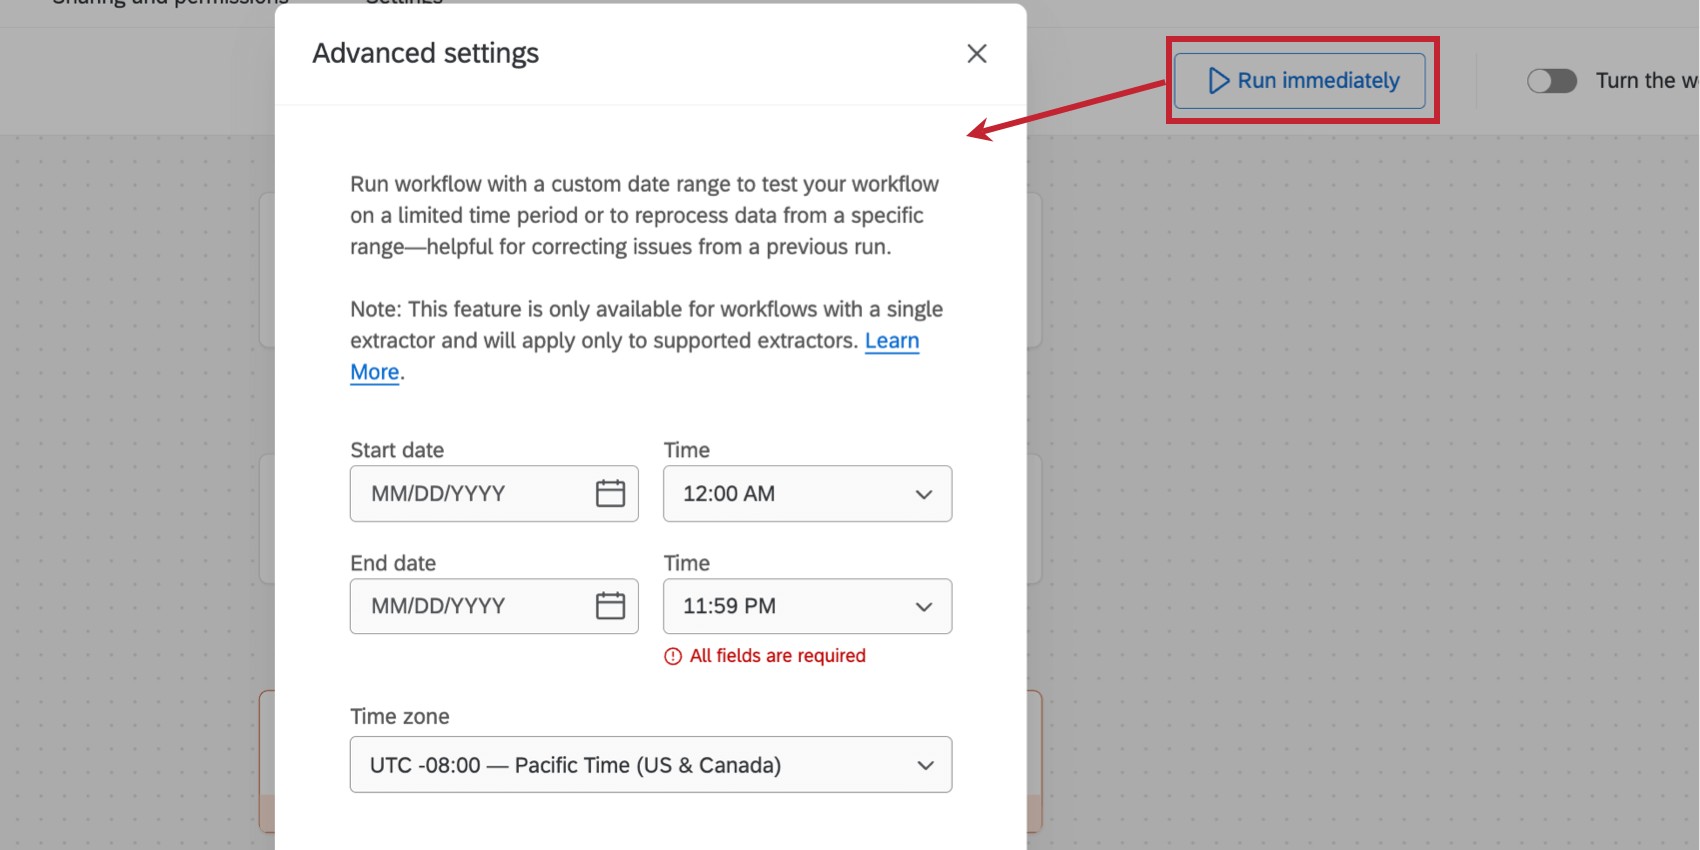
Qtip: On subsequent executions, it will only extract emails if the case’s “Closed Date” is between the previous execution and current execution (which are determined by your ETL schedule).Qtip: You can set a custom timeframe to extract data from a specific date range by clicking the Run Immediately button at the top of your workflow. This allows you to “override” the default data extraction behavior above. See Extracting Data From a Specific Date Range for step-by-step instructions. Please note that this option is only available when extracting emails from Salesforce.
- Click Next.
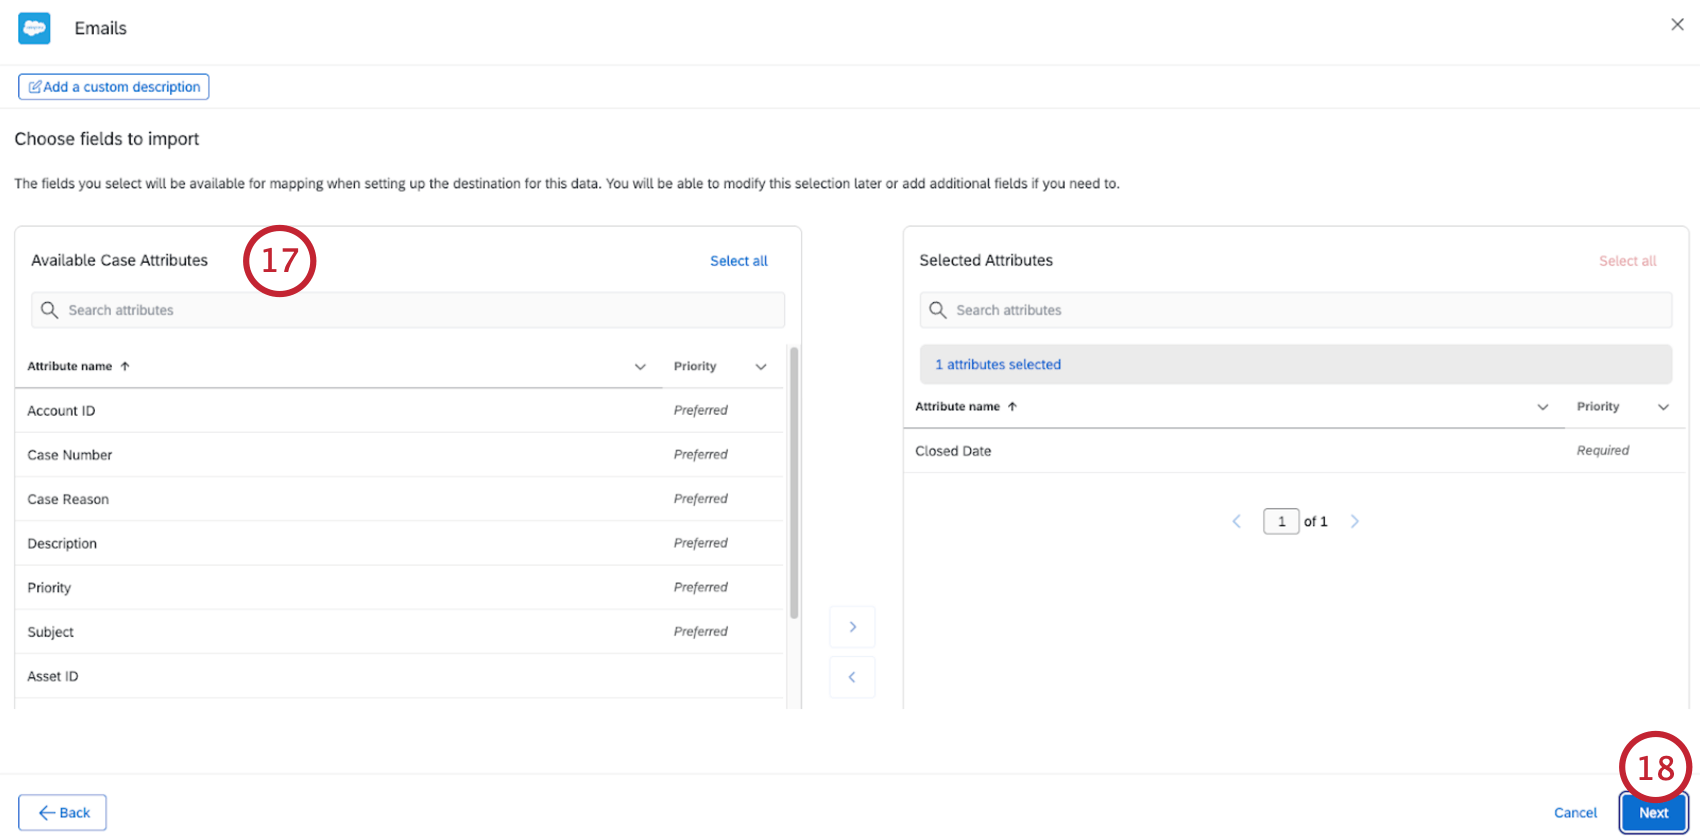
- On the next page of the extractor, you will see the Salesforce fields connected to the EmailMessage object in Salesforce.
Attention: Compound fields from Salesforce will not appear here since they cannot be imported to Qualtrics.
- The left side of the table contains optional fields that can be imported, if you’d like. Some fields are marked as “Preferred” since they can be useful in an OXM project.
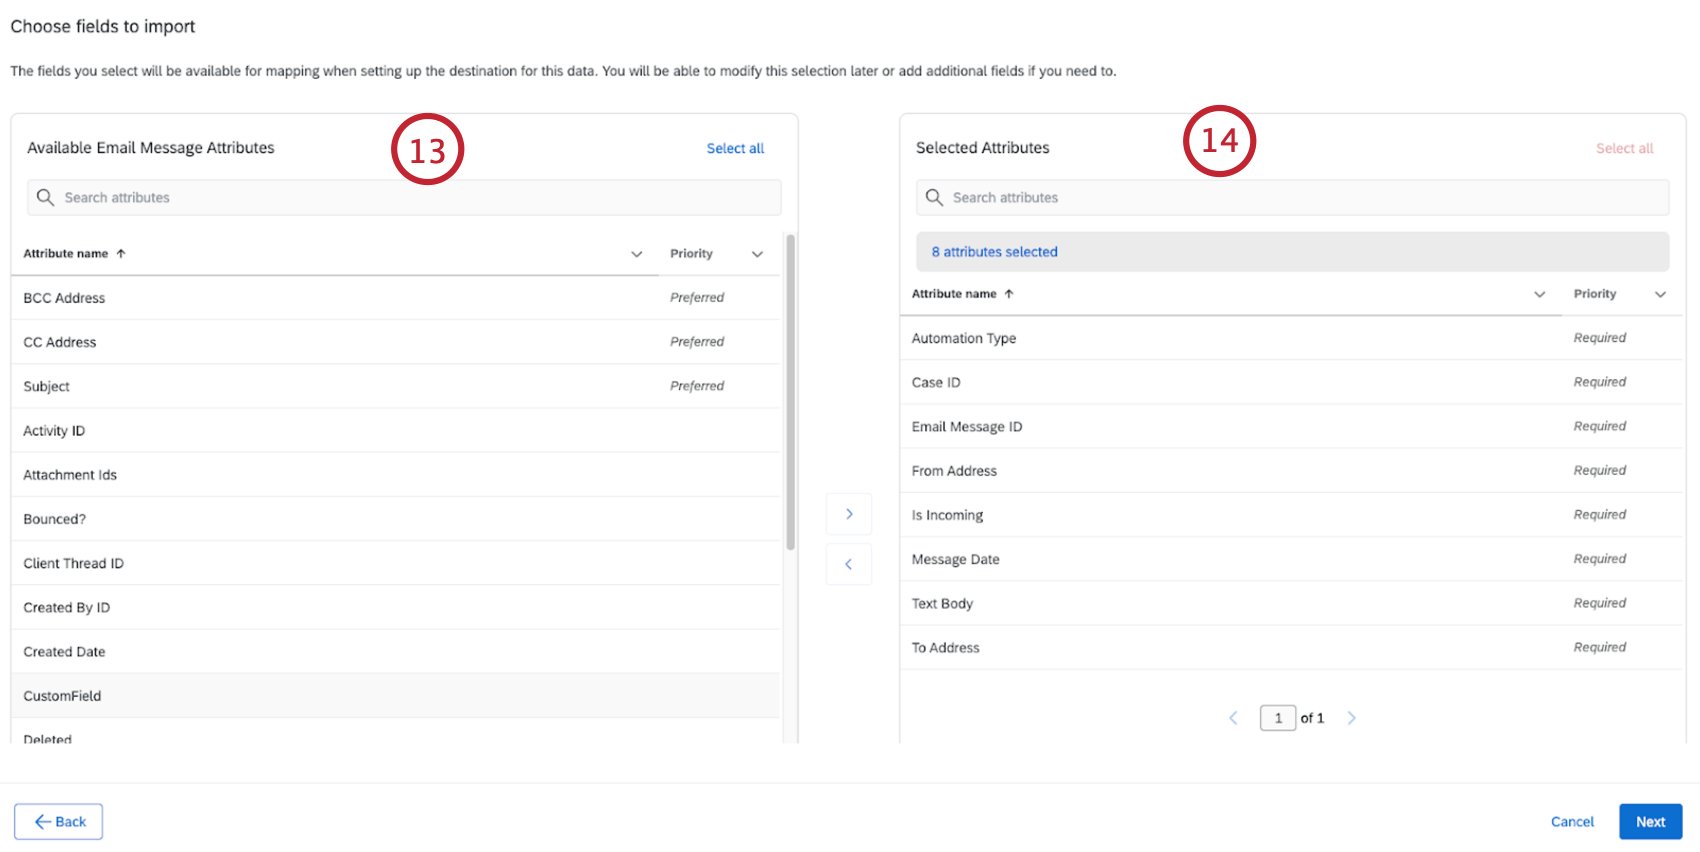
- The right side of the table has fields that will be imported into Qualtrics.
Qtip: Some attributes are required and will already be in this column. They cannot be removed.
- To move a field between the two sides of the table, click the field and then the arrow button. You can click on multiple fields to select them at the same time.
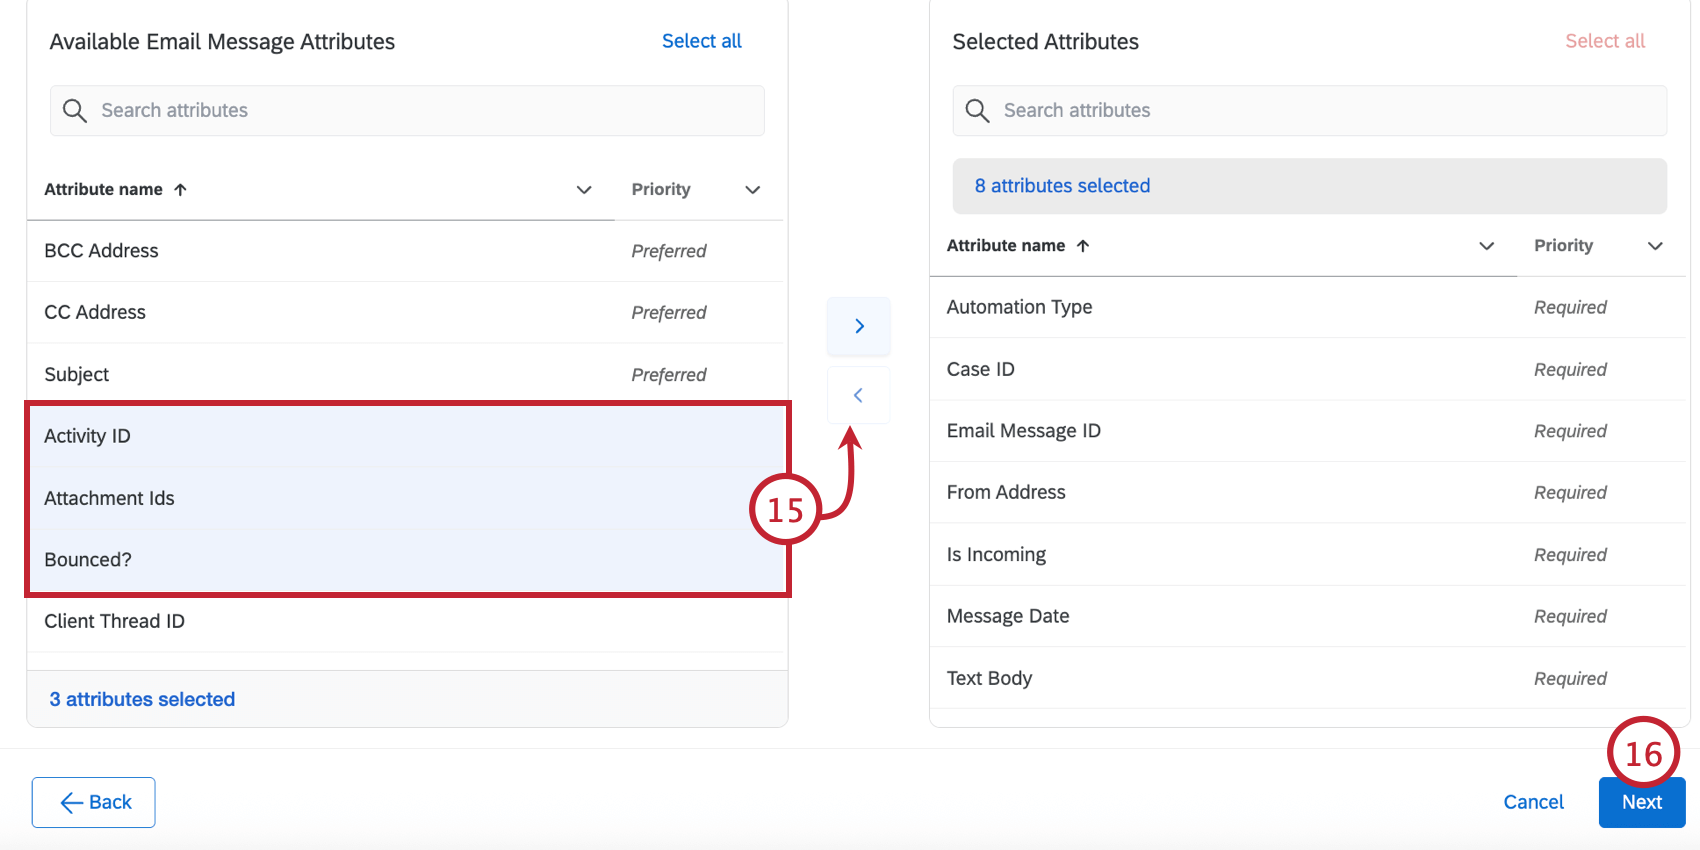
- Click Next.
- The next page contains Case fields. Only Cases with emails will be imported into Qualtrics. You can adjust the fields that are imported into Qualtrics using the same method as before.
- Click Next.
- The last page contains fields connected to the Account object (which is connected to the Case object in Salesforce via AccountId). You can adjust the fields that are imported into Qualtrics using the same method as before.
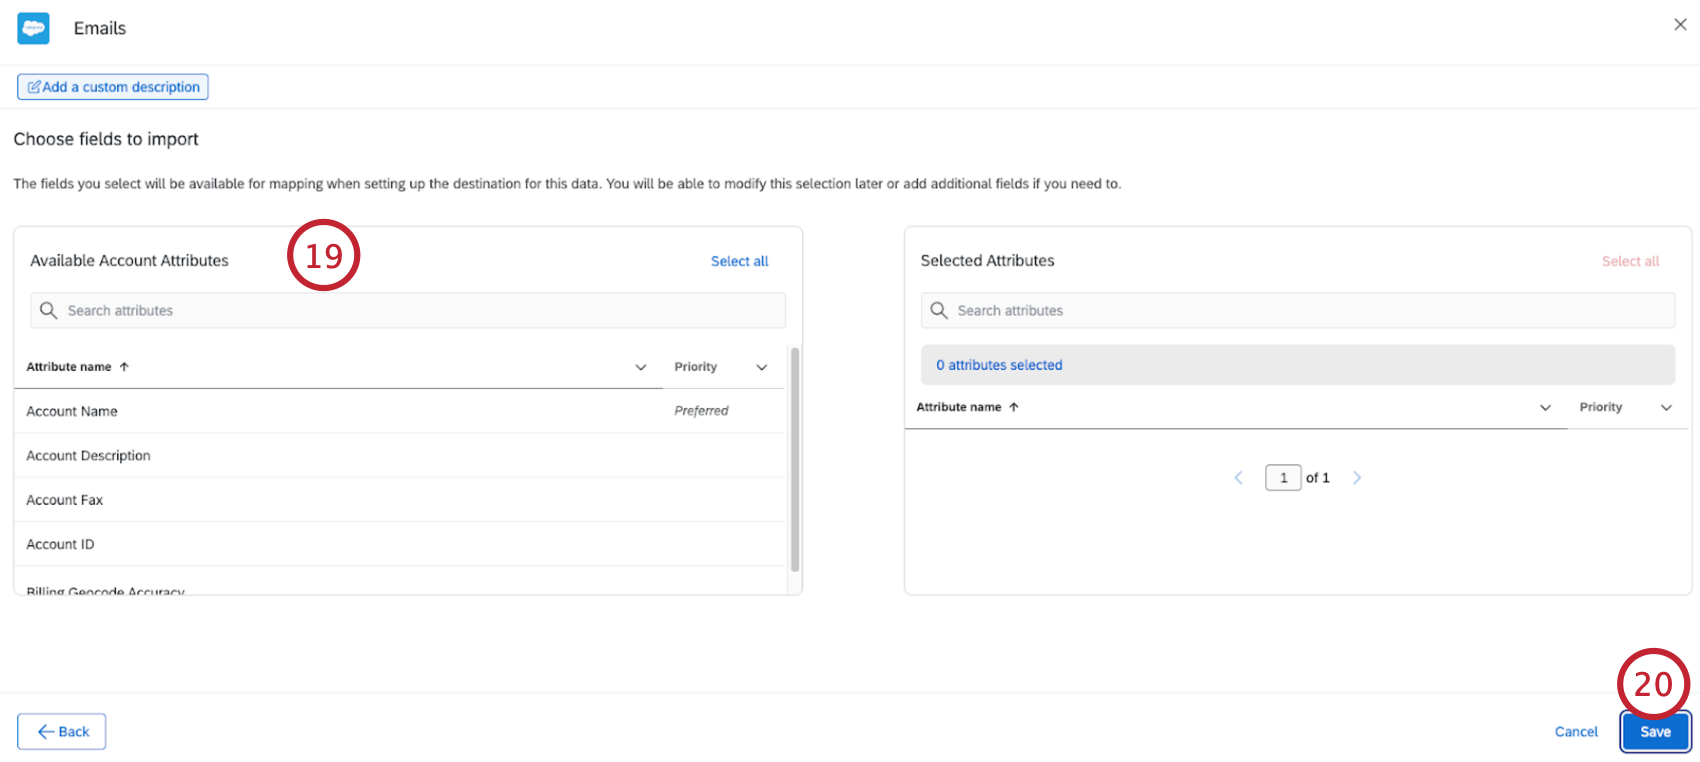
- Click Next.
- After extracting data from Salesforce, you must tell Qualtrics where to save the data with a data loader task. When extracting emails from Salesforce, you’ll use the Load Data to Conversational Analytics Task to load the data to an Email Data Project.
Extracting Report Data from Salesforce
This section covers how to extract data from Salesforce reports to use in Qualtrics.
- Create a new ETL workflow.
- Select Data source (ETL extractor).
- Search for the Salesforce Extractor task.
- Select Reports.
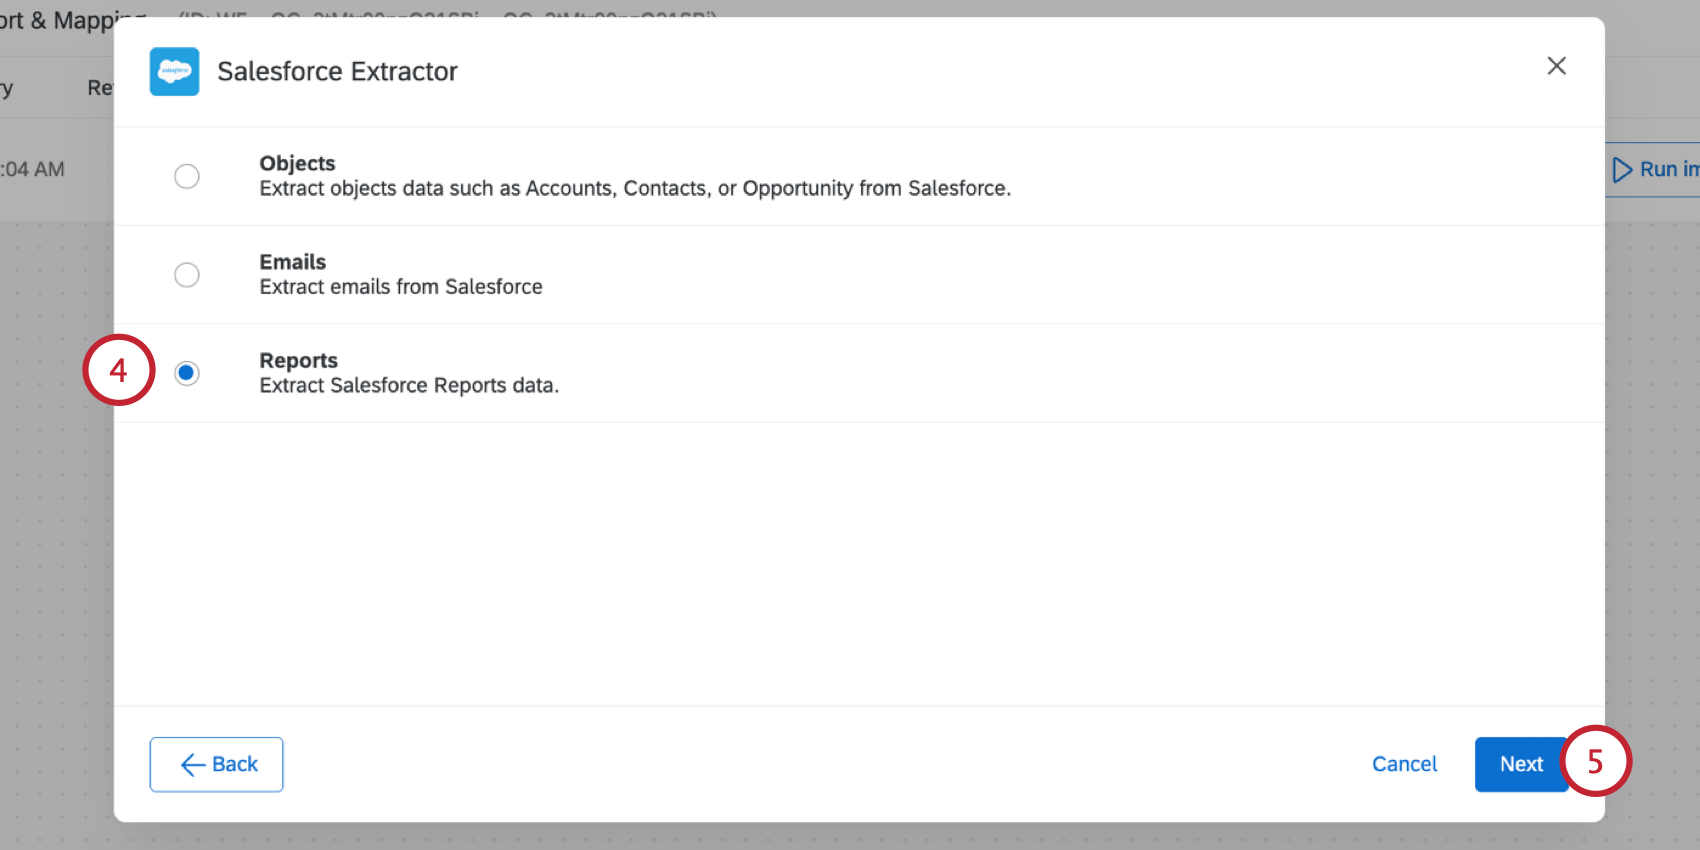
- Click Next.
- Select the Salesforce account to import data from.
- If you’d like to add a new Salesforce account, click Add a user account.
Qtip: Any Salesforce accounts you’ve previously connected as well as accounts set up by Brand Administrators will be available here.Attention: You may have up to 5 external connections to your Salesforce account for this task. If you add more than 5 connections, the oldest connection will be severed.
- Click Next.
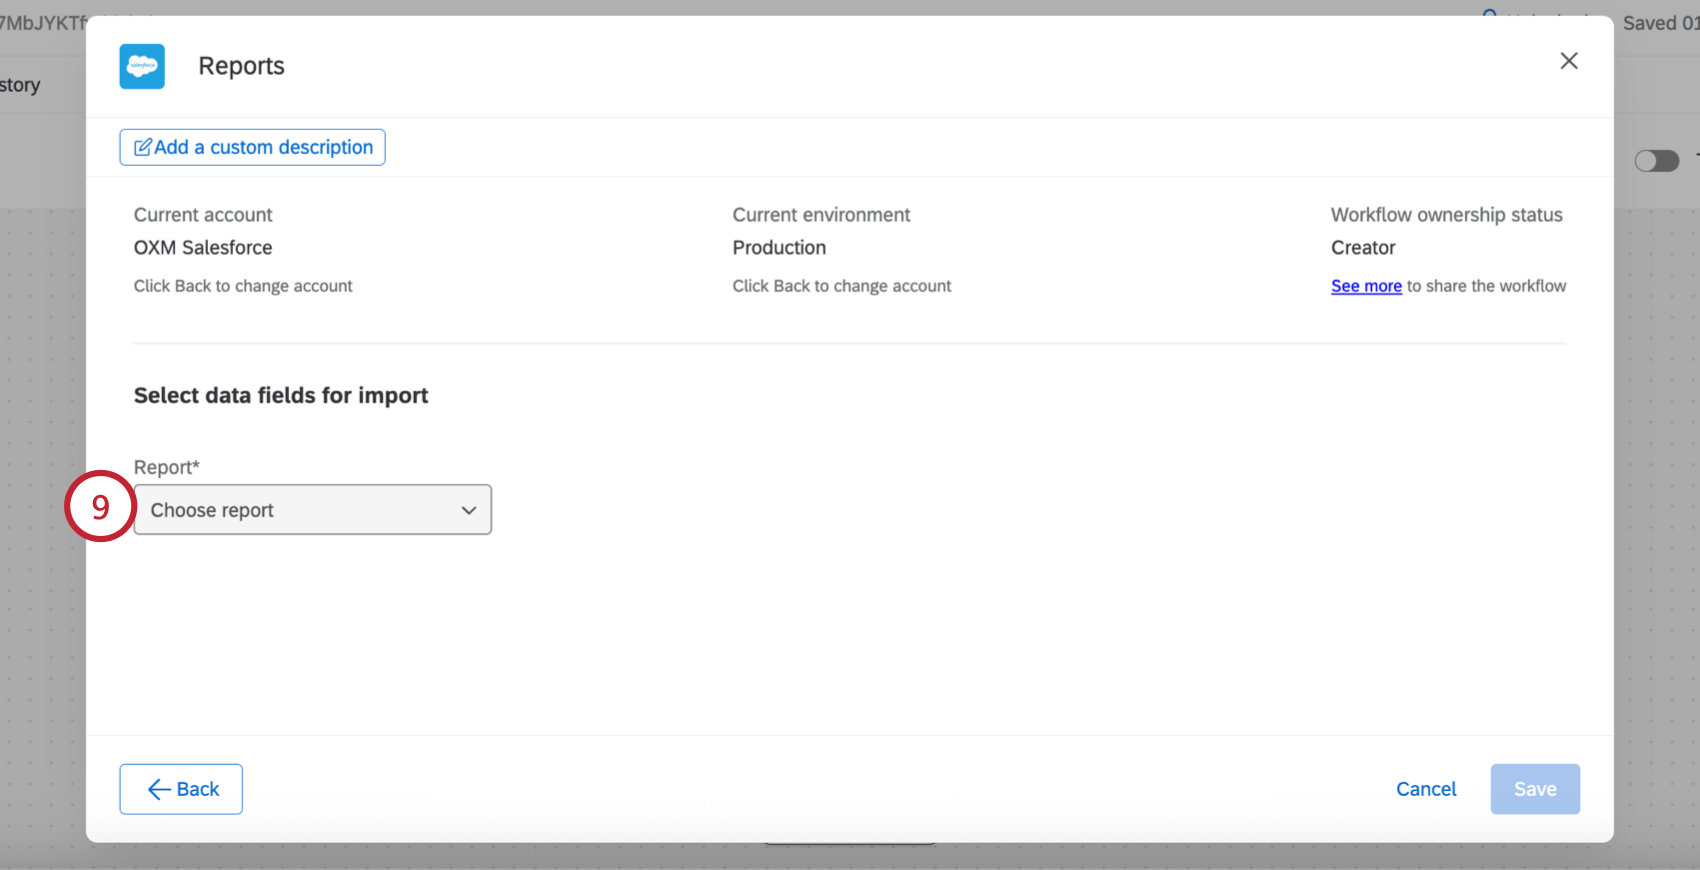
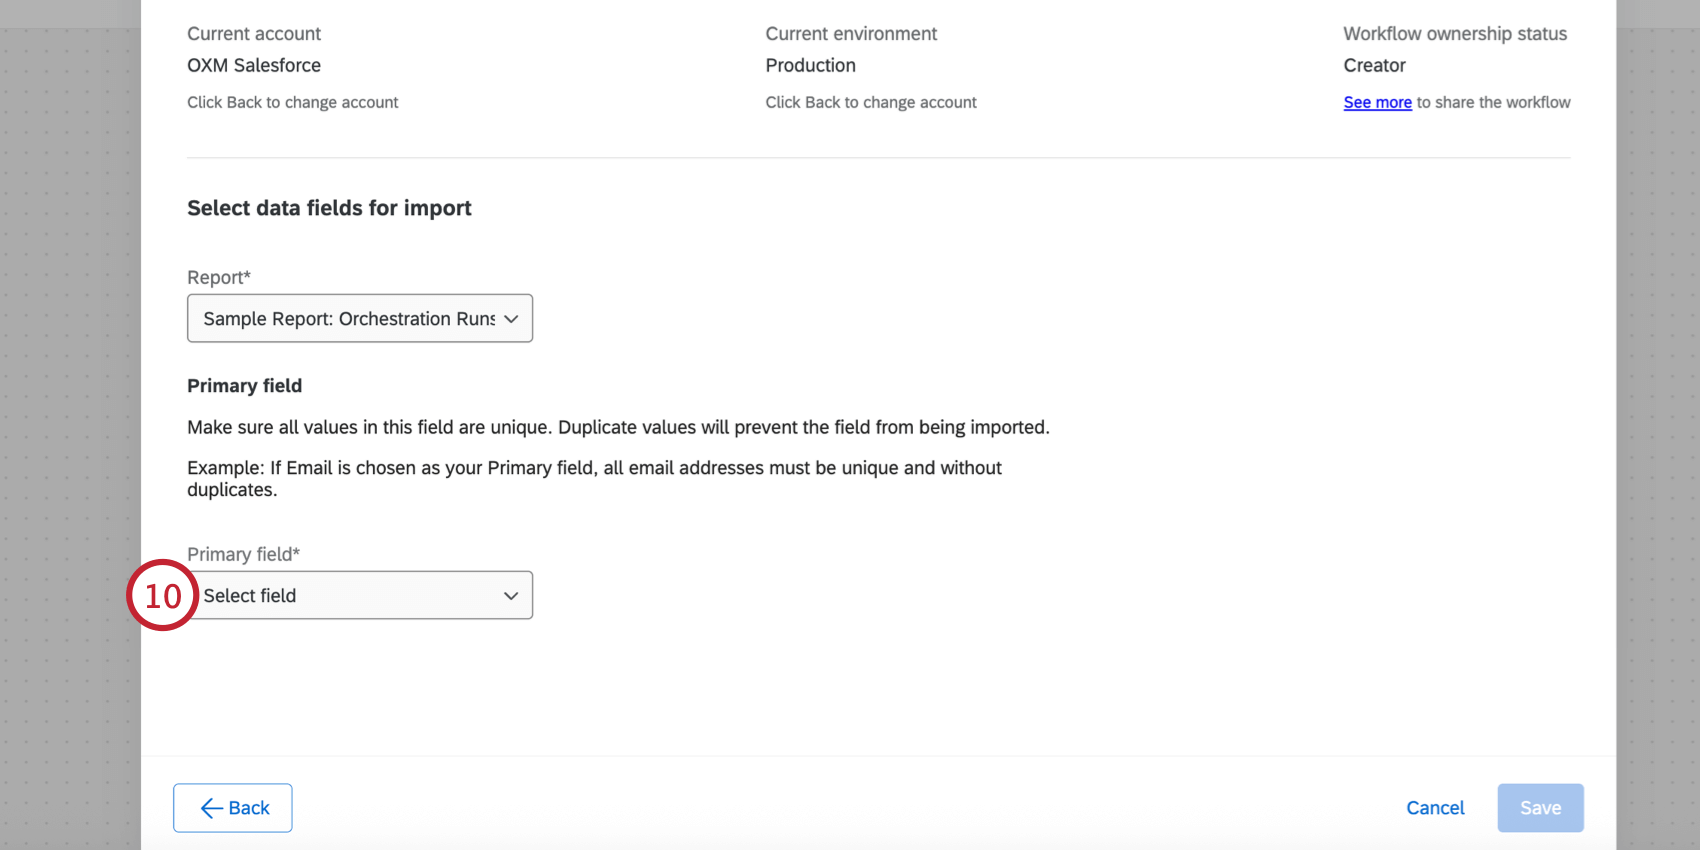
- Click Choose report to select a report to import data from.
- Select a Primary field for the import. All values for this field should be unique since this field is used to prevent duplicate data.
- To start adding additional fields, click Add field.
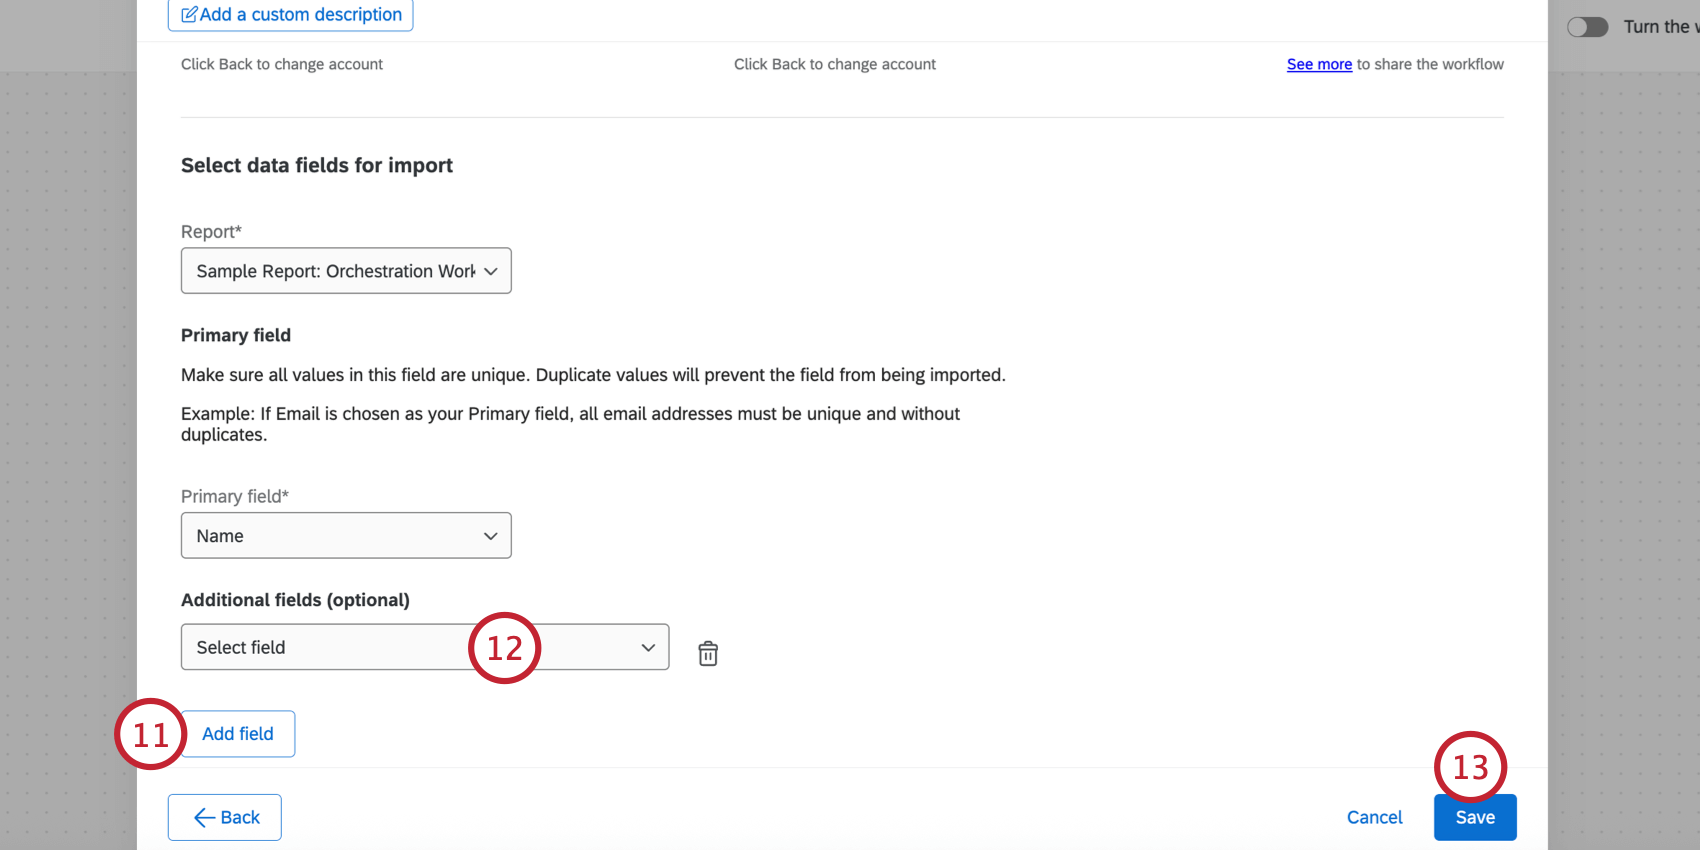
- Use the Select field dropdown menu to select a field to import. Repeat these steps for as many fields as needed.
Qtip: To remove a field from your mapping, click the trash can icon.
- Click Save.
Next, you’ll need to save your data to Qualtrics using a loader task. Typically, this is the “Add Contacts and Transactions to XM Directory” task.