-

Qualtrics Platform -

Customer Journey Optimizer -

XM Discover -

Qualtrics Social Connect
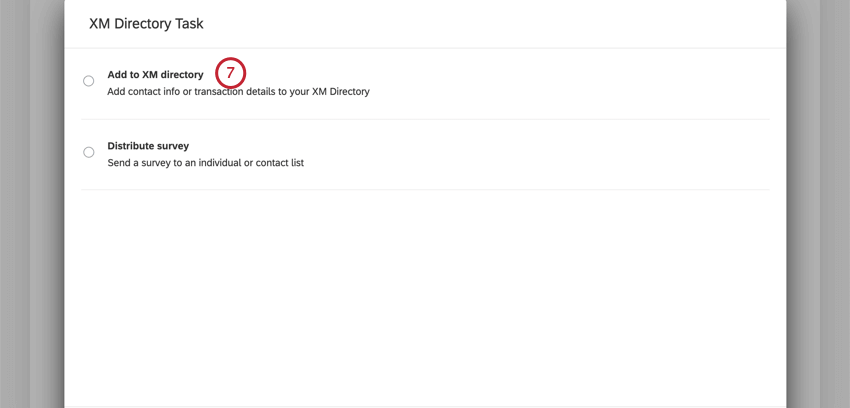
XM Directory Task
About the XM Directory Task
The XM Directory task allows you to save contact information and transactional data to your XM Directory. It also allows you to distribute a survey to individual recipients or contact lists from your XM Directory. This task is useful for sending follow-up surveys to respondents who’ve entered contact information in your survey as well as updating existing information for contacts already in your XM Directory.
Adding Contact Information with the XM Directory Task
The XM Directory task allows you to add attributes such as contact information and transactional data to contact entries in your XM Directory. The following section walks through how to configure this task.
- Go to the Workflows tab.
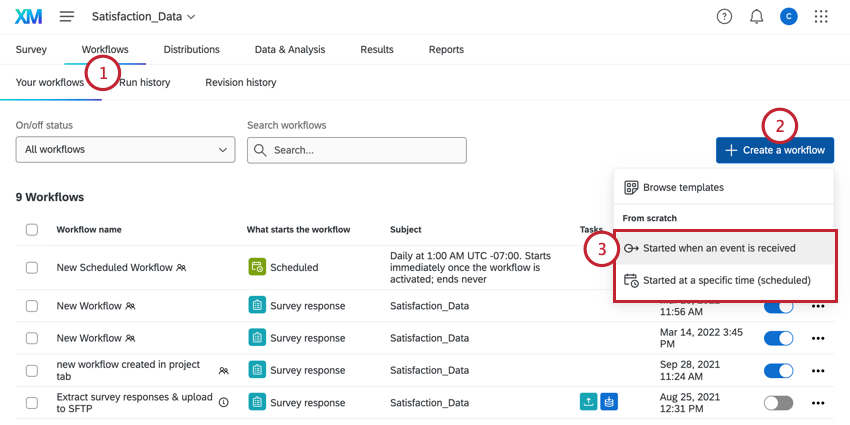
- Click Create a workflow.
- Determine whether the workflow should be scheduled or based on an event. This will be the source of the contact information.
Qtip: Choosing Event-Based and then choosing a survey response creation event is the most common, although you are free to select another choice.
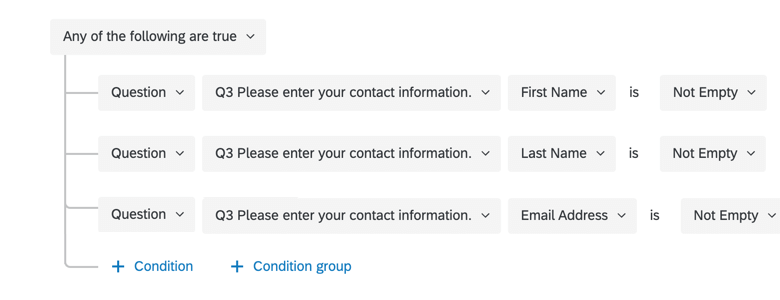
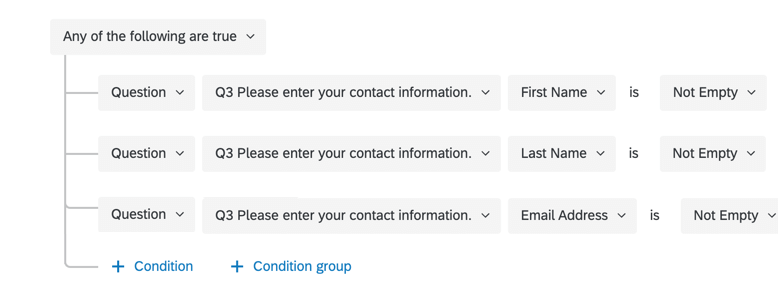
- If you’re creating an event-based workflow, click the plus sign ( + ) and then Add a condition to set the conditions under which the workflow is triggered.
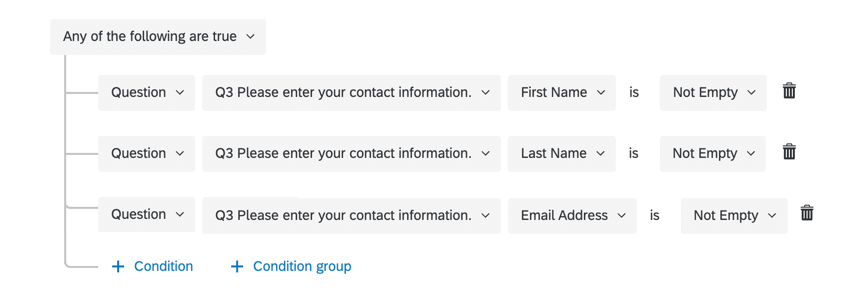
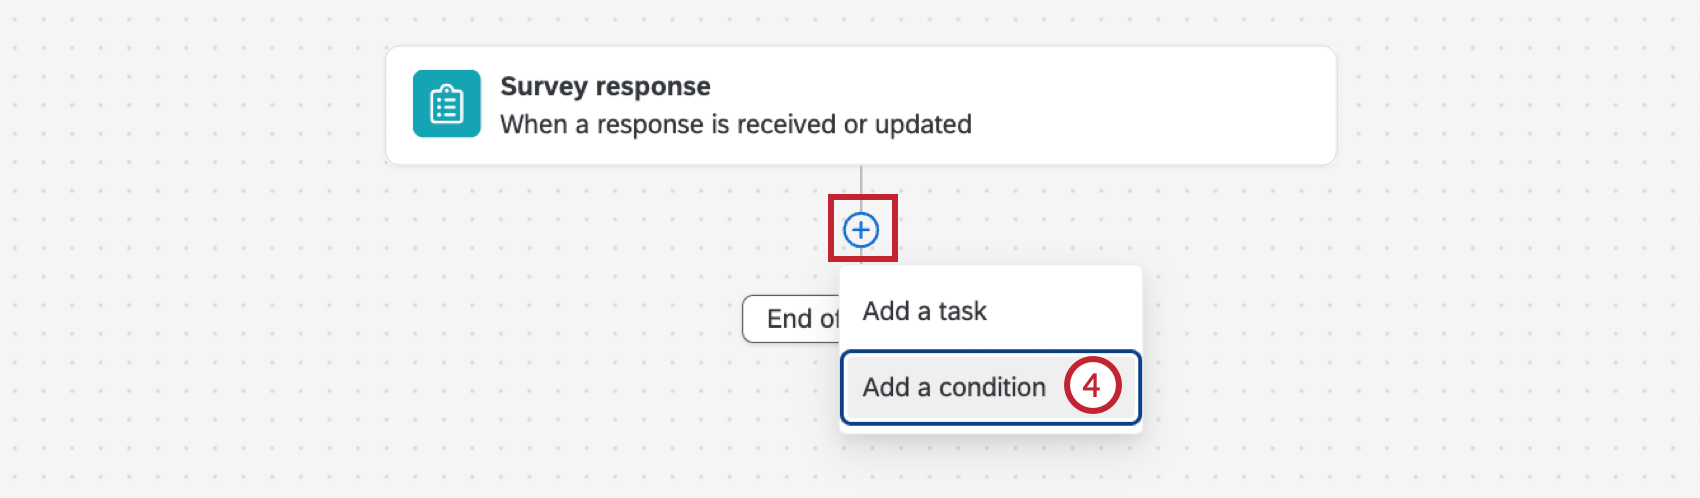 Example: In our survey, we’re asking respondents to fill out their contact information. We can then add conditions so that the workflow will only fire when the respondent has answered all of the questions asking for contact information.
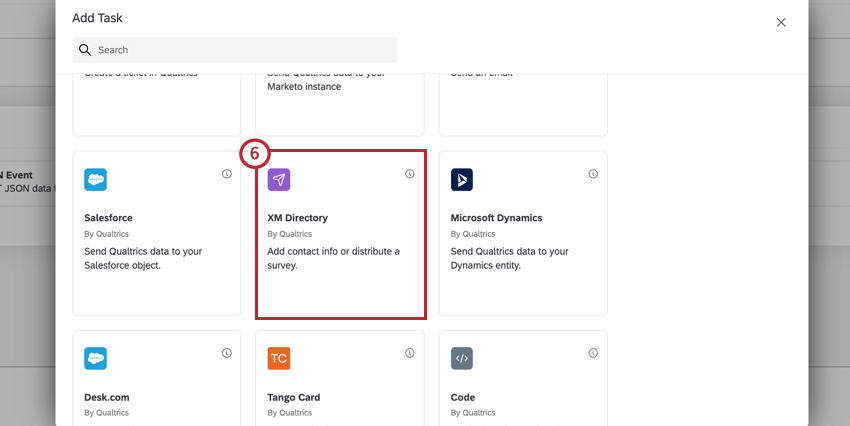
- Click the plus sign ( +) and then Add a task.

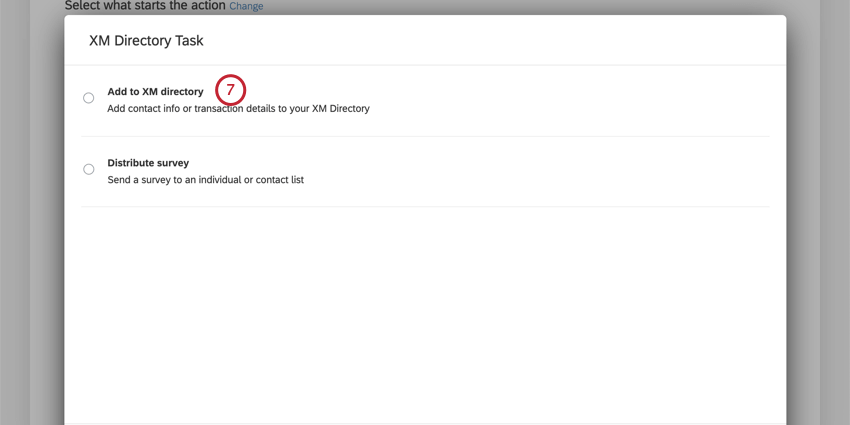
- Select the XM Directory Task.
- Select the Add to XM directory option to save and update contact information.
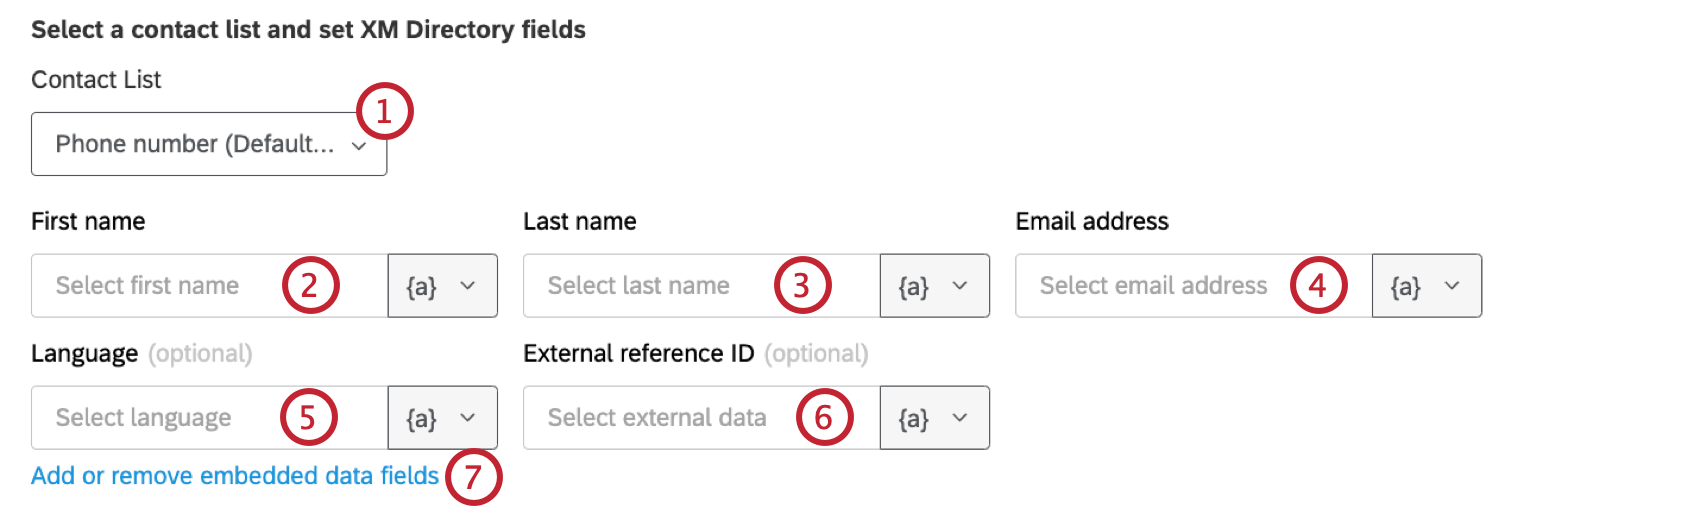
- Select a mailing list to save the contact information. You can create a new list or select an existing list.
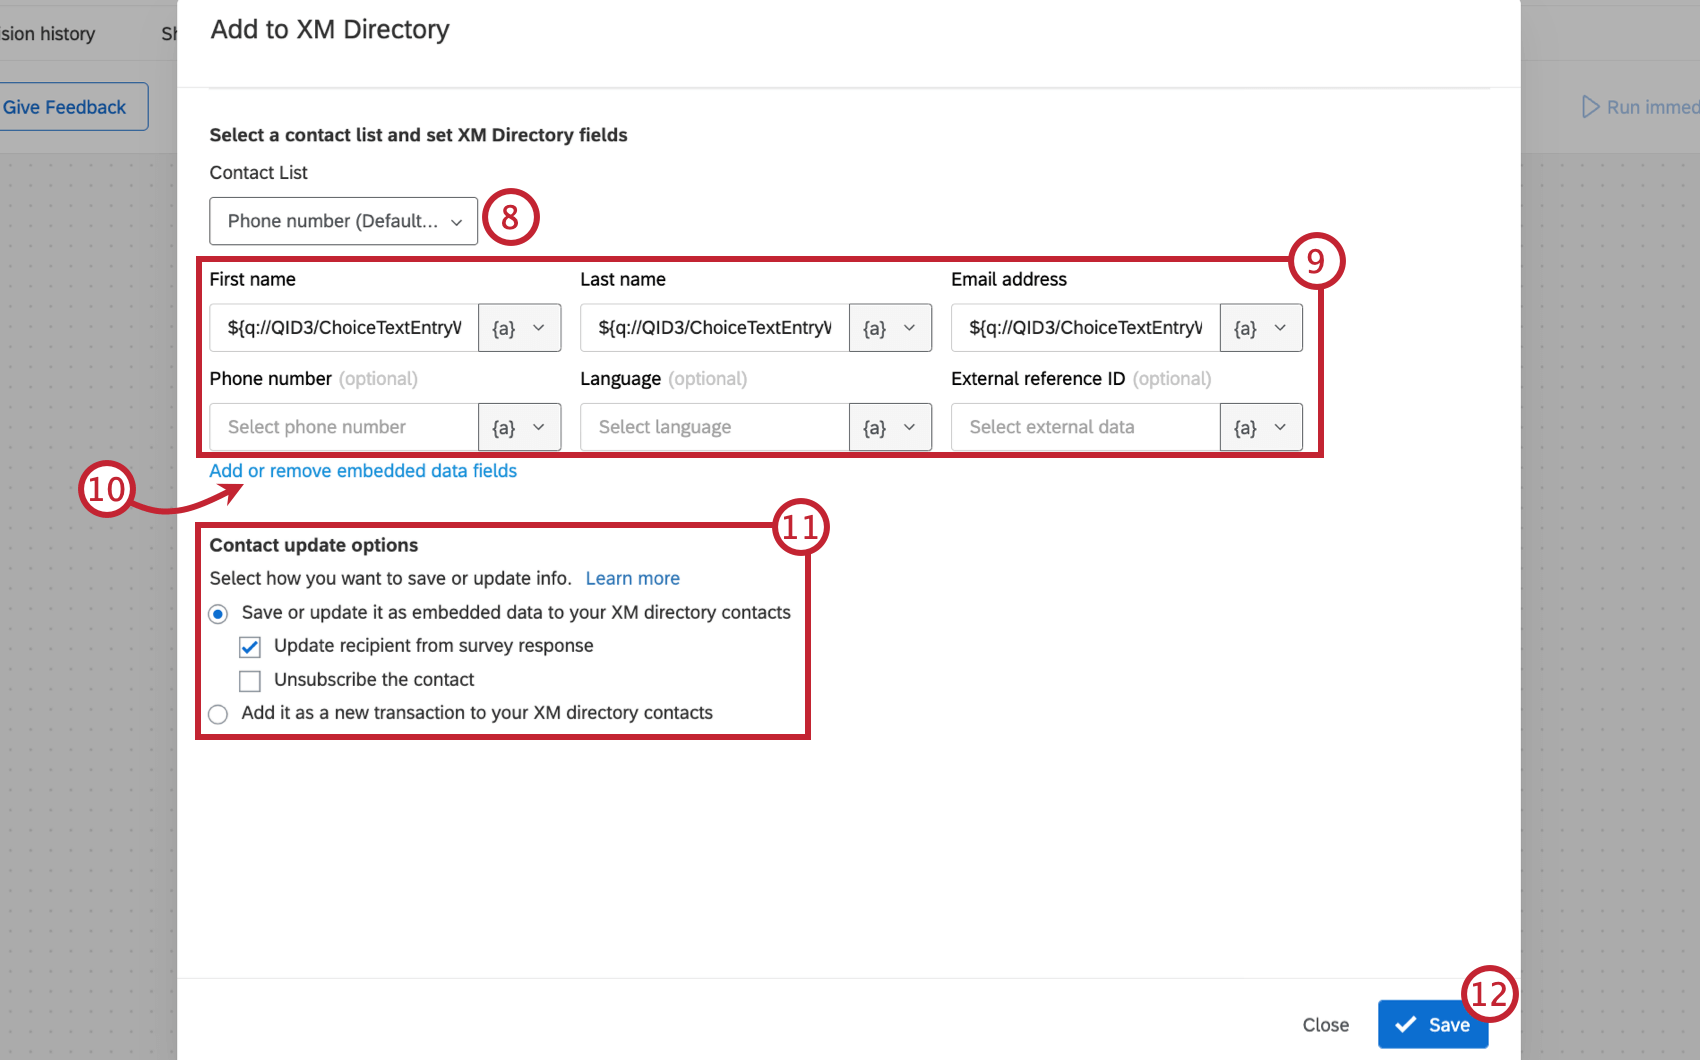 Qtip: If you have multiple directories, you can select a list from any directory in this step. The name of the directory the list belongs to is in parentheses after the list name. If you create a new list, it will be created in the default directory.
 - Enter in the contact information. First Name, Last Name, and Email Address are required. All other fields are optional.
Qtip: Use piped text to dynamically fill in the contact fields. Add piped text to your contact fields by clicking the {a} icon in each field box.
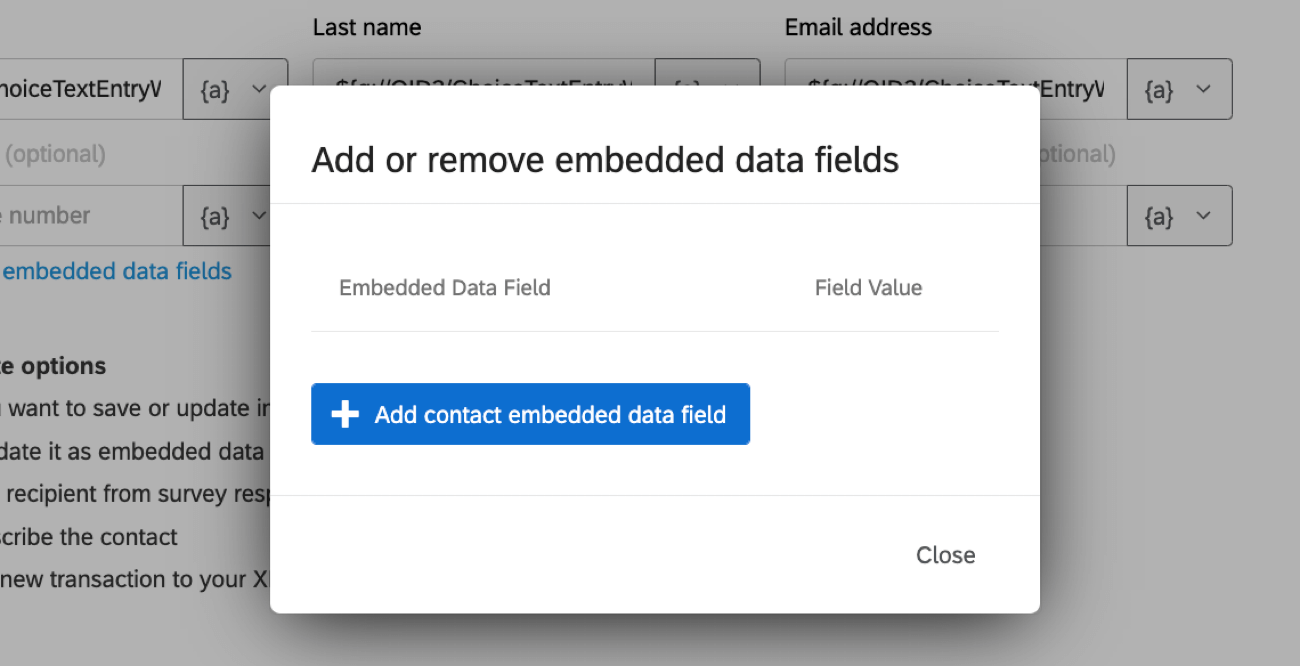
- If desired, click Add or remove embedded data fields to manage embedded data saved to your contact entry.
Qtip: In the Add or remove embedded data fields pop up window, use the Add contact embedded data field button to add more fields and the red X to delete fields. The name of the embedded data field goes into the Field Name box while the value of the field goes into the Value box. Use the {a} icon to insert piped text into your fields.
- Choose your Contact update option. This option decides how your contact’s data is saved.
- Save or update embedded data: This option saves your contact’s information as embedded data. If the contact does not exist in the contact list, they will be added as a new contact instead. When selected, 2 sub-options will appear:
- Update recipient from survey response: This option will update the contact’s information per their survey response’s data.
Qtip: This option is only available to users with access to XM Directory. In XM Directory Lite, new contacts will be added to the list whenever the task is triggered. You can always merge duplicates afterwards.
- Unsubscribe the contact: This option will opt out your contact from your mailing list.
- Update recipient from survey response: This option will update the contact’s information per their survey response’s data.
- Add as a transaction to the contact info: This option saves your contact’s information as transactional data.
Qtip: This option will only be available if you’re sending an individual distribution type or have had the contacts use an authenticator. Otherwise, information will not be linked to an existing contact, and a new contact will be created.Qtip: When this option is enabled, it will copy all embedded data saved to a contact, not just what you’ve configured in the task. We recommend having duplicate contacts merged automatically in your directory to prevent embedded data from becoming disorganized.
- Save or update embedded data: This option saves your contact’s information as embedded data. If the contact does not exist in the contact list, they will be added as a new contact instead. When selected, 2 sub-options will appear:
- Click Save.
Distribution Types
When distributing your survey with the XM Directory task, you can choose to send your survey to an individual contact or an entire contact list. Your chosen contact list can be static, or can dynamically change based on selected criteria. This section explains the different distribution types and their use cases.
Individual
The Individual option is useful if you:
- Distributed your original survey to several different contact lists.
- Did not distribute to a contact list, but asked the respondents to enter their email addresses or phone numbers in the survey.
Below you’ll find an explanation of each field available when distributing through the Individual method.
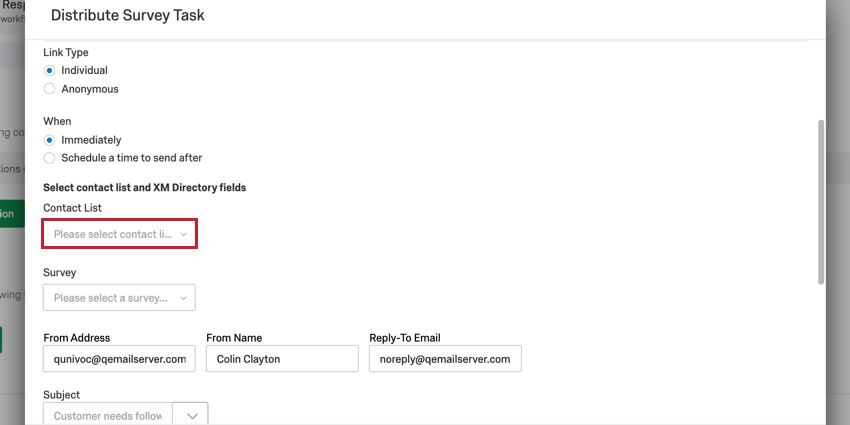
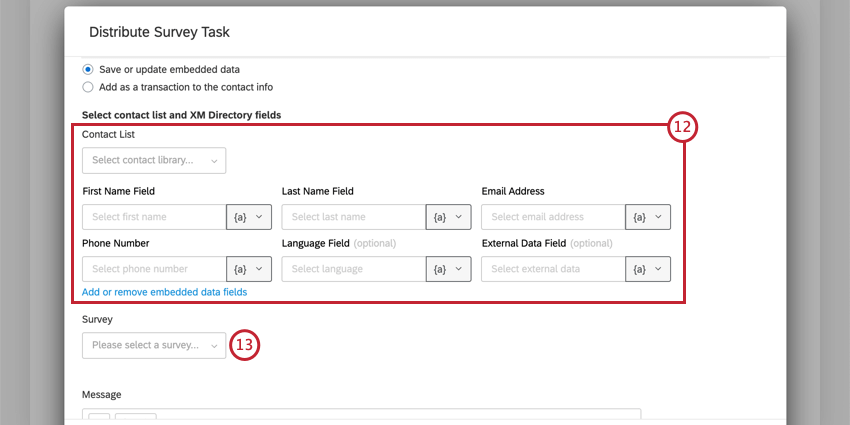
- Contact List: This field lets you save your recipients’ contact information to a contact list you own.
Qtip: You must fill out the Contact List field to use the XM Directory task.Qtip: If you have multiple directories, you can select a list from any directory in this step. The name of the directory the list belongs to is in parentheses after the list name. If you create a new list, it will be created in the default directory.
- First Name Field: This field is the recipient’s first name and is required.
- Last Name Field: This field is the recipient’s last name and is required.
- Email Address: The recipient’s email address that will receive your survey invitation. This field is required.
- Language Field: The recipient’s language code. This field is optional.
- External Reference ID Field: Extra information about the contact. This is most often used to store data such as an employee or student ID. This field is optional.
- Add or remove embedded data fields: This field lets you add or remove additional embedded data to your contact entry.
Qtip: The embedded data management window looks like the below image. Use the Add contact embedded data field button to add more fields and the red X to delete fields. The name of the embedded data field goes into the Field Name box while the value of the field goes into the Value box.
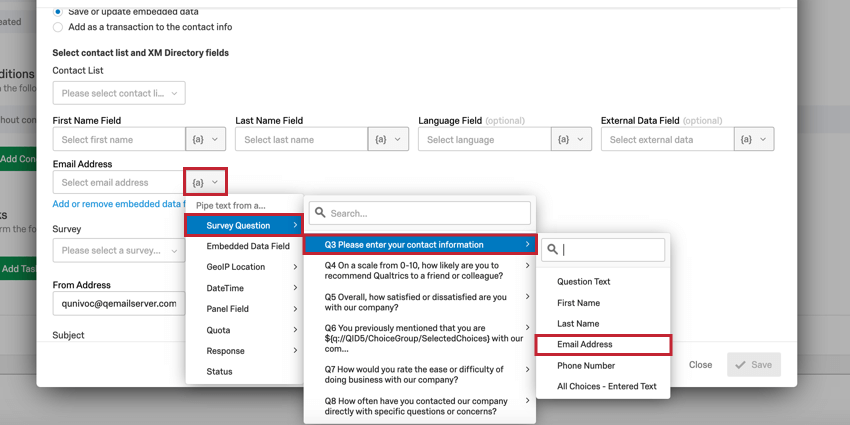
When configuring the fields for your Individual distribution type, you may want to have the recipient of your distribution to be dynamic. To create dynamic distributions that send to different recipients, you’ll use piped text to enter their contact information. The piped text menu is available by clicking the {a} icon in the field’s box.
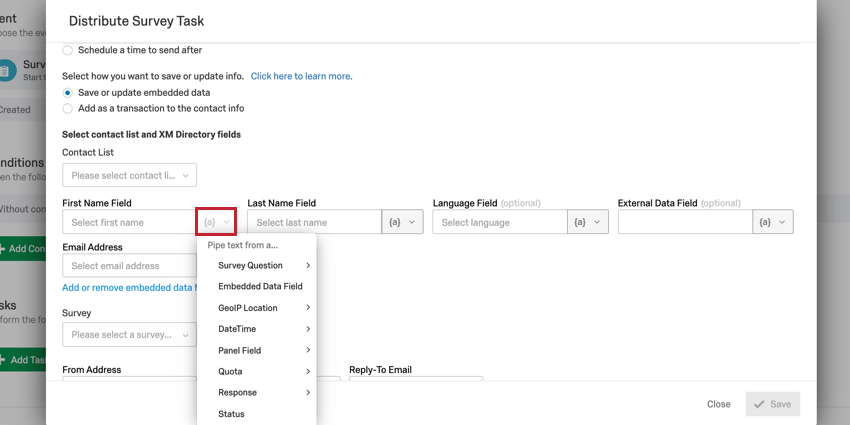
- If you distributed the original survey through an email, you can select Panel Field -> Recipient Email to automatically choose the recipient’s email.
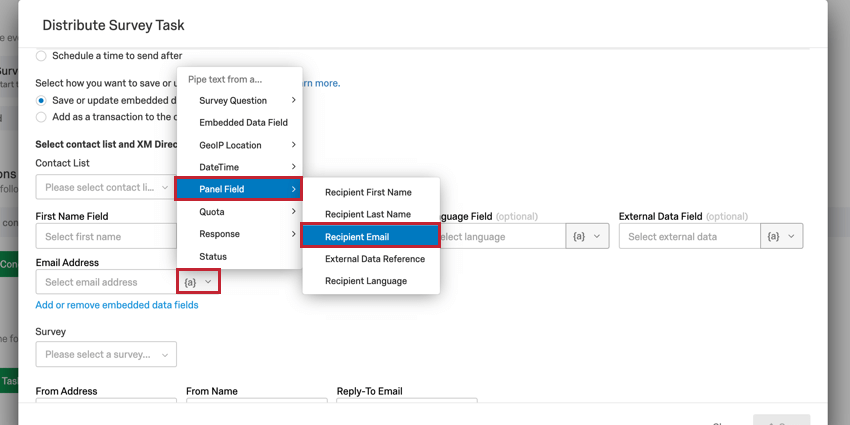
- If you distributed the original survey through SMS, you can select Embedded Data and enter the name of the phone number field name (usually Phone) to automatically choose the recipient’s phone number.

- If you asked for contact information in the survey, you can select Survey Question to select the question where the user entered their information.
Contact List
The Contact List option will distribute to an entire contact list of your choosing. Use the dropdown menu to select the desired list.
Make sure all the contacts you’d like to reach are in 1 list, or you will need to make multiple XM Directory tasks.
Dynamic Contact List
The Dynamic Contact List option is used when you are distributing to a contact list, but need to be able to dynamically change what contact list receives the survey. To use this option, you need to make sure that the desired contact list’s library ID and mailing list ID are accessible to the task.
When using this option, you need to provide 2 IDs:
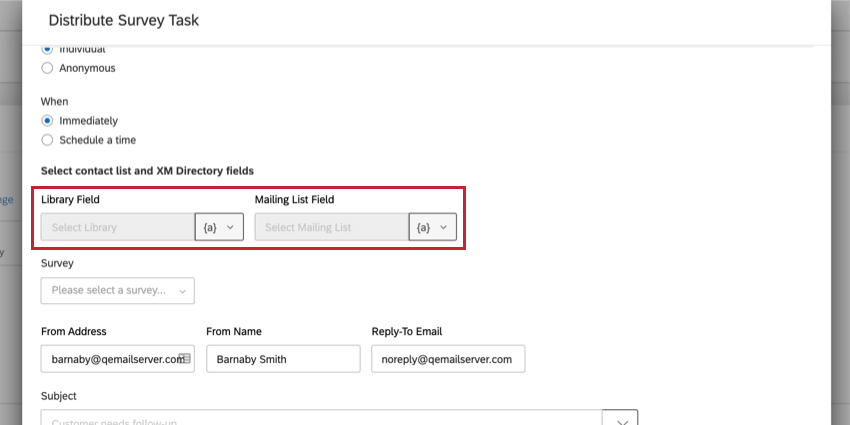
- Library Field: This is the ID of the directory that the contact list is saved in.
- Mailing List Field: This is the ID of the specific mailing list.
To capture values for these fields, click the piped text icon, {a}, and select the field that contains this information.
Sending Email Distributions with the XM Directory Task
The XM Directory task can be used to distribute surveys via email to respondents. The following section walks through how to set up this task.
- Go to the Workflows tab.
- Click Create a workflow.
- Determine whether the workflow should be scheduled or based on an event. This will be the cause of your email distribution.
Qtip: Choosing Started when an event is received and then choosing a survey response creation event is the most common, although you are free to select another choice.
- Click the plus sign ( + ) and select Add a condition to set the conditions under which the workflow is triggered.
Example: In our survey, we’re asking respondents to fill out their contact information. We can then add conditions so that the workflow will only fire when the respondent has answered all of the questions asking for contact information.
- Click the plus sign ( + ) and choose Add a task.
- Select the XM Directory task.
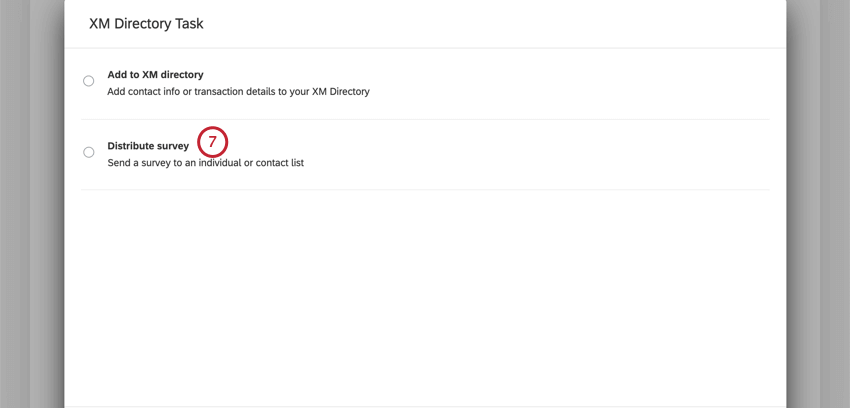
- Select the Distribute survey option.
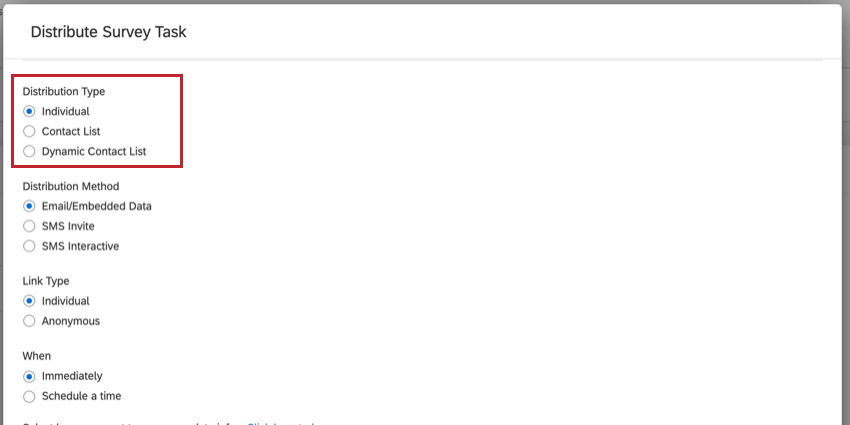
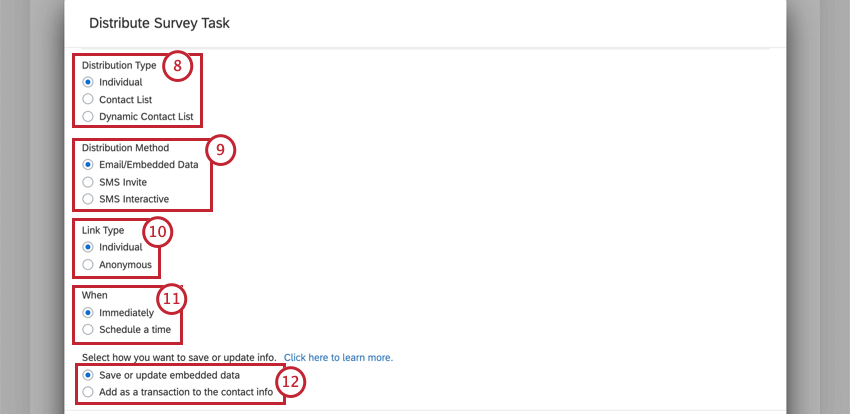
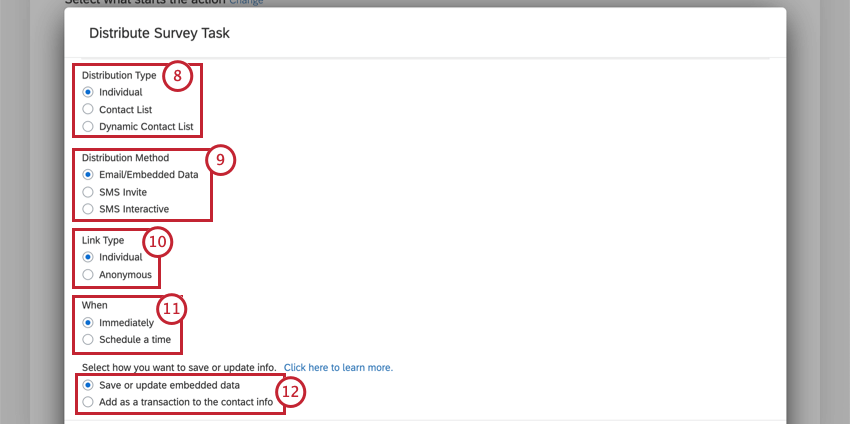
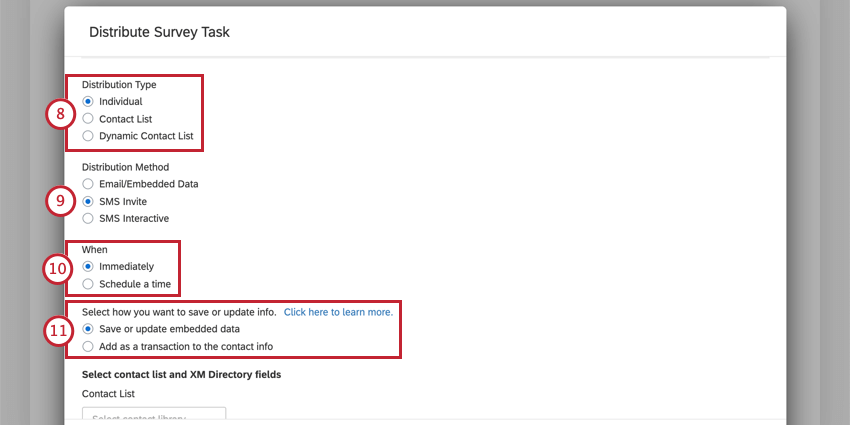
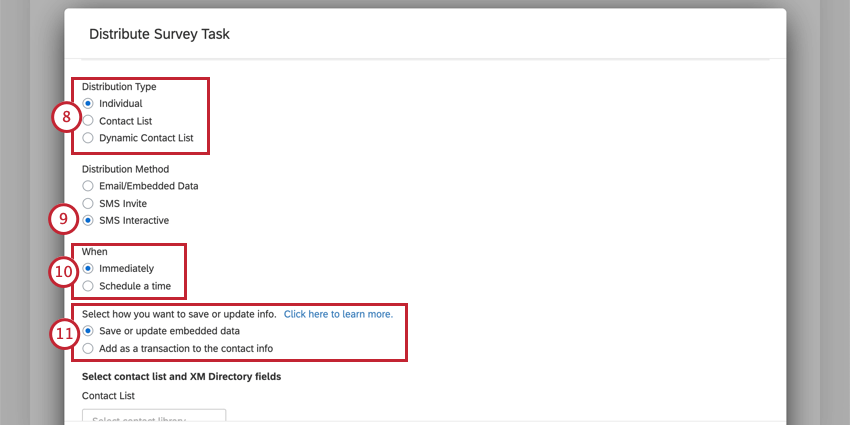
- Choose your Distribution Type. You can send your survey to an Individual contact, to an entire Contact List, or to a Dynamic Contact List. Explanations of each distribution type can be found in the Distribution Types section.
 Qtip: If you have multiple directories, you can select a list from any directory in this step. The name of the directory the list belongs to is in parentheses after the list name. If you create a new list, it will be created in the default directory.
 - Select Email/Embedded Data as your distribution method.
- Choose the type of link that is sent. You can send an individual link or an anonymous link. Both of these links expire 90 days after being sent.
- Choose when the survey will send. You can set the survey to send Immediately when the workflow fires or Schedule a time to send after.
Qtip: If Schedule a time to send after is selected without a specifying a time, the email will send at the time of the executed workflow after the number of days indicated.
- Select how you want to save contact information to your directory. You can Save and update embedded data or Add as a transaction to the contact info.
Qtip: This option will only be available if you’re sending an Individual distribution type.
- Configure who will receive the survey invitation. First Name, Last Name, and Email Address are required. The setup you complete here will depend on your selected distribution type. See the Distribution Types section for more information about each type’s specific setup.
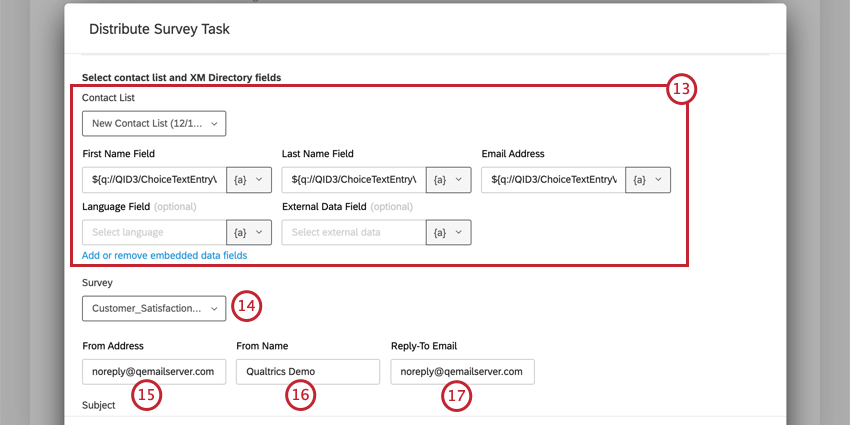
- Select the survey you’d like to distribute.
- Enter the From Address. This is the email address from which the invitation will send.
Qtip: To send from a custom “From” domain, a Brand Administrator must configure the domain for use within Qualtrics.
- Choose a From Name. This is the name that will appear in your recipient’s inbox.
- Enter a Reply-To Email. Any replies to your survey invitation will be sent to this address.
- Create a subject line for your email by typing in the Subject box. You can also load a saved subject line from your message library by clicking the dropdown arrow next to the subject line field.
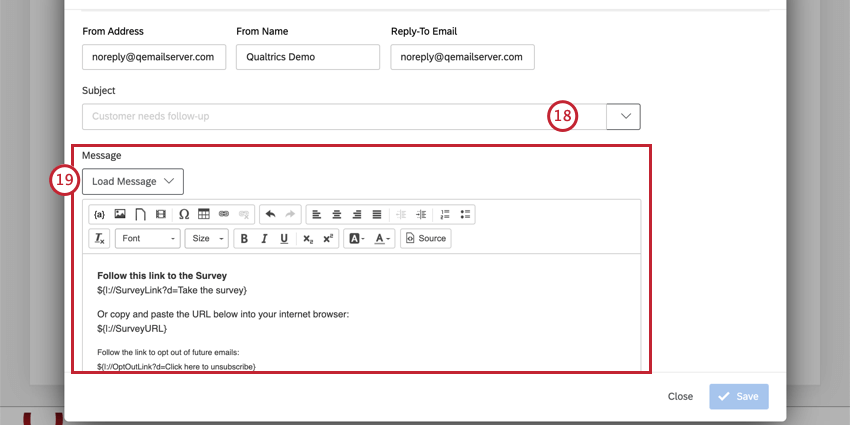
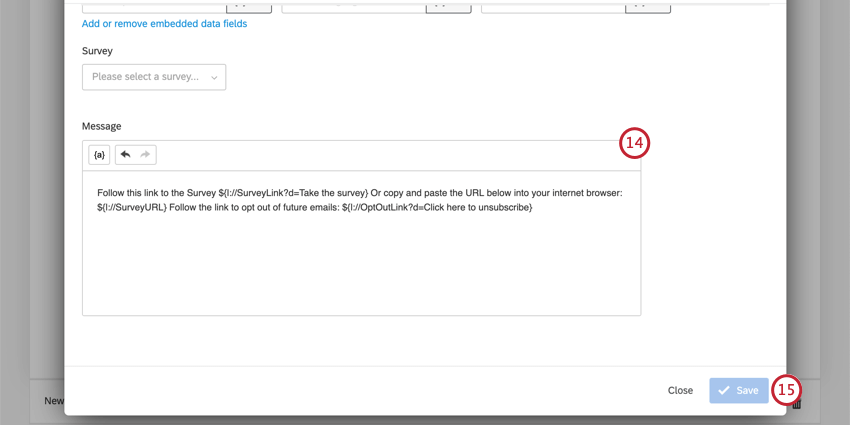
- Write your email message. You can use the Load Message dropdown to use something from your library, or you can write a new message in the space provided.
Qtip: Check out the Customizing Your Email with Piped Text page for tips on how to make a survey invitation that’s individualized to each respondent.Qtip: Messages loaded from your library will dynamically pull in translations, if you’ve set these up in your message library. Only general messages can be used here.Attention: If you are including images in your email message, you must insert the images through the image icon in the rich content editor. You will be able to choose any images saved in your library. If you manually paste an image into your email message, the task will fail.
- Determine how long the link should last. This is the number of days after which the link is created that it can no longer be used to access the survey.
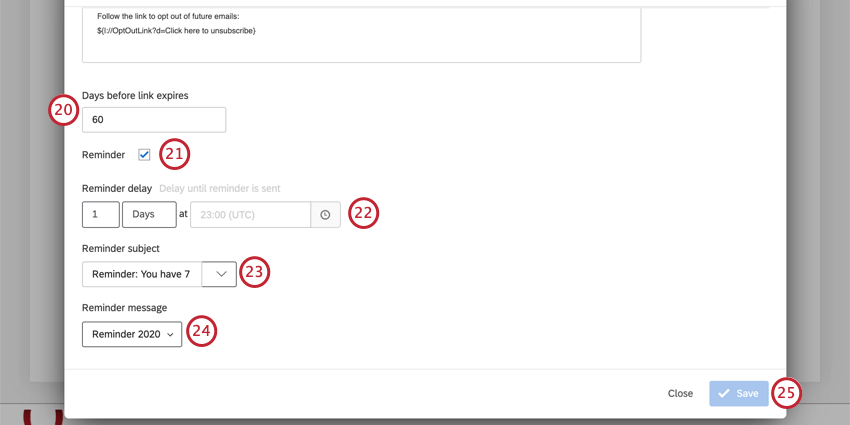 Qtip: The maximum time frame for link expirations is 180 days.Qtip: Link Expirations cannot be changed or undone. Note that this is separate from the Survey Availability (which can always be changed or undone) or Incomplete Survey Response settings (which cannot be changed or undone). See Distribution and Survey Expirations for a more detailed comparison of the 3.
 - If desired, enable the checkbox for Reminder to schedule a reminder email to send to all unfinished respondents.
- Choose the Reminder delay, which is when the reminder will send. This delay is the number of days since the response that triggered the workflow was recorded. Your reminder delay must be further in the future than when the initial invitation sends.
Example: Let’s say I set my initial invitation to send after 2 days. If I want the respondent to receive a reminder a week later, I would set the reminder delay to 9 days.
- Type a Reminder subject line in the box. You may also select a saved message from your message library by clicking the arrow to the right of the box.
- Load a Reminder message from your message library.
- Click Save.

Sending SMS Distributions with the XM Directory Task
The XM Directory task can be used to send survey invitations via SMS to respondents. This sends respondents a survey link via SMS that opens your survey in their mobile browser. The following section walks through how to set up this task.
- Go to the Workflows tab.
- Click Create a workflow.
- Determine whether the workflow should be scheduled or based on an event. This will be the cause of your SMS distribution.
Qtip: Choosing Started when an event is received and then choosing a survey response creation event is the most common, although you are free to select another choice.
- Click the plus sign ( + ) and select Add a condition to set the conditions under which the workflow is triggered.
Example: You may have a contact list that contains some entries without a phone number. To exclude contacts without a phone number from your SMS survey, create a condition for the task to fire only when the embedded data field Phone is not empty.
- Click the plus sign ( + ) and choose Add a task.
- Select the XM Directory task.
- Select the Distribute survey option.
- Choose your Distribution Type. You can send your survey to an Individual contact, to an entire Contact List, or to a Dynamic Contact List. Explanations of each distribution type can be found in the Distribution Types section.
 Qtip: If you have multiple directories, you can select a list from any directory in this step. The name of the directory the list belongs to is in parentheses after the list name. If you create a new list, it will be created in the default directory.
 - Select SMS Invite as your Distribution Method.
- Choose when your survey will send. You can set the survey to send Immediately when the workflow fires or Schedule a time to send after.
Qtip:If Schedule a time to send after is selected without a specifying a time, the email will send at the time of the executed workflow after the number of days indicated.
- Select how you want to save contact information to your directory. You can Save and update embedded data or Add as a transaction to the contact info.
Qtip: This option will only be available if you’re sending an Individual distribution type.
- Determine who will receive the survey invitation. First Name, Last Name, Email Address, and Phone Number are required. The setup you complete here will depend on your selected distribution type. See the Distribution Types section for more information about each type’s specific setup.
- Choose the survey you’d like to distribute.
- Compose your SMS invitation message.
- Click Save.
Survey invitations sent through this method do not expire. The links will remain valid until: your survey expires, you manually pause response collection, or you close your survey.
Sending 2-Way SMS Distributions with the XM Directory Task
The XM Directory task can be used to send 2-Way SMS surveys to respondents. The respondent takes the survey by responding to survey questions sent to them via SMS. This section walks through how to set up this task.
For SMS interactive surveys, or “2-way SMS” to work, you have to build a compatible survey. Learn more about what features you can use in the Survey Design section of the SMS Distributions support page.
- Go to the Workflows tab.
- Click Create a workflow.
- Determine whether the workflow should be scheduled or based on an event. This will be the cause of your SMS distribution.
Qtip: Choosing Started when an event is received and then choosing a survey response creation event is the most common, although you are free to select another choice.
- Click the plus sign ( + ) and choose Add a condition to set the conditions under which the workflow is triggered.
Example: You may have a contact list that contains some entries without a phone number. To exclude contacts without a phone number from your SMS survey, create a condition for the task to fire only when the Embedded Data field Phone is not empty.
- Click the plus sign ( + ) and choose Add a task.
- Select the XM Directory task.
- Select the Distribute Survey option.
- Choose your Distribution Type. You can send your survey to an Individual contact, to an entire Contact List, or to a Dynamic Contact List. Explanations of each distribution type can be found in the Distribution Types section.
 Qtip: If you have multiple directories, you can select a list from any directory in this step. The name of the directory the list belongs to is in parentheses after the list name. If you create a new list, it will be created in the default directory.
 - Select SMS Interactive for your distribution method.
- Choose when your survey will send. You can set the survey to send Immediately when the workflow fires or Schedule a time to send after.
Qtip:If Schedule a time to send after is selected without a specifying a time, the email will send at the time of the executed workflow after the number of days indicated.
- Select how you want to save contact information to your directory. You can Save and update embedded data or Add as a transaction to the contact info.
Qtip: This option will only be available if you’re sending an Individual distribution type.
- Determine who will receive the survey invitation. First Name, Last Name, Email Address, and Phone Number are required. The setup you complete here will depend on your selected distribution type. See the Distribution Types section for more information about each type’s specific setup.

- Select the survey you’d like to distribute.
- Click Save.
Note that respondents are given 48 hours to respond to 2-way SMS. After 48 hours, if a respondent tries to respond to the initial text, they will receive the message, “You are not currently taking a survey,” and the response will not be saved, nor will the respondent be able to progress through the rest of the survey.
Transactional Data and the XM Directory Task
The XM Directory task allows you to update the transaction data of a contact. Transactions are saved in the contact’s transactional data.
When using the XM Directory task, you can distribute to a specific transaction of a contact. This means if the value of a field is overwritten before the respondent can take the survey, the respondent will still see the initial value of the field as opposed to the updated version. See the sections on sending emails, sending SMS surveys, or sending 2-way SMS surveys for information about how to set up your survey distribution using this task.
Example: Let’s run through the following scenario as an example of using transactional data.
- You have a customer who calls your support team on Monday and you save the name of the support representative they worked with in the transactional data field “Support Rep”.
- You schedule a XM Directory task to send the customer a survey 3 days later about their support interaction. You can begin the workflow using a JSON event that’s integrated with your CRM.
- The next day, on Tuesday, the same customer calls your support team again with a separate issue and they speak to a different support representative whose name gets saved to the “Support Rep” field.
- Since the XM Directory task was set up using transactional data, the survey that the customer receives on Thursday will have the name of the representative they spoke to on Monday, even though the customer has a new value for the “Support Rep” field.
- The customer will receive a second email on Friday and it will contain the name of the second support representative they spoke with.