
Qualtrics XM App
What's on this page
About the Qualtrics XM App
Qtip: The Qualtrics XM App is included with some CX and EX licenses. Talk to Account Services if you’re interested in this feature.
The Qualtrics XM App lets you and your colleagues view your dashboards on the go. With this app, you can view widgets, filter pages, switch between dashboards, and even check out your dashboard’s text analysis!
This app is available for almost all kinds of dashboards, including CX and EX dashboards. Only results dashboards are not compatible.
Qtip: The Qualtrics XM App is for viewing dashboards, not editing them. To customize your dashboards, please log onto the Qualtrics site.
Qtip: The Qualtrics XM App is not the same as the offline app.
Qtip: For gov1 users, the Qualtrics XM App currently supports all functionality except push notifications. All other functionality, including access to the general notifications feed, are available to gov1 users.
Downloading the App
The minimum operating system requirements for the Qualtrics XM App are iOS 16.0+ or Android 12.0+. Any devices that run on these or later systems will be compatible with the app.
Downloading the App
You can find the app in the Android or Apple store. In the example steps below, we are downloading the app in the Apple store. However, the workflow for Android is extremely similar.
Qtip: Here is a link to the XM Mobile App in the Apple Store, and here is a link to it in Google Play.
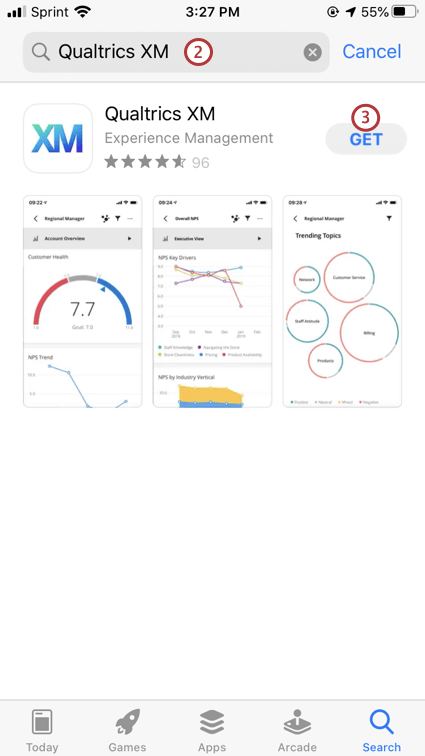
Qtip: The Qualtrics XM App only works in its native app format, and is not compatible with any desktop browsers.
Logging into the App
Qtip: If the app won’t let you log in, even after opening and closing or updating the app, you might not have permission to use it. Talk to your Brand Administrator to find out if your organization has permission to use the Qualtrics XM App. (Note: This is different from the Offline App.)
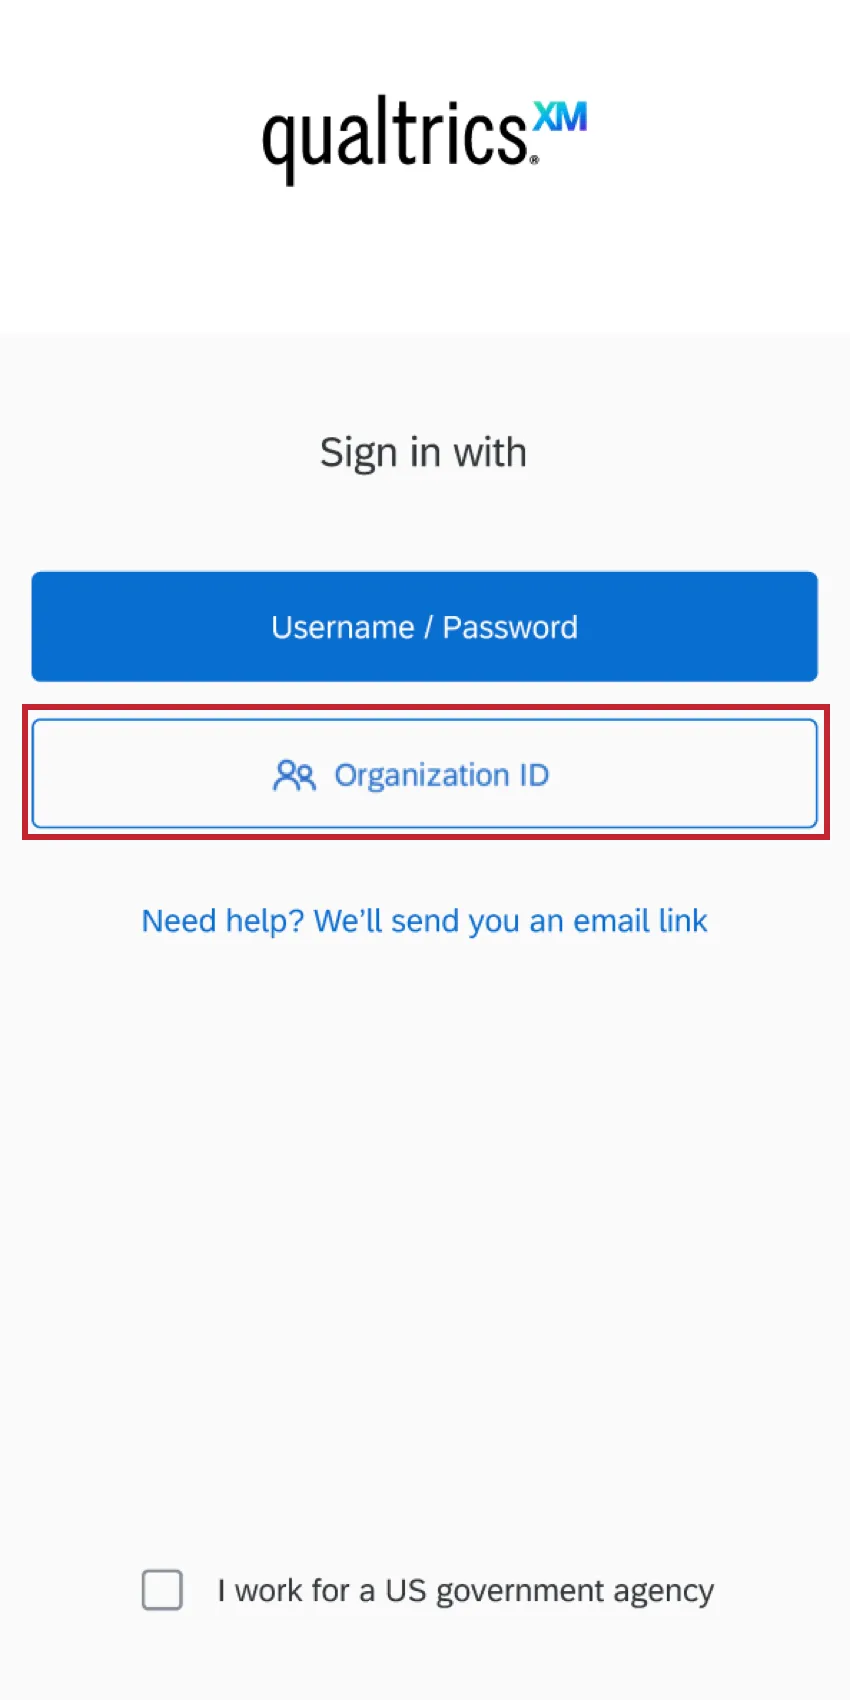
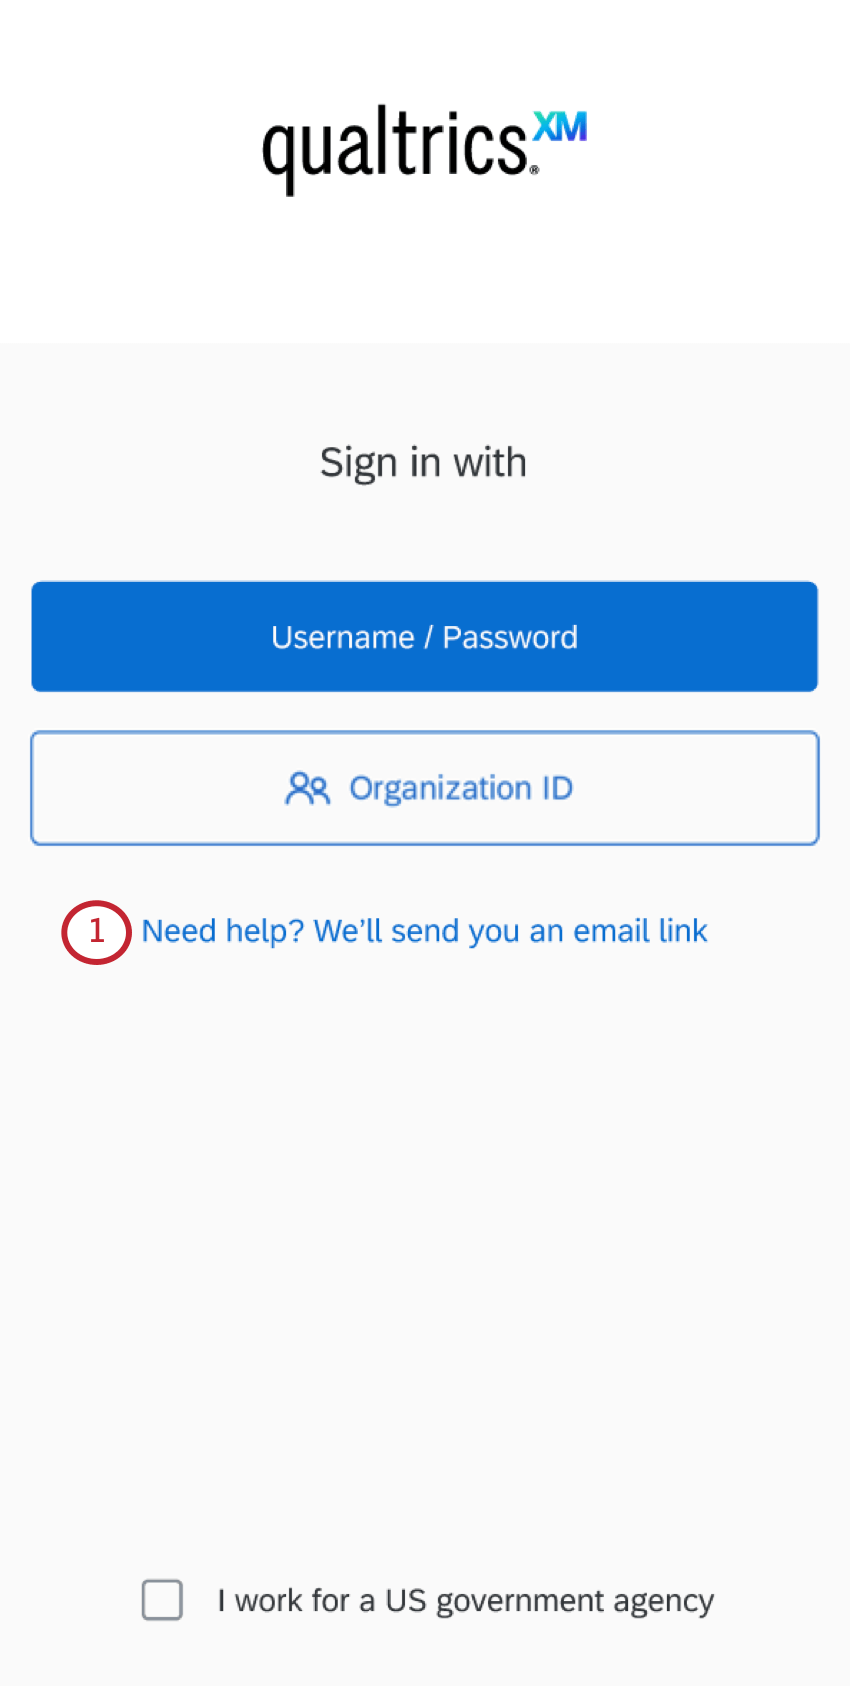
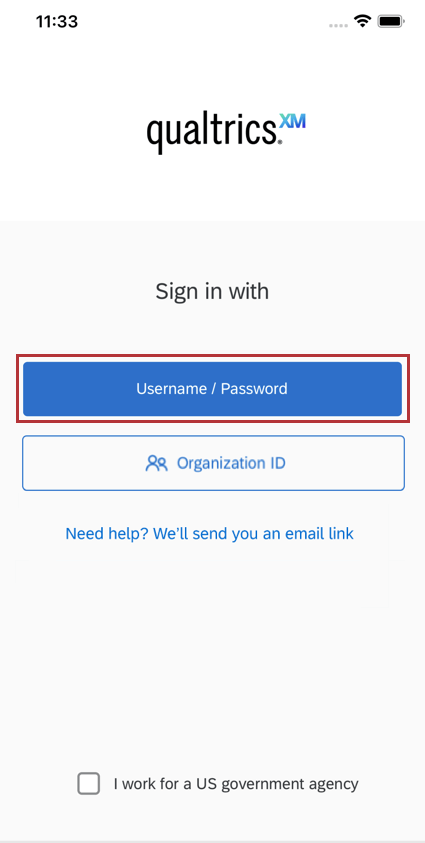
The XM app offers a few quick and easy login options.
Standard Login
Upon opening the app, tap Username / Password to enter your normal Qualtrics username / password to log in.
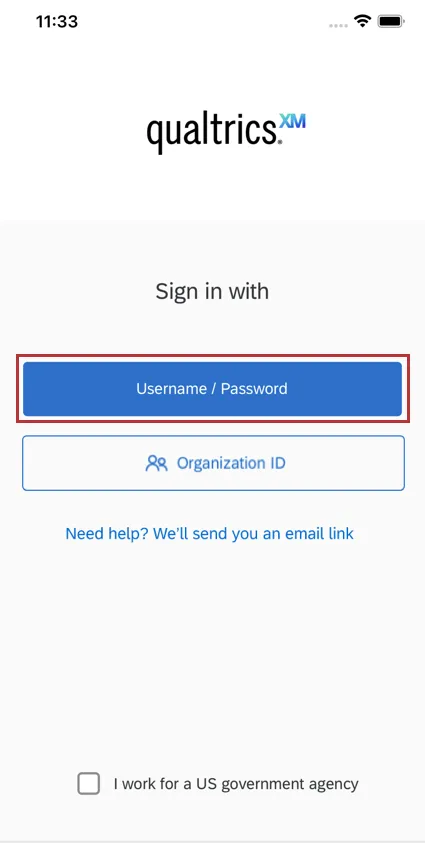
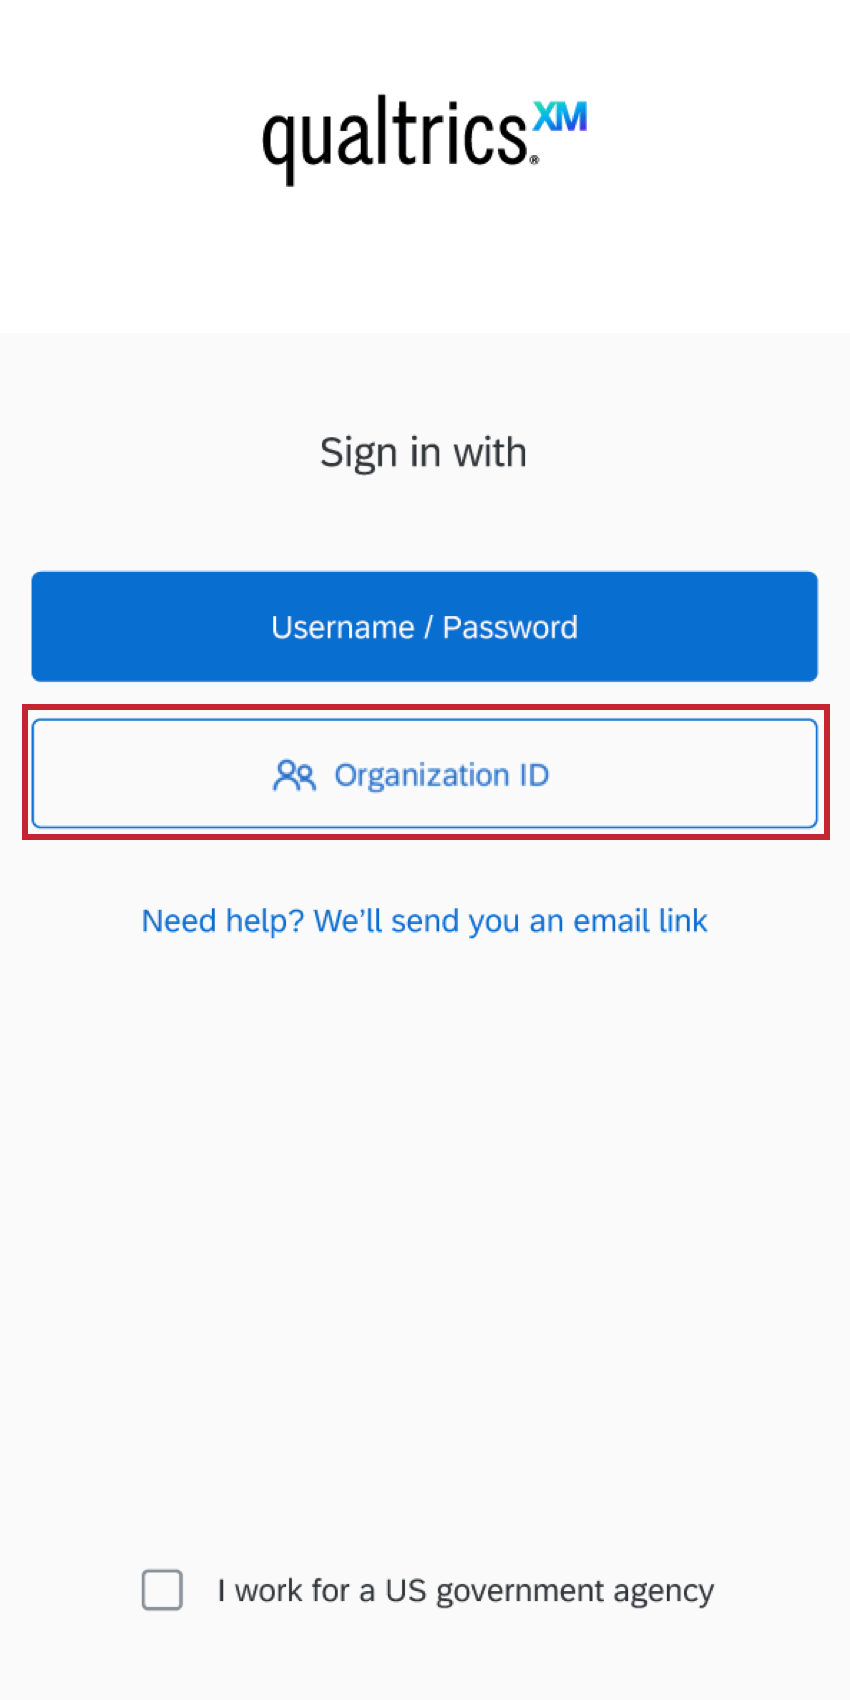
SSO Login
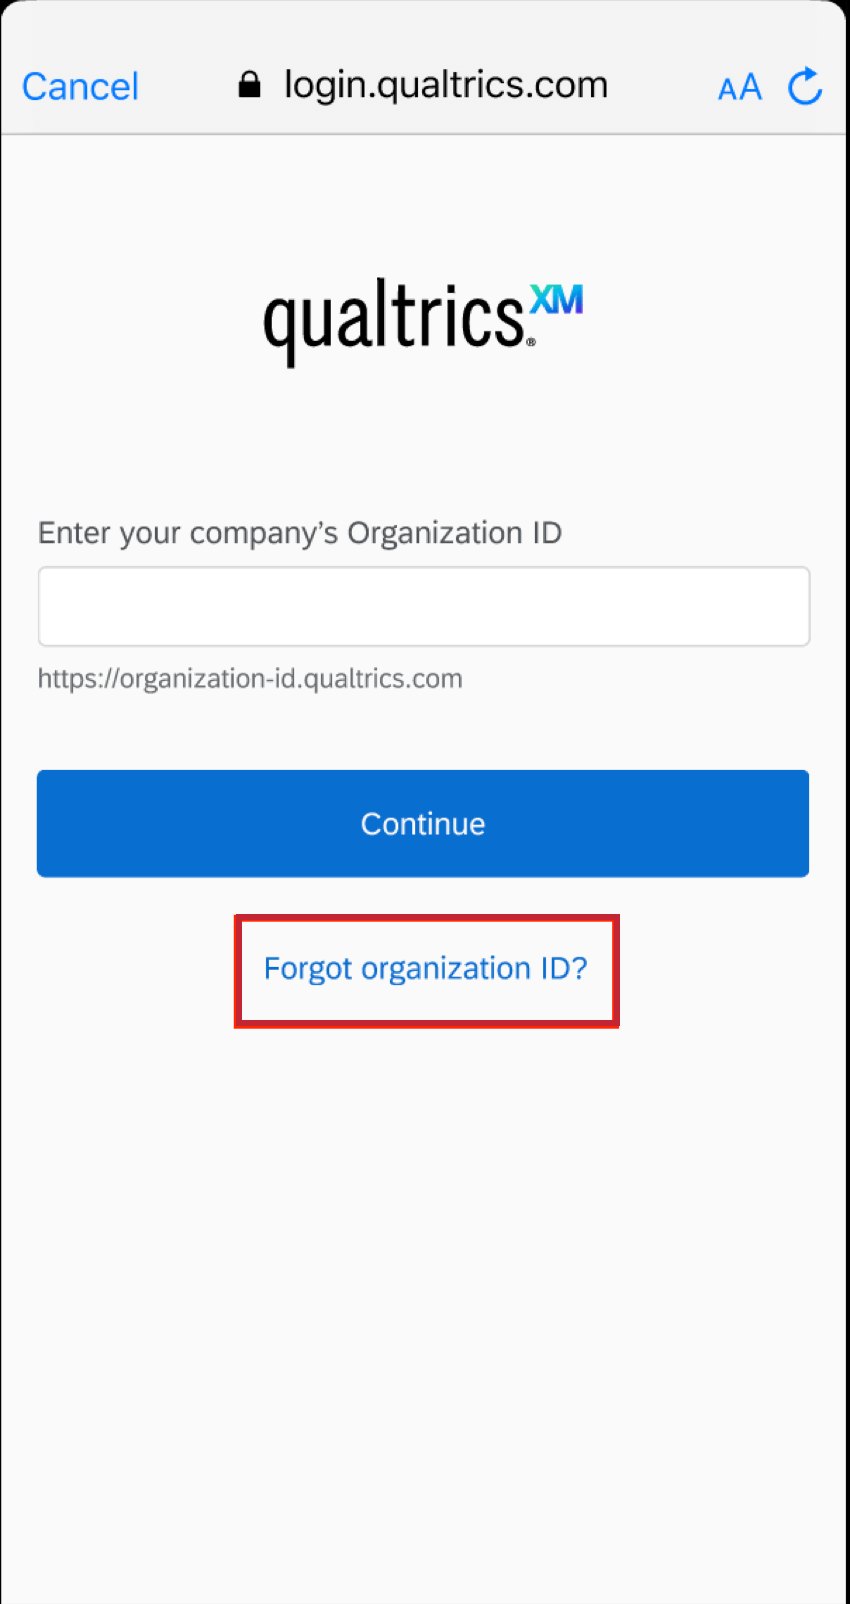
If your organization uses SSO to log on (e.g., when logging into Qualtrics, you are redirected to your company’s login portal), you should tap Organization ID instead. See the Logging in with your Organization ID page for more details.
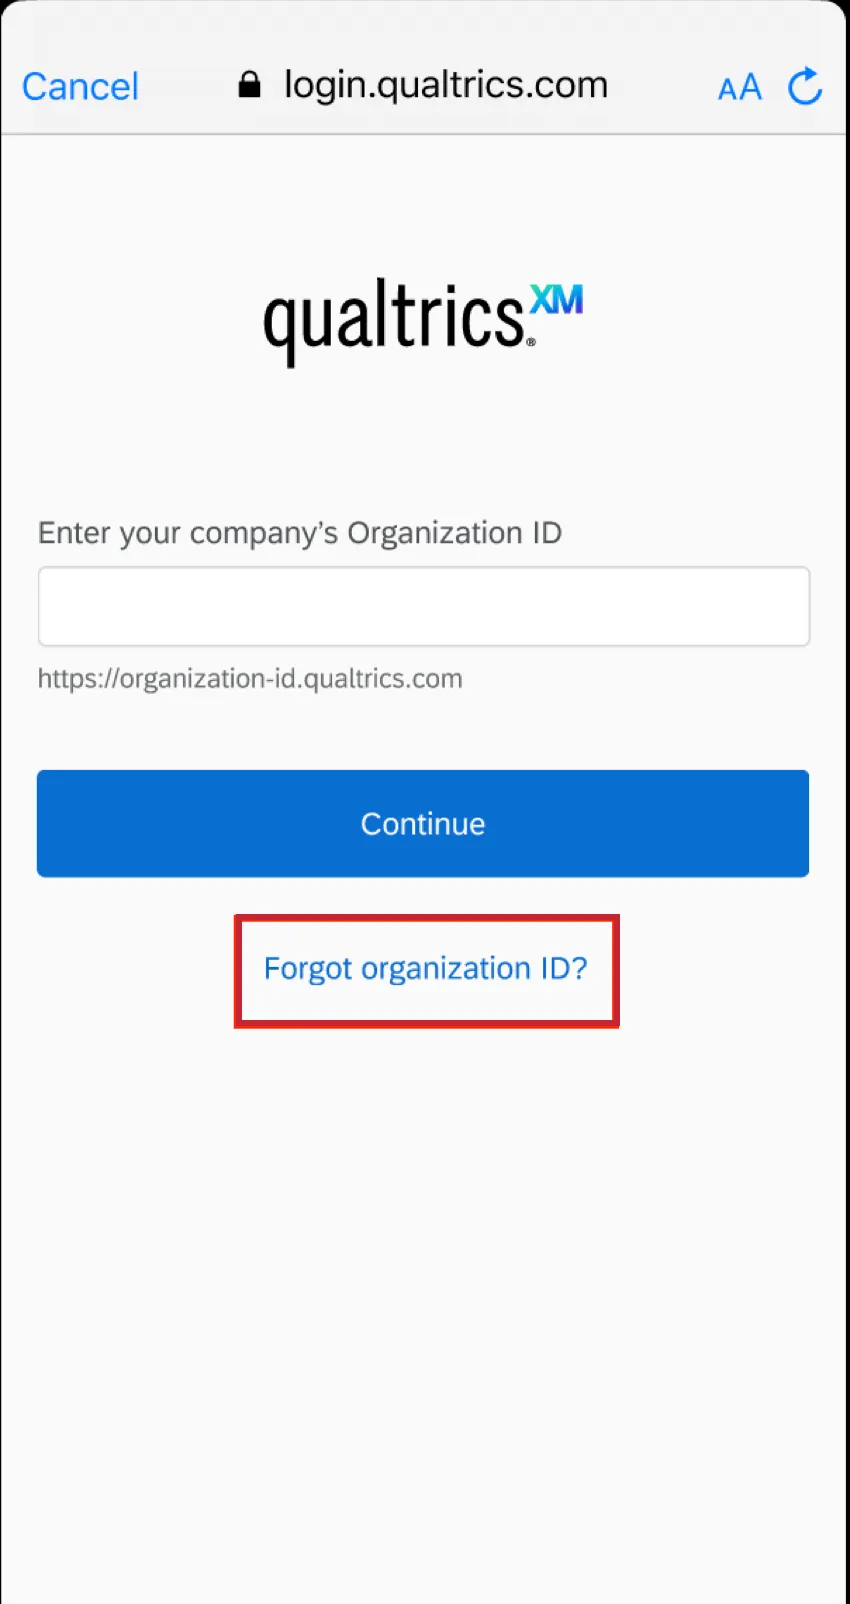
Qtip: If you don’t remember your organization ID, don’t worry! Click Forgot organization ID? to be emailed a link you can use to login instead.
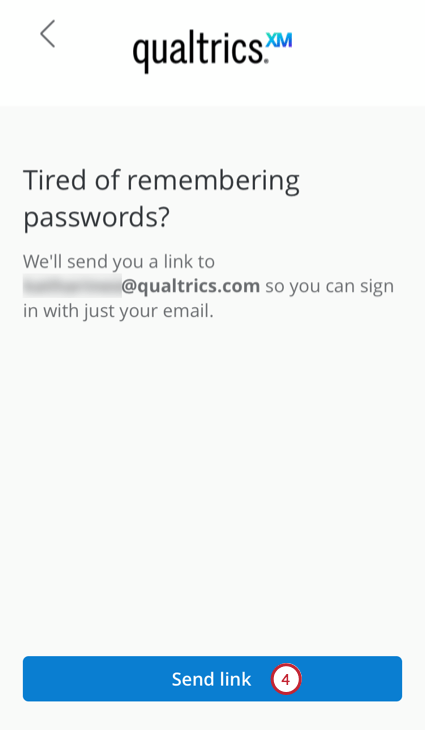
Sign in Without a Password
You can log in without a password – instead, we’ll send a link to your email address that you can click to access your account. You can use this option regardless of whether you use SSO or a standard login!
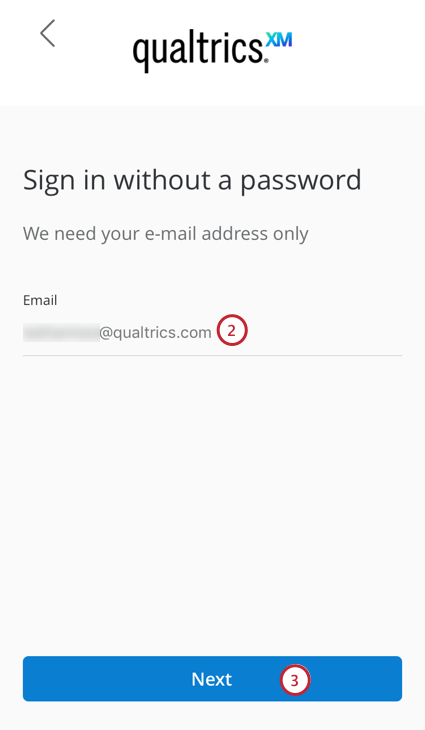
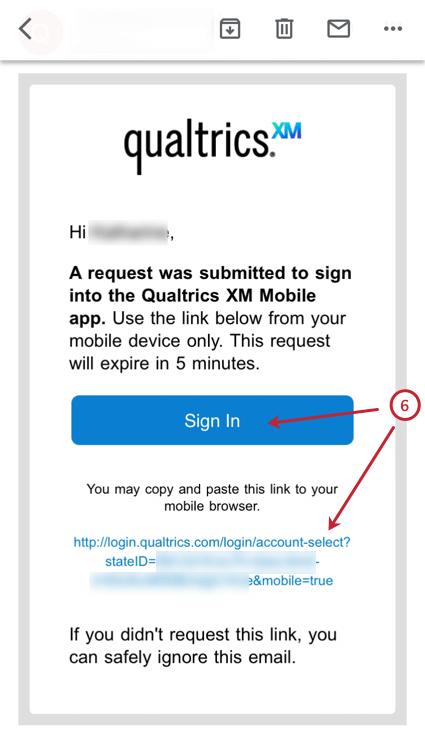
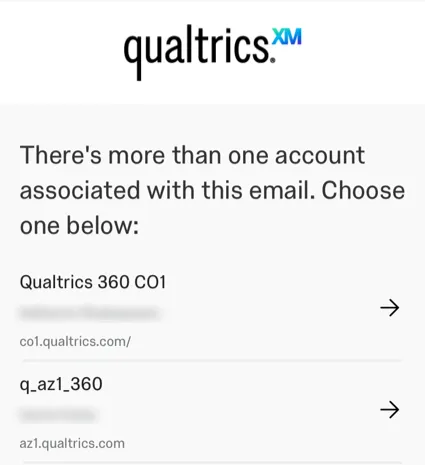
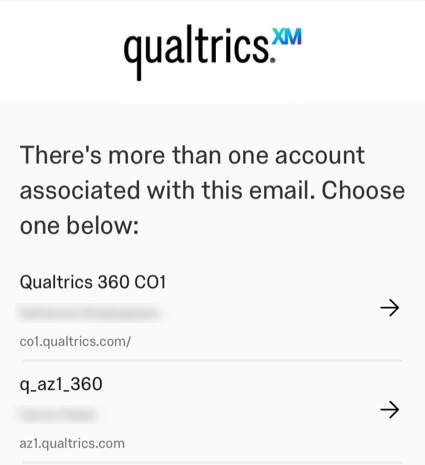
Qtip: If your email address is associated with more than one account, you will be redirected to a list of accounts and asked which one you want to access on the XM app.
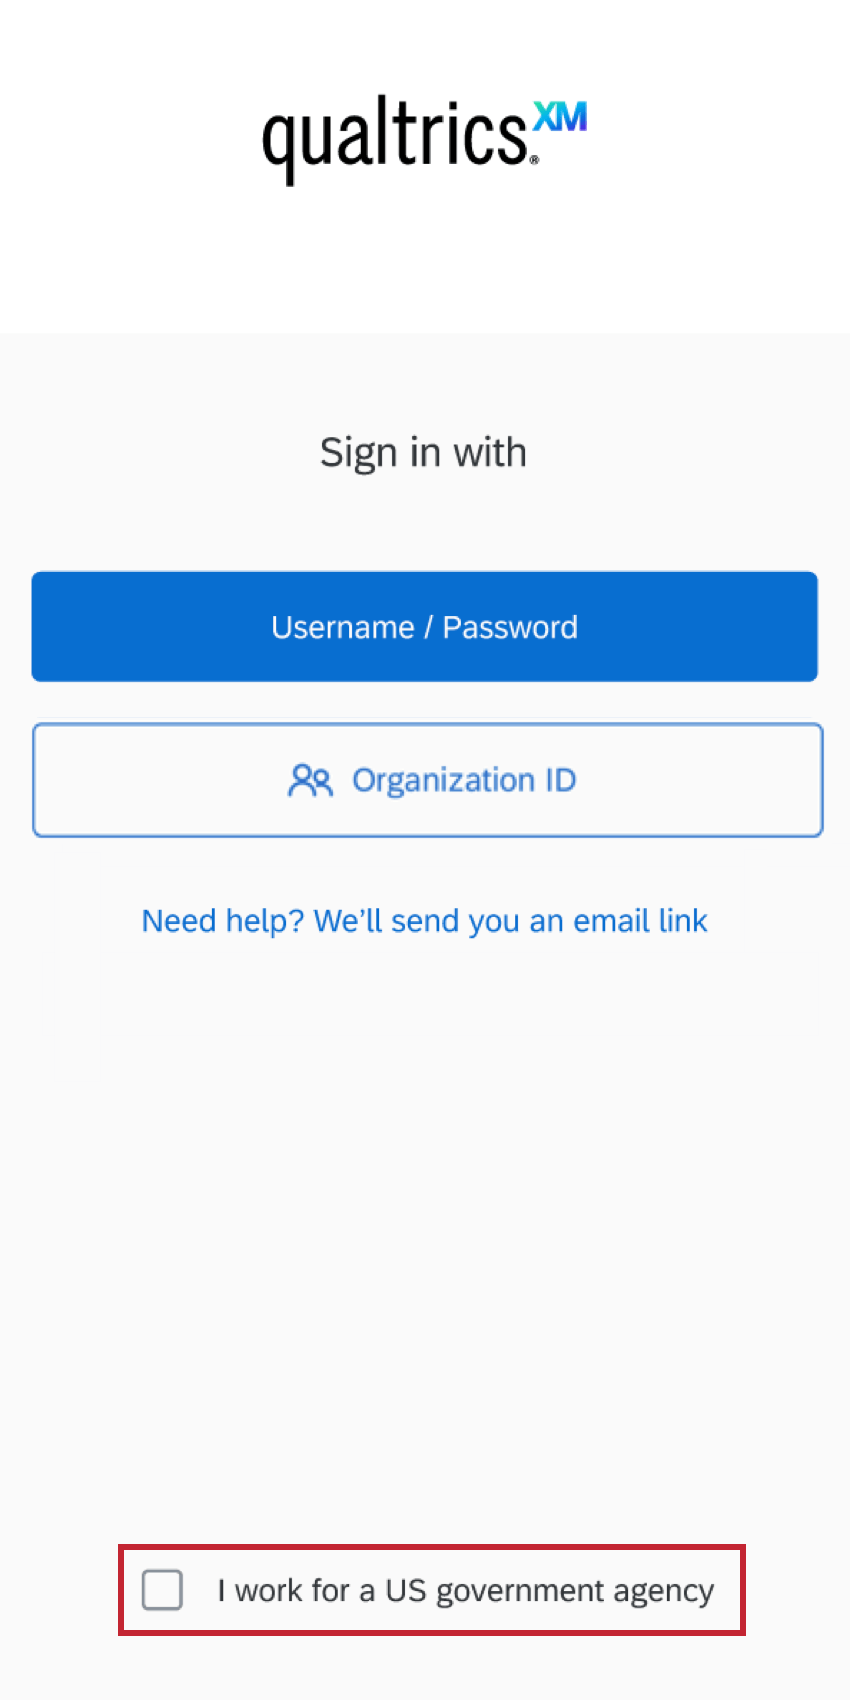
Logging in as a Gov1 User
Gov1 users can log into the XM App by first selecting I work for a US government agency. You can then log in using any of the methods described above – including standard login, single sign-on (SSO), and the alternative sign-in method that sends a link.
Attention: For gov1 users, the Qualtrics XM App currently supports all functionality except push notifications. All other functionality, including access to the general notifications feed, are available to gov1 users.

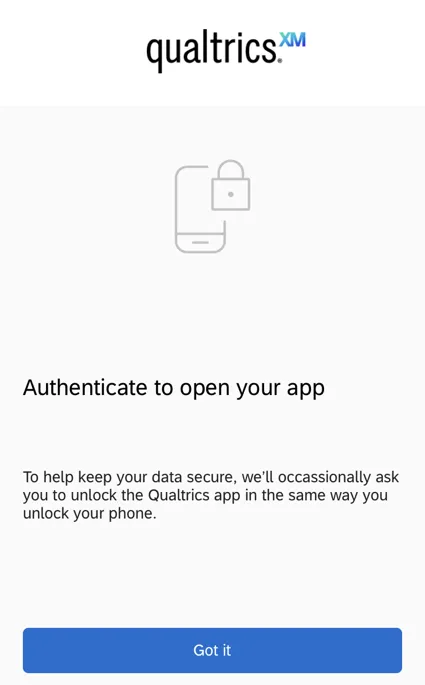
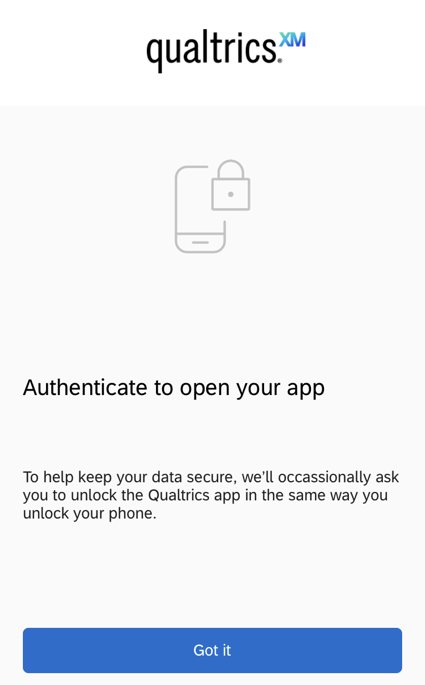
Unlocking the App
As an extra security measure, we may ask you to re-authenticate into the app. This generally happens when the app has been open in the background for about 60 seconds or more, or if you have just logged in.
If you have a PIN, Face ID, or Touch ID enabled on your phone, you will be asked to use this same authentication method to re-enter the app. This is to ensure that only you are logging onto your phone to see your data.
Although we do not advise disabling this setting, if you no longer want to use it, follow these steps:
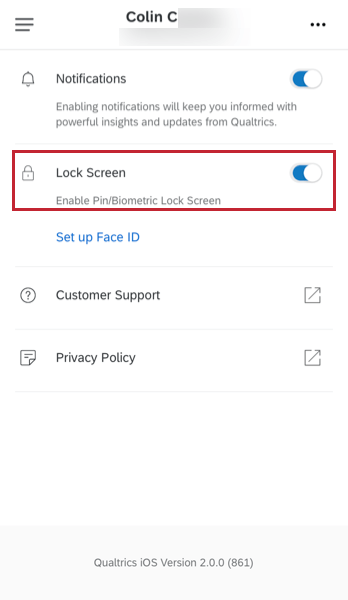
Qtip: When you disable this setting, you will be logged out if you have the app closed or in the background for more than the minimum user session length, which is usually 60 minutes. (If you are an administrator interested in adjusting this length, see Minutes of inactivity until automatic logout.) This is done in order to ensure the highest security standards are met.
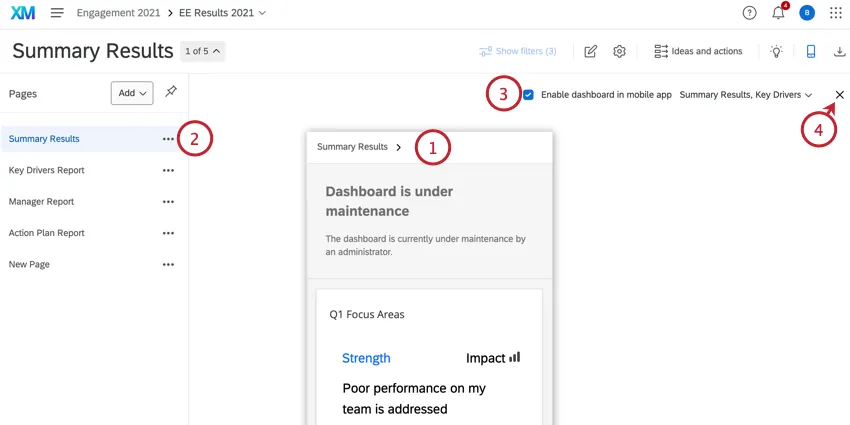
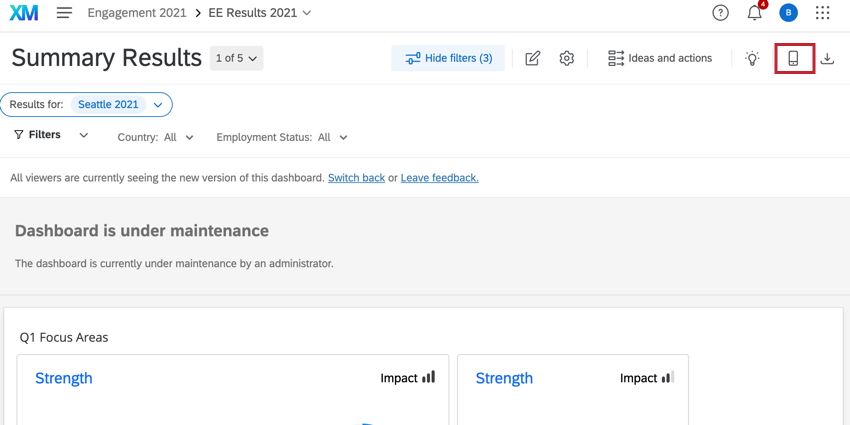
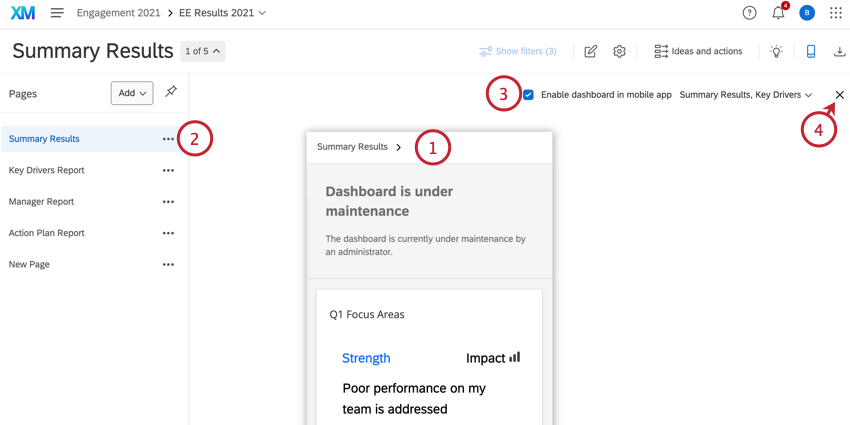
Enabling Dashboards for Mobile Viewing
Attention: Your dashboards will be Enabled in the Qualtrics XM App by default.
This section describes how you enable both CX dashboards and EX dashboards for the app.

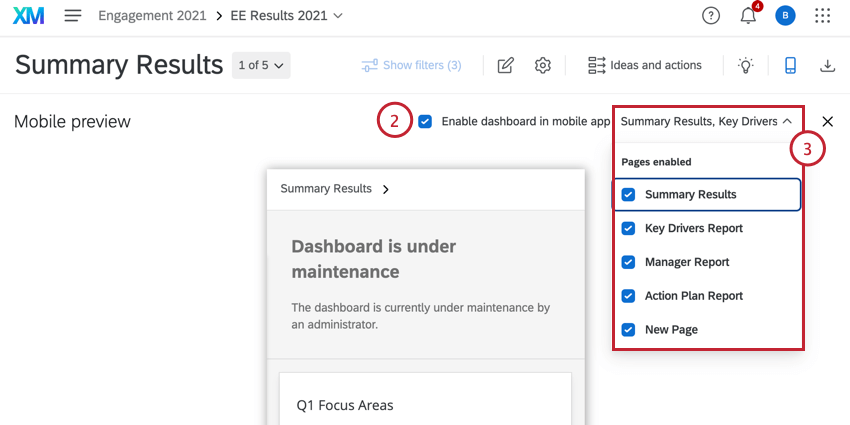
Qtip: This option is disabled in brands by default. To get it enabled, please reach out to Account Services.
Qtip: When you enable a dashboard for mobile viewing, you can make it so that a message will appear when users log onto the dashboard on desktop, encouraging them to try the mobile app. A user should only see this message two times, max. If you want this feature enabled for your brand, please reach out to Account Services. Please note that this feature cannot be enabled/disabled for individual users or groups. This message cannot be customized and appears as pictured.

Previewing how a dashboard will look on mobile
Before you publish a dashboard to mobile, make sure you approve of how it looks on mobile. Click the Mobile Preview button in the dashboard toolbar.
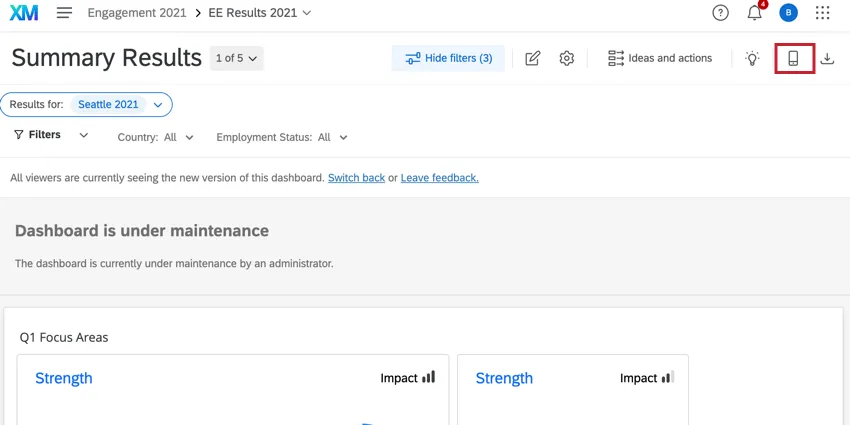
While previewing the mobile dashboard view, you can do the following:
Qtip: You cannot edit your dashboard while previewing the mobile display. Exit the mobile preview to edit your dashboard.
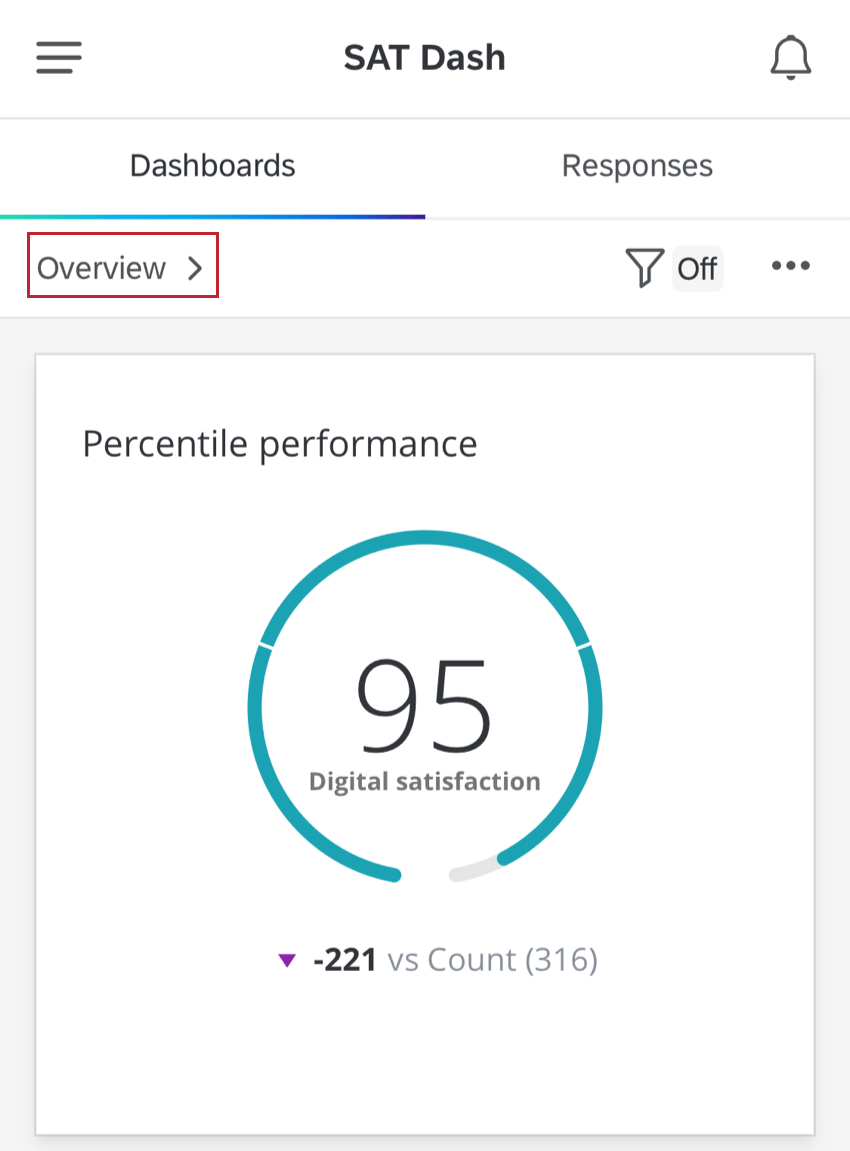
Viewing Mobile Dashboards
Once logged in, you can use the Qualtrics XM App to scroll through your dashboards. All widgets will do their best to meet the dimensions defined on the desktop, but may look a little different or require scrolling.
Qtip: This app is only available in your device’s portrait mode.
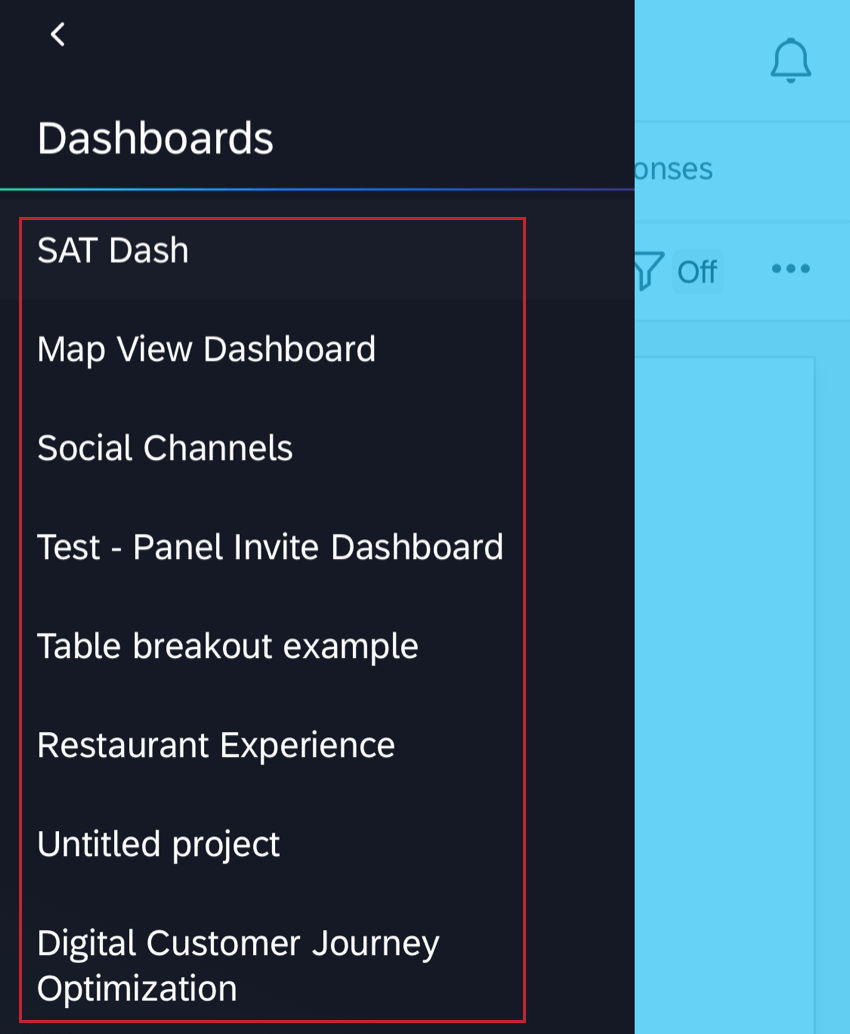
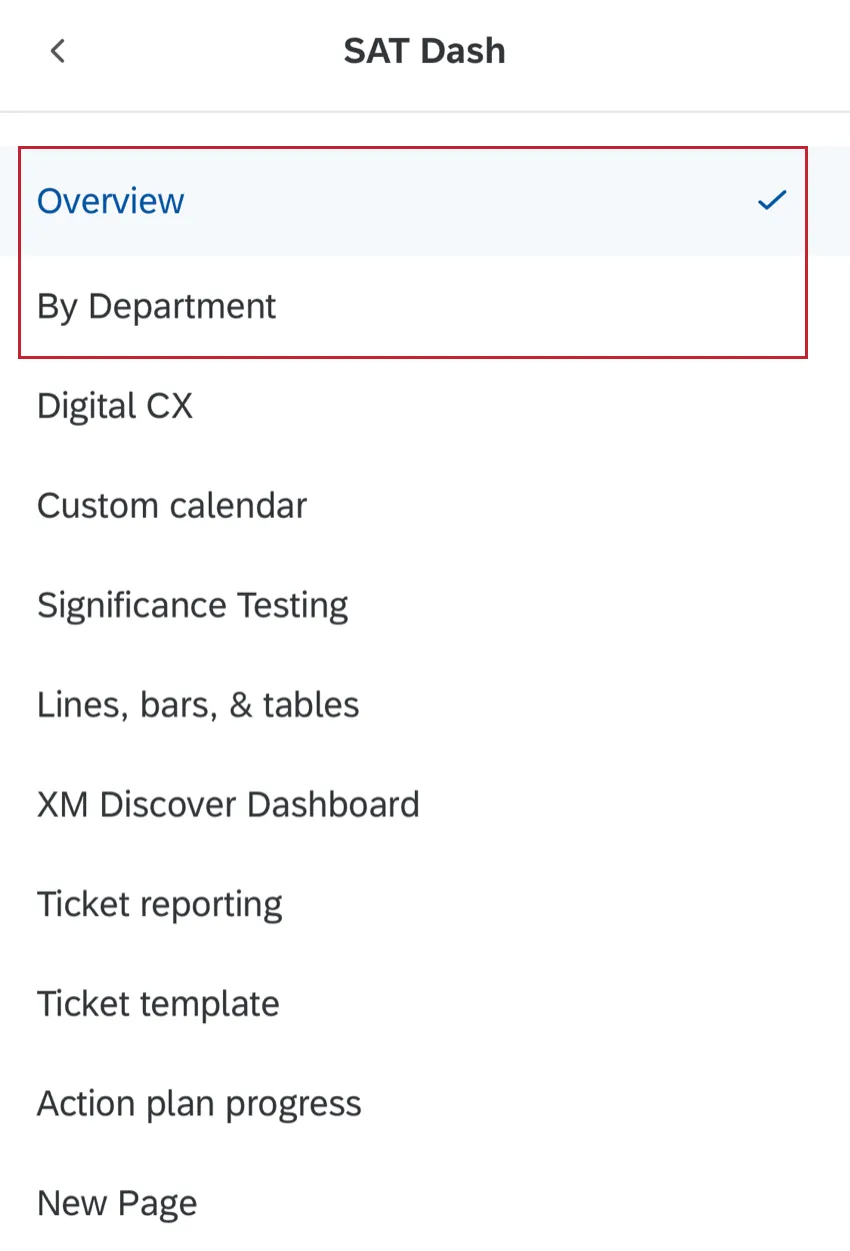
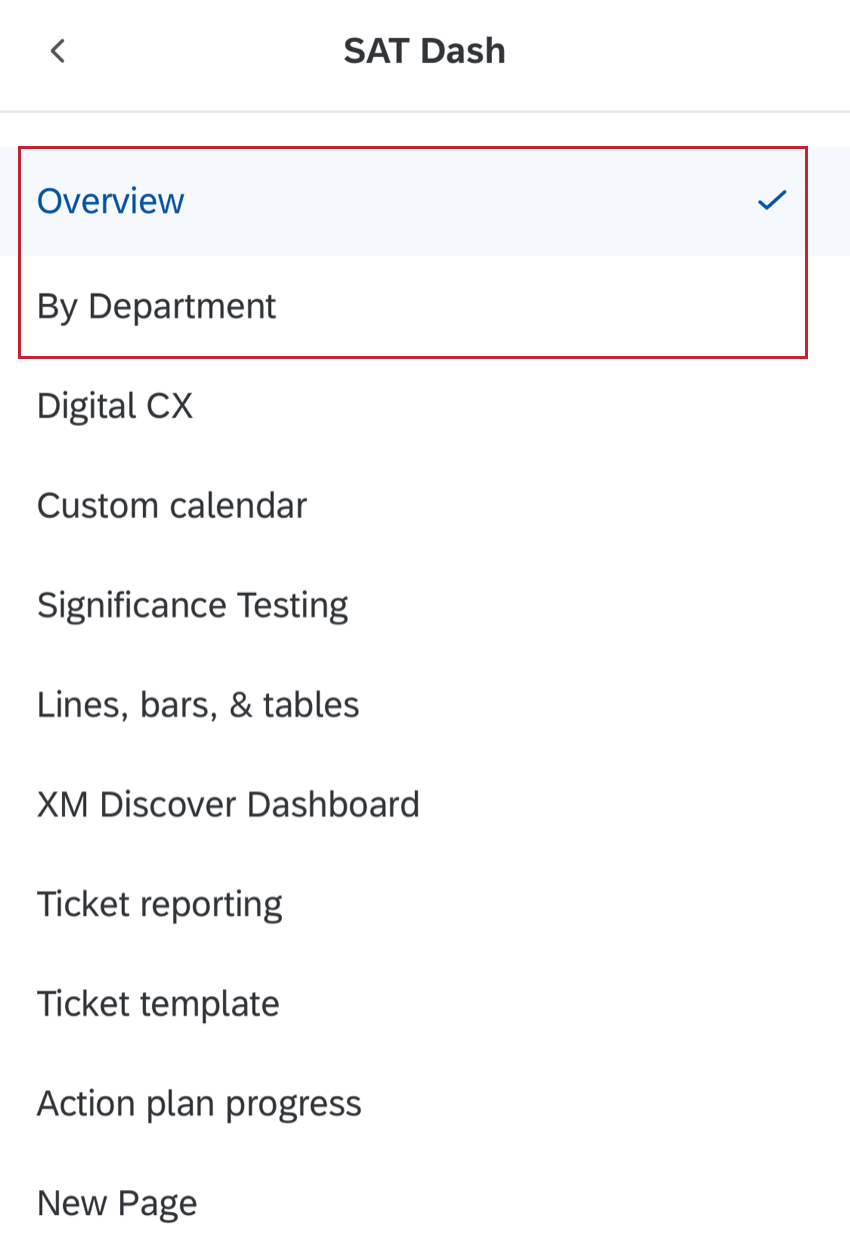
Navigating Dashboards
To navigate between different dashboards:

Navigating Pages
To change pages, tap the current page name at the top of your dashboard.
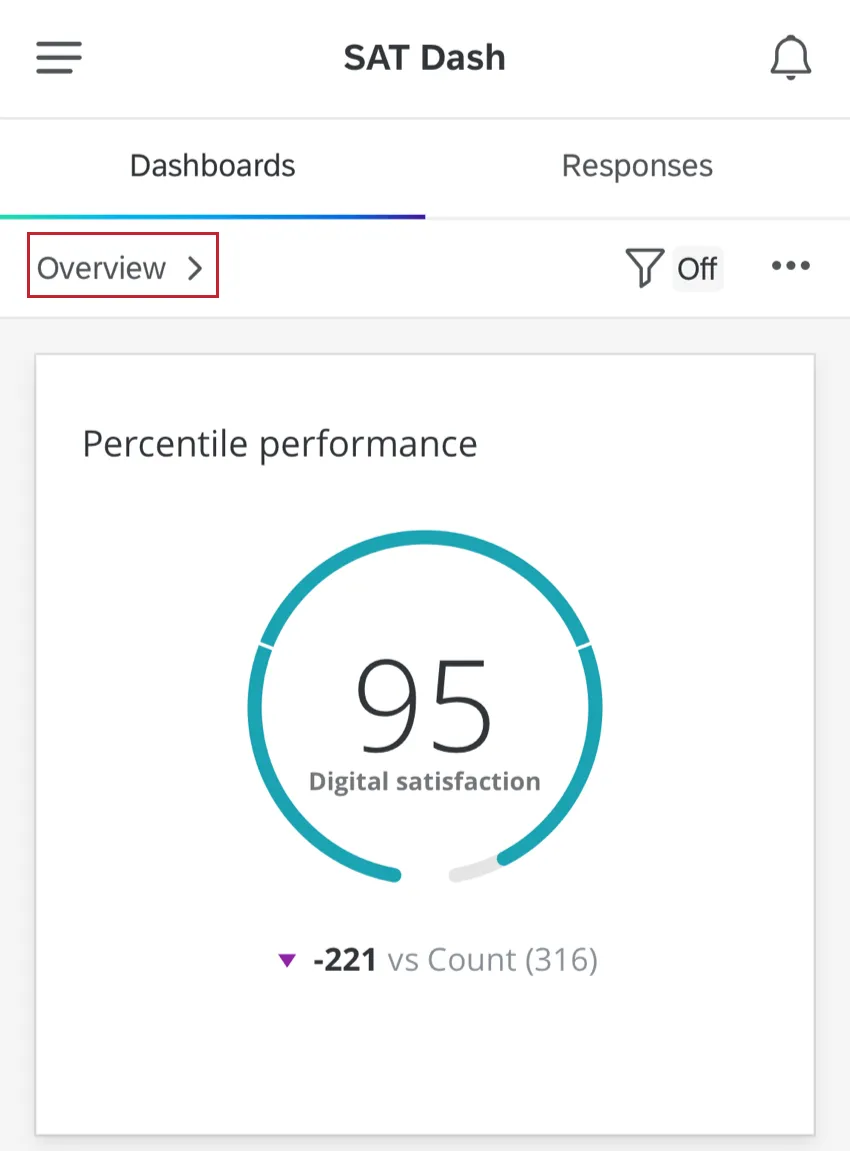
Once you tap the page name, a list of the dashboard’s pages will appear. Select the page you’d like to see from the list.
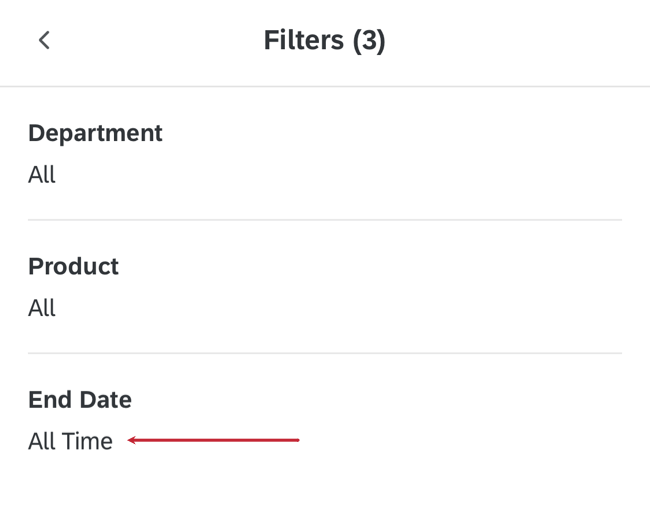
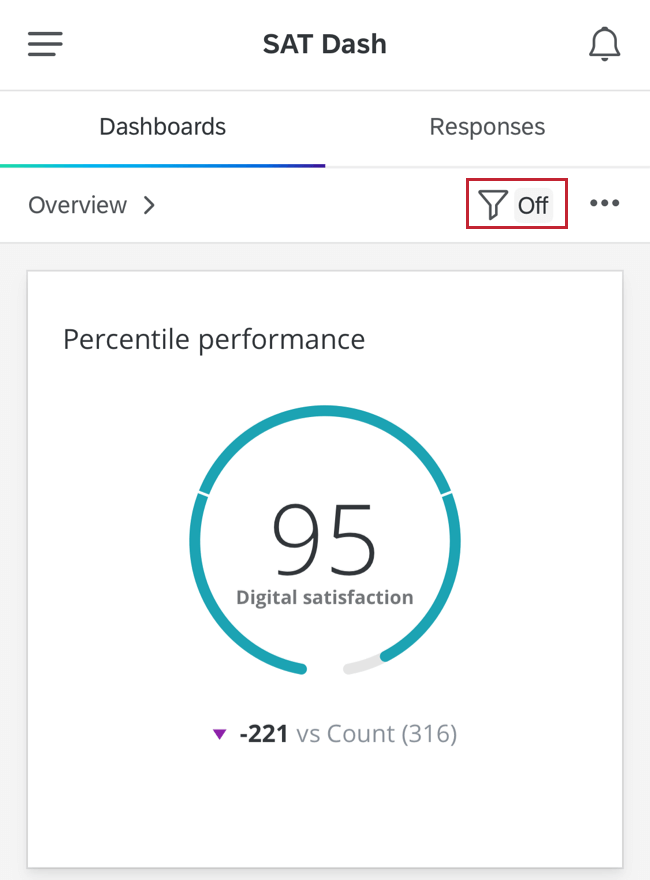
Filtering
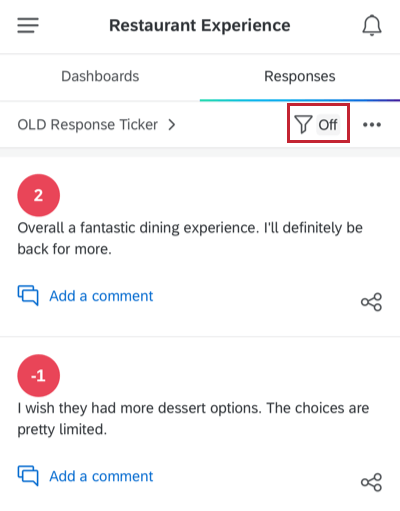
If your dashboard page has filters added to it, you can click the filter icon on the upper-right to start using them.

Qtip: If the filter icon is grayed-out, that means the dashboard page does not yet have any filters on it. Remember, the dashboard’s creator or project administrators (CX) must add filters (CX | EX) on the desktop view before you will have filters to adjust.
You will see a list of possible filters you can adjust. Here, we have a filter for NPS Group and Response Date. Let’s apply a filter for Response Date. To apply a filter, tap the filter name.
Tap and type to adjust your filter settings. For filters with many options, you can type to search for your preferred selection. When you’re finished, click the blue Done button at the bottom of the screen.
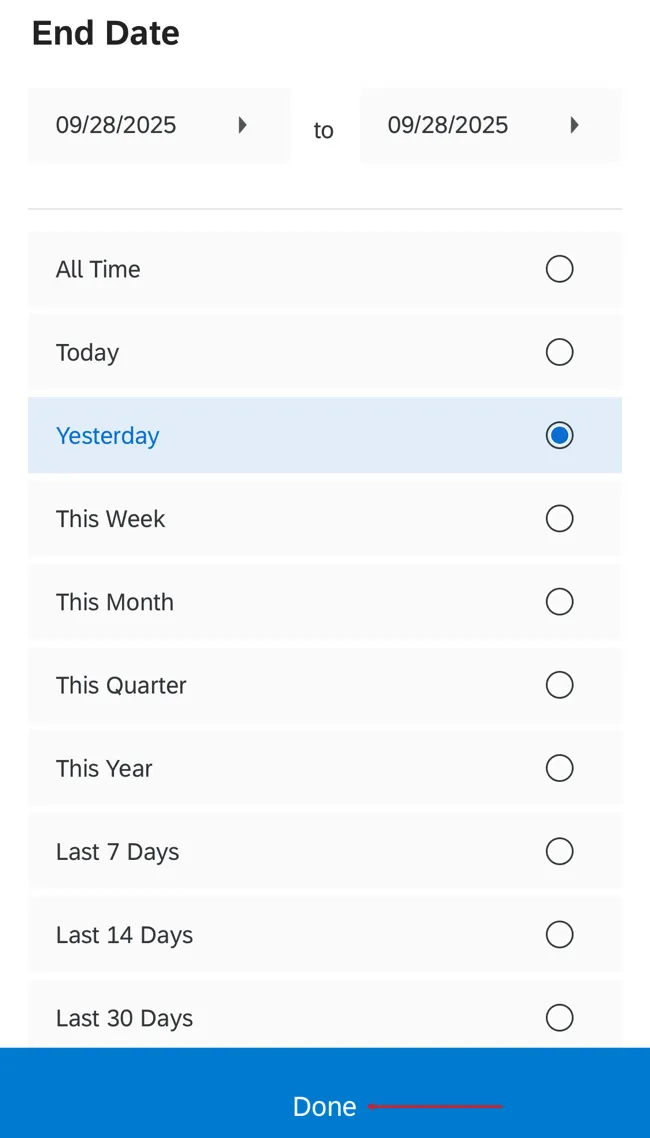
Qtip: If you want to remove a filter, click Reset in the top left hand corner.
Qtip: Filters added directly to widgets are not compatible with the Qualtrics XM App.
Sharing the Dashboard
The Qualtrics XM App also lets you share parts of your dashboard through text, email, and other apps on your device! First, center the part of the dashboard you’d like to take a snapshot of. Then click the dots in the upper-right and select Share.

In addition to a screenshot of the content, it will also send a link that allows the recipient to log in from a mobile browser.
Qtip: Users must already have an account to log in from the link.
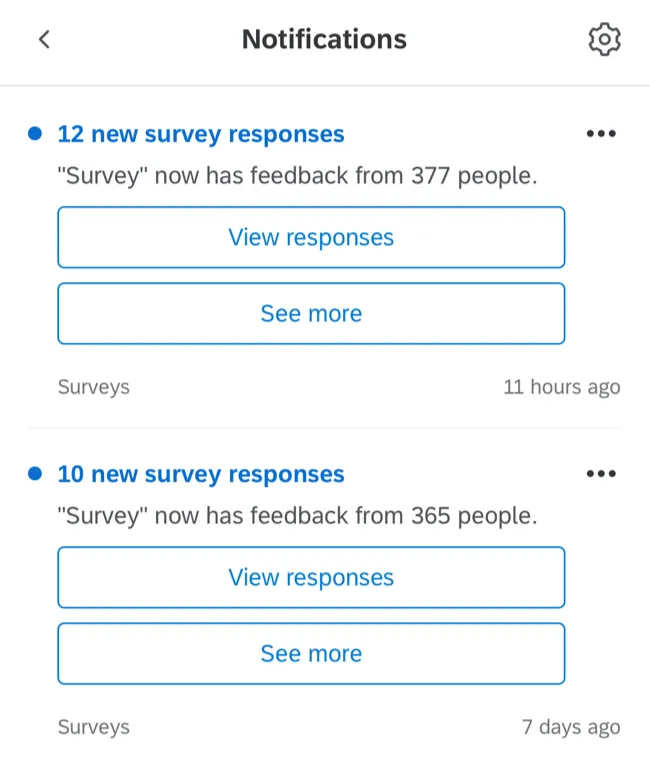
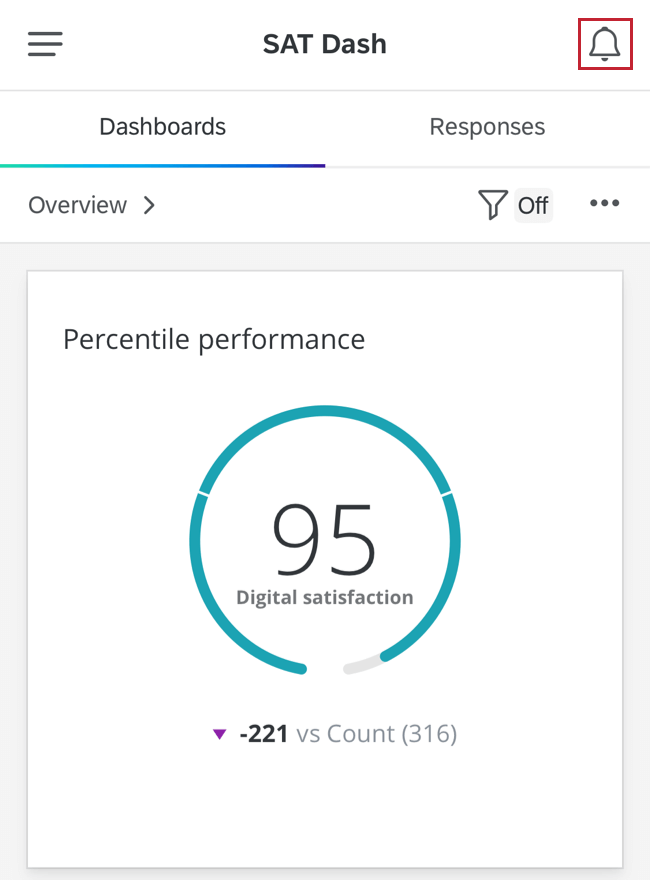
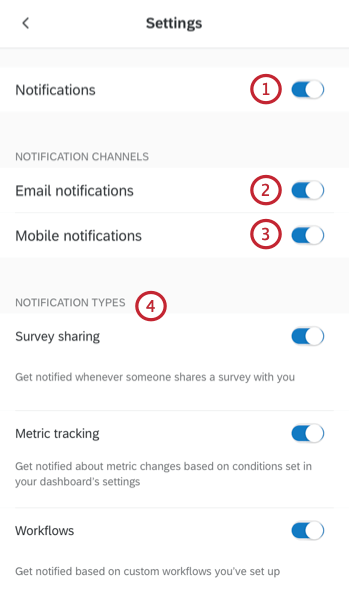
Mobile App Notifications
The Qualtrics XM App allows you to be notified when various events in Qualtrics take place. This includes events such as a survey being shared with you, a workflow beginning, or a ticket being assigned to you.
To view your notifications and change your notification settings, click the bell icon in the top right hand corner.
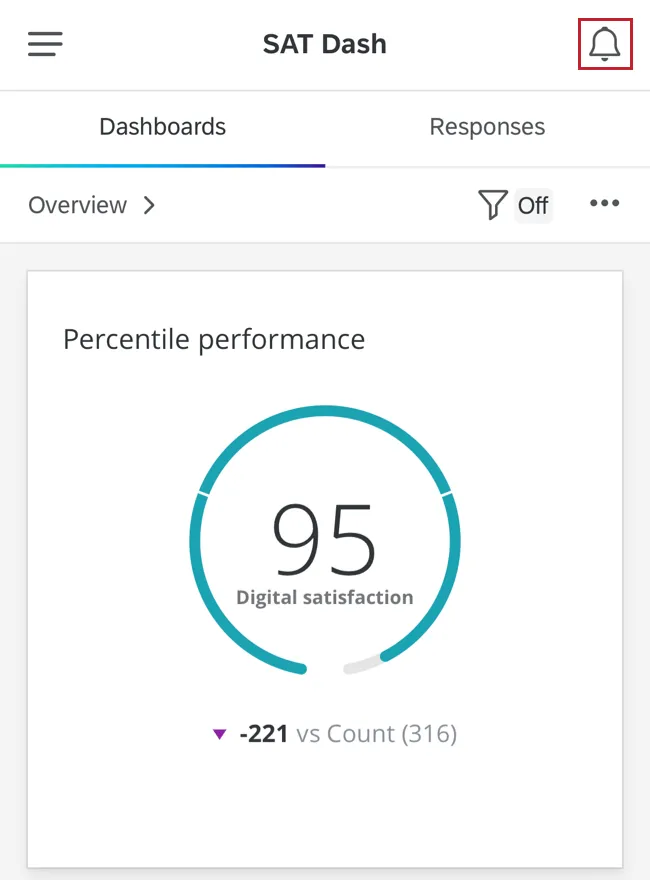
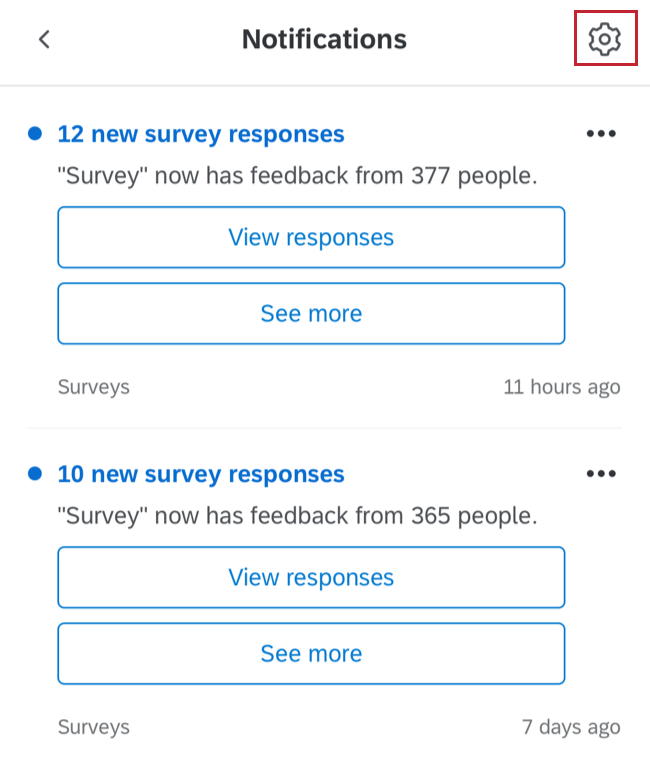
This is your Notification Feed, where you will see your notifications and can action them. Tap a notification for more information about it.
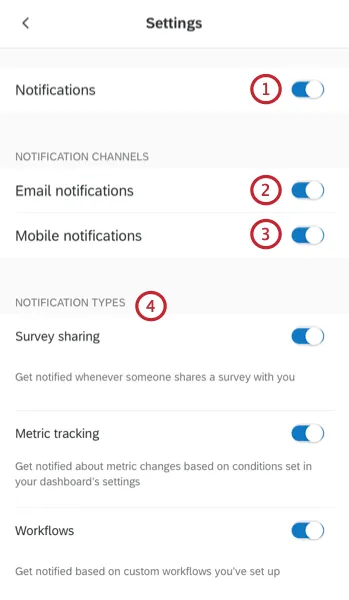
Notification Settings
To change your notification settings, such as what events cause notifications and how you receive notifications, click the gear icon in the top right hand corner of the Notification Feed.
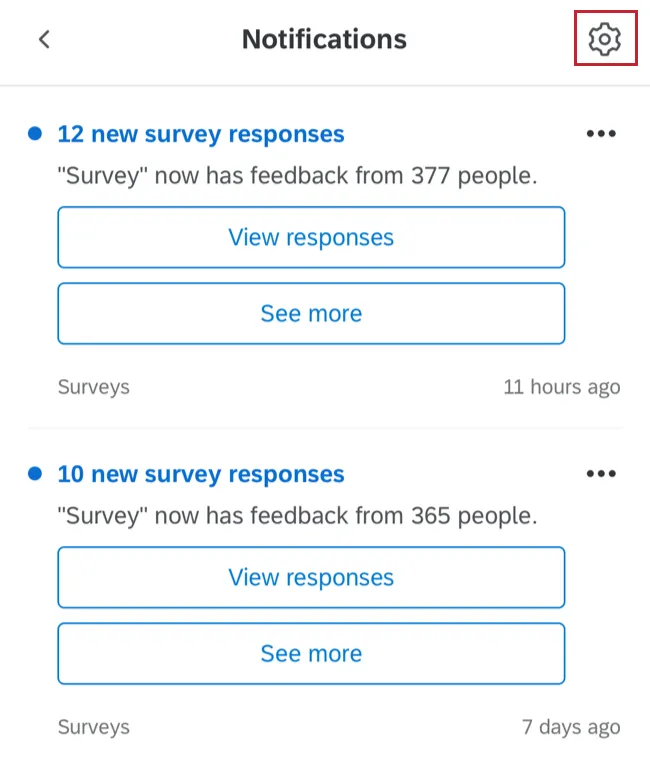
You can then change the following settings:
Qtip: This functionality is currently unavailable to gov1 users.
Widget Compatibility
Not all widgets are compatible with mobile dashboards. This section will cover compatible vs. incompatible widgets.
Qtip: Widget descriptions, such as tooltips, are not compatible with the app.
CX Widget Compatibility
This section explains which CX widgets are compatible or incompatible with mobile viewing via the app.
Compatible
- Line, horizontal bar, and vertical bar chart widgets
- Donut / pie widget
- Table widget
- Record table widget
- Number Chart widget
- Star Rating widget
- Breakdown Bar widget
- Gauge Chart widget
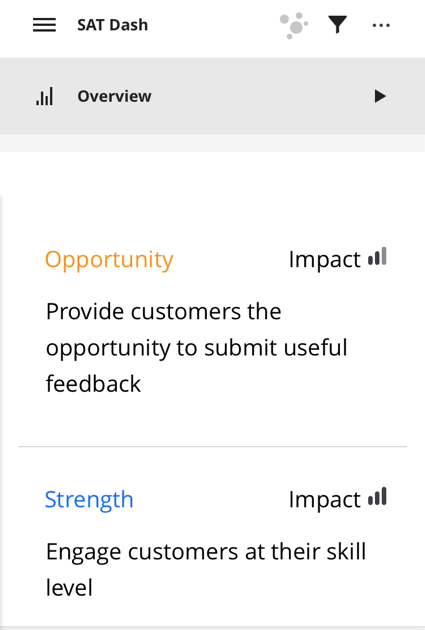
- Focus Areas widget
Qtip: The comparison rings do not appear on mobile, but the color-coding is still there to distinguish from opportunities and strengths. If you have many key drivers added, a Show All button will appear at the bottom.
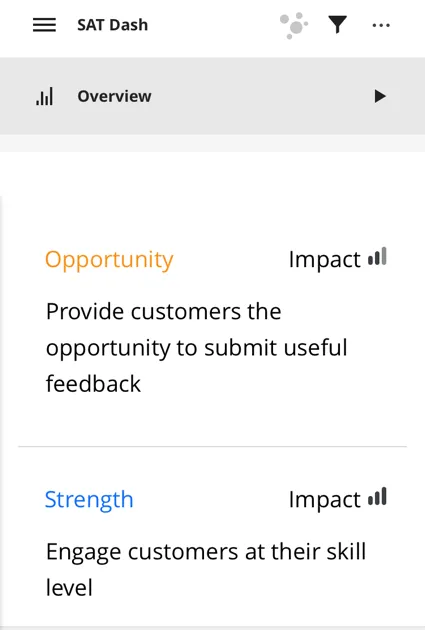
- Key Drivers widget
- Rich Text Editor widget
Qtip: Hyperlinks added to rich text editor widgets will not work in the XM app. - Image widget
- Response Ticker widget
- Word Cloud widget
- Compatible legacy widgets
- Simple Chart widget
- Simple Table widget
- Pie Chart widget
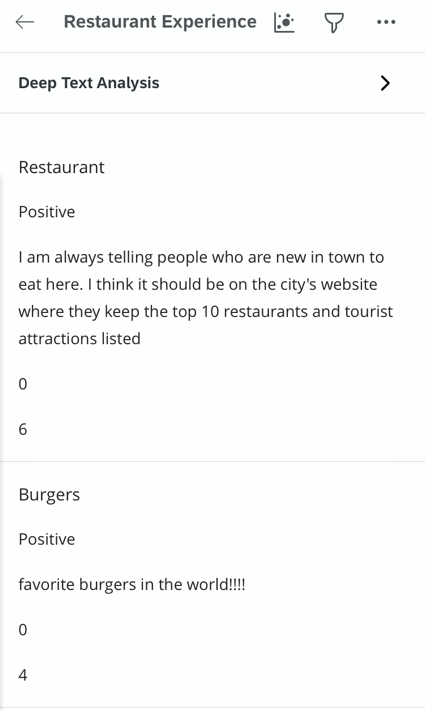
- Record Grid widget Qtip: Although Record Grids with multiple columns are compatible with the Qualtrics XM App, instead of multiple columns, you will see content broken into multiple rows. Below, you’ll see how feedback, a Sentiment Score, and a Sentiment Polarity column are split by row, with dividers separating different responses.

Incompatible
- Scatter Plot widget
- Trend Chart widget
- Breakdown Trends widget
- Pivot Table widget
- Breakdown Table widget
- Multiple Source Table widget
- Image Slideshow widget
- Map View widget (both legacy map view and new map widget)
- Distributions Table widget
EX Widget Compatibility
This section explains which EX widgets are compatible or incompatible with mobile viewing via the app. Action Planning pages are compatible with the Qualtrics XM App so long as the widgets on the page are compatible.
Compatible
- Line, horizontal bar, and vertical bar chart widgets
- Donut / pie widget
- Table widget
- Record table widget
- Number Chart widget
- Gauge Chart widget
- Key Drivers widget
- Rich Text Editor widget
Qtip: Hyperlinks added to rich text editor widgets will not work in the XM app. - Image widget
- Heat Map widget
Qtip: You can click the name of a category to see a breakdown of scores by statements in that category. - Engagement Summary widget
- Participation Summary widget
- Question List widget
- Record Grid widget
Qtip: These widgets are for Action Planning Pages only. - Scorecard widget
- Word Cloud widget
- Response Ticker widget
- Focus Areas widget
Qtip: The comparison rings do not appear on mobile, but the color-coding is still there to distinguish from opportunities and strengths. If you have many key drivers added, a Show All button will appear at the bottom.

- Compatible legacy widgets
- Simple Chart widget
- Simple Table widget
- Pie Chart widget
Incompatible
- Response Rates widget
- Demographic Breakout widget
- Action Planning Item Summary widget
- Bubble Chart widget
- Comparison widget
Mobile Dashboard Text iQ
Qtip: This functionality is only available for CX dashboards.
If you have Text iQ enabled for your dashboard, you can check this out on the Qualtrics XM App, too! Here, dashboard viewers with Text iQ access can see open text responses, their sentiment scores, and text topics.
Qtip: Remember that the Text iQ that opens in your dashboard is unique from the one that opens directly in a survey.
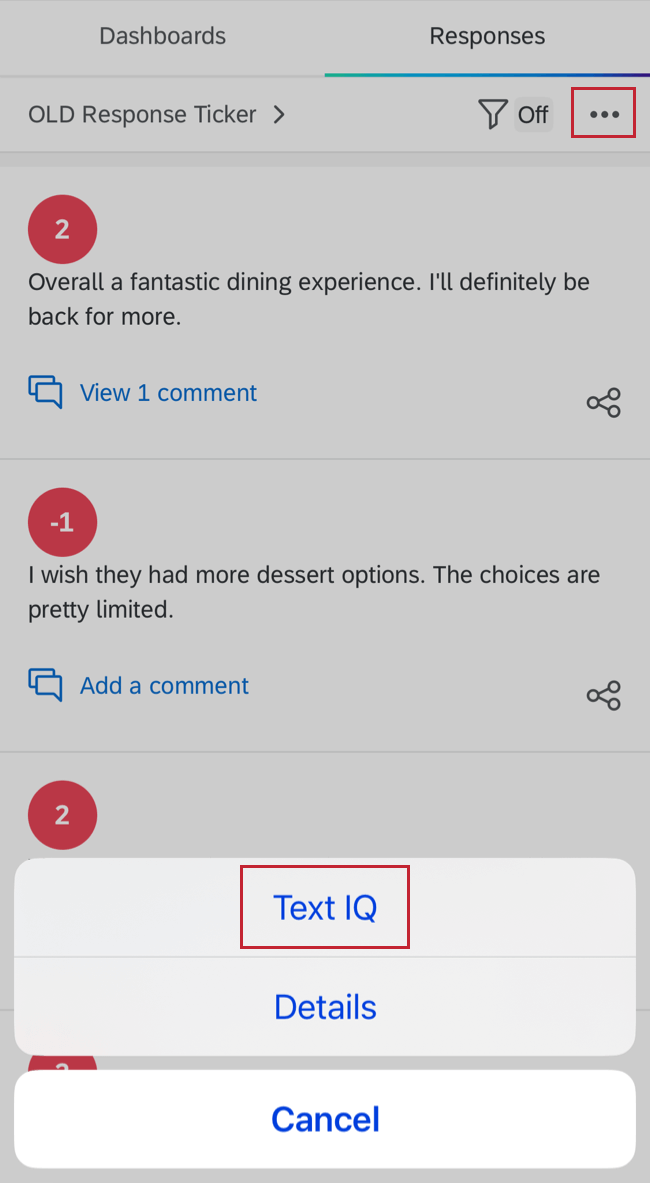
Navigating to Text iQ
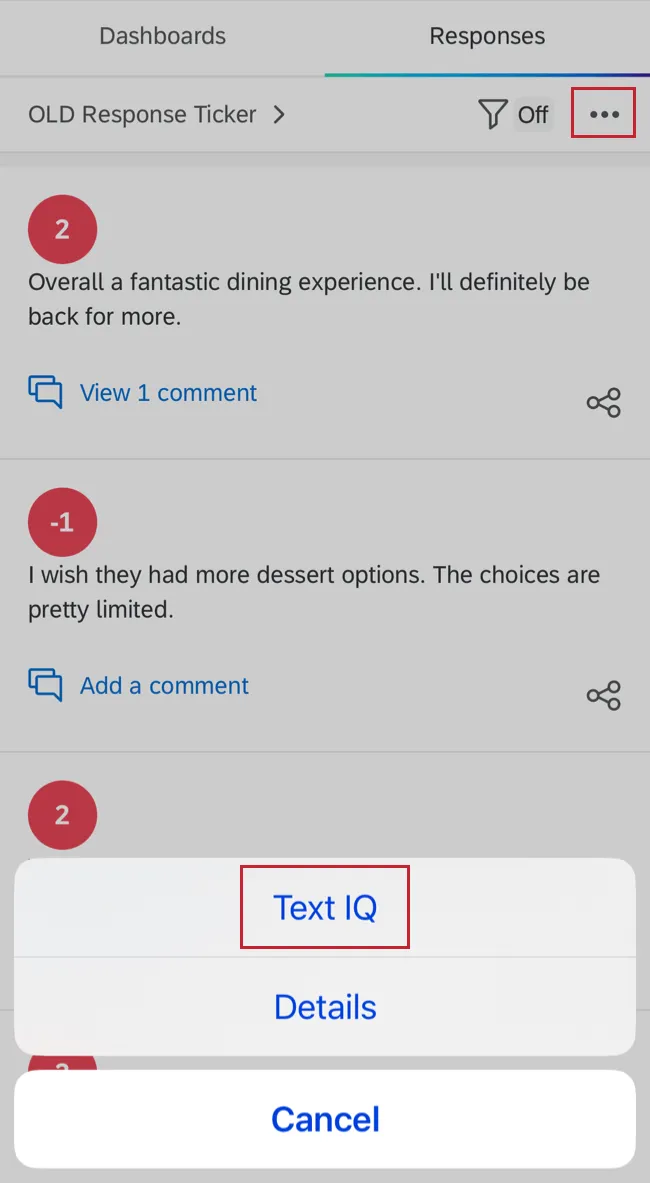
To open Text iQ on your dashboard, select the 3 horizontal dots within the Responses tab and then tap Text iQ.
Topic Widgets
Qtip: If you do not see a bubble widget and instead see the “No Topics” message, then you haven’t created topics in your CX Dashboard’s Text iQ yet. Log onto a desktop and perform text analysis. Don’t forget to apply changes when you’re finished!
When you enter Text iQ, you will see a bubble widget containing all your topics. The color borders represent the percentage of comments belonging to each type of sentiment: positive (green), negative (pink/red), neutral (gray), and mixed (yellow).
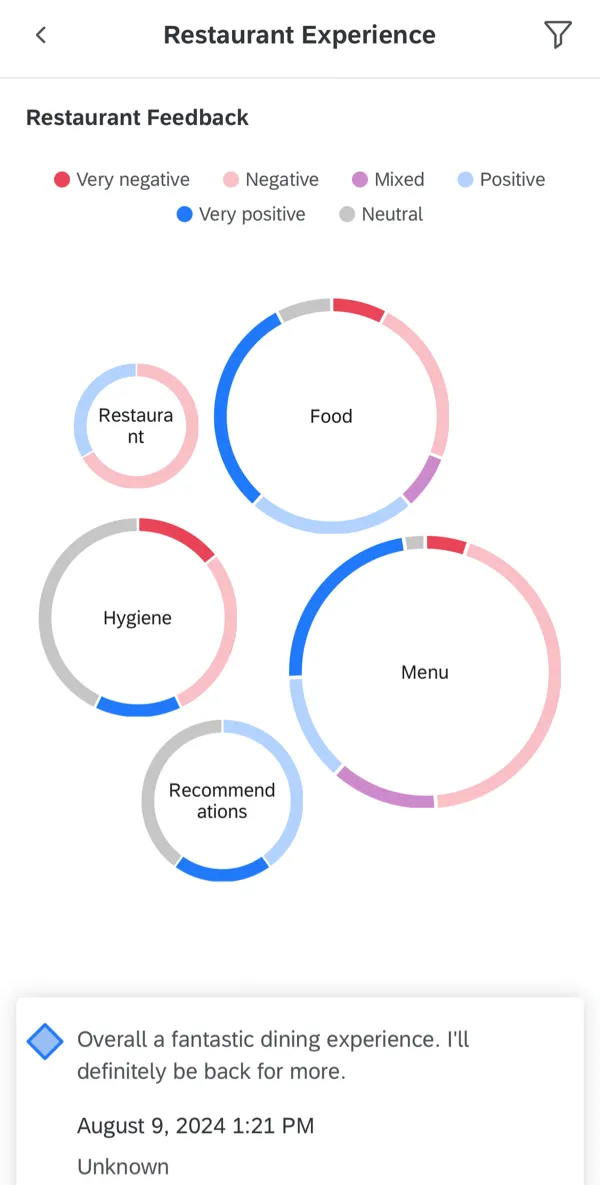
Click a bubble to narrow down the comments you see.
Qtip: Click the arrow in the upper-left to leave a topic and return to Text iQ home.
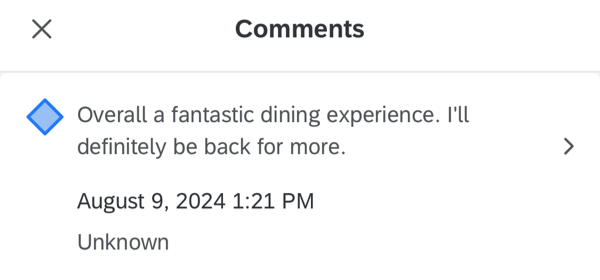
Comments and Sentiments
Scroll down the page to look at open text feedback. To the left of each piece of feedback will be a sentiment score.
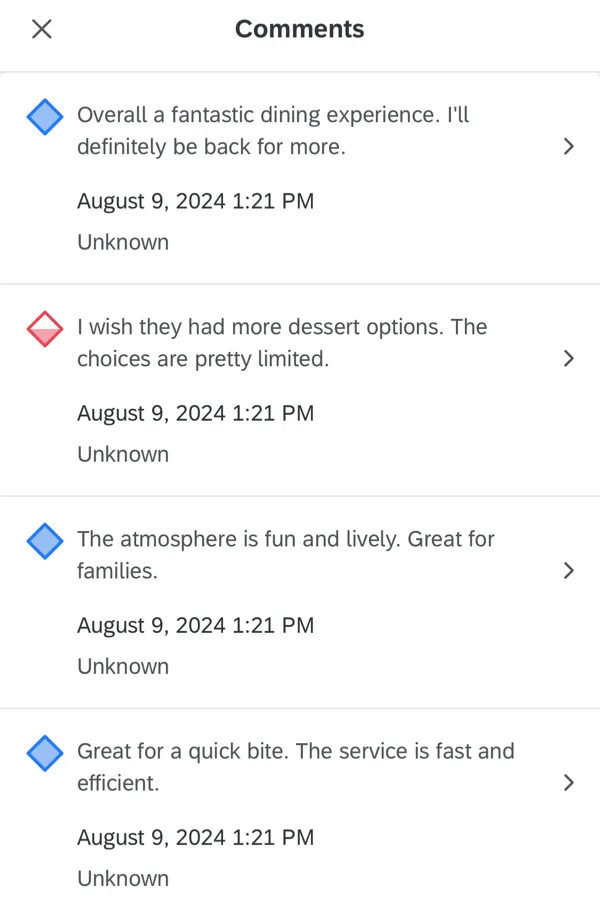
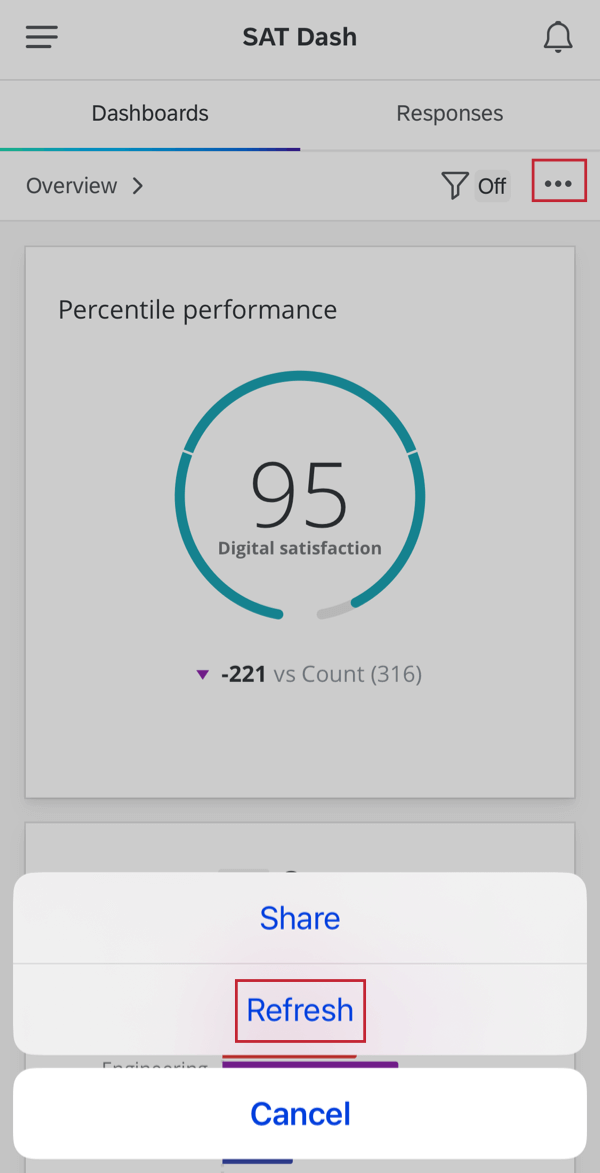
Qtip: If there’s a grey dash instead of a sentiment score, that may mean Text iQ is still calculating sentiments. Give it time, or navigate to different pages to refresh your app. You can also refresh your app by clicking the three dots in the upper-right and selecting Refresh.

When you click a comment, you can share it by clicking the icon in the upper-right.

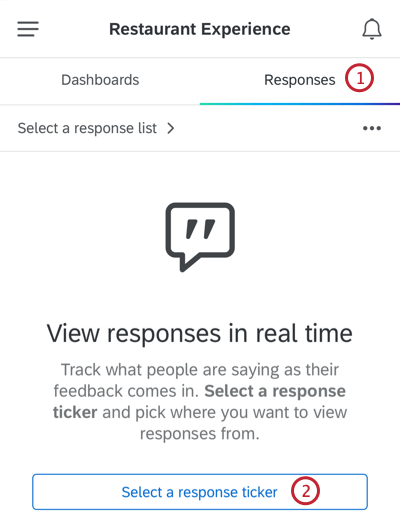
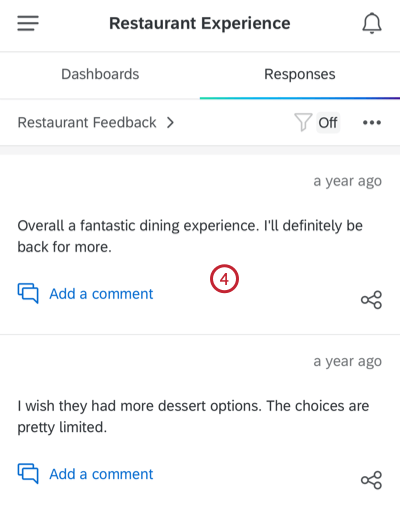
Viewing and Commenting on Responses
You can view responses on the XM app and keep track of the latest feedback that comes in. In this section, we’ll cover how to set this up in your dashboard, and then how to view these responses on the XM app.
Qtip: To view this feature, make sure you are updated to version 1.31.1 or higher.
Dashboard Setup
To make this feature available to your dashboard viewers, all you need to do is add a response ticker widget to any of the dashboards you’ve made available in the app.
For guided setup, see the linked support pages.
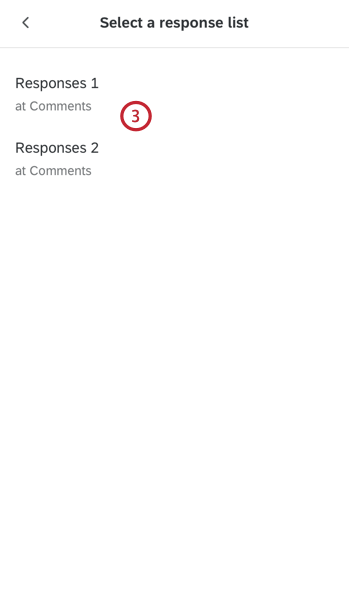
Qtip: The response set’s name comes from the widget title. If you do not add a widget title, this will display to dashboard viewers as “Responses 1.”
Qtip: To allow dashboard viewers to see the full response or share the response from the mobile dashboard, you need to enable the full response records. This is only available in CX Dashboards.
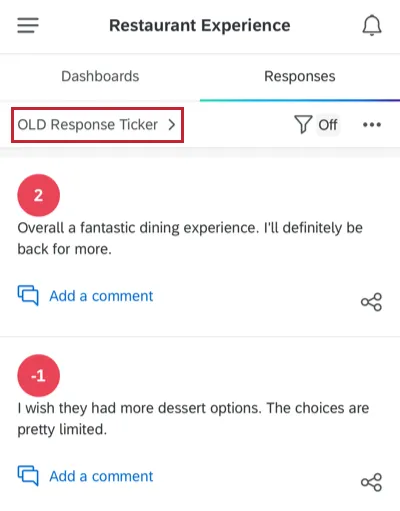
Viewing Responses
Responses are sorted from newest to oldest. The date is dependent on the date field used in the response ticker widget.
Qtip: You will see the name of the Response Ticker and the name of the dashboard page where this widget can be found.
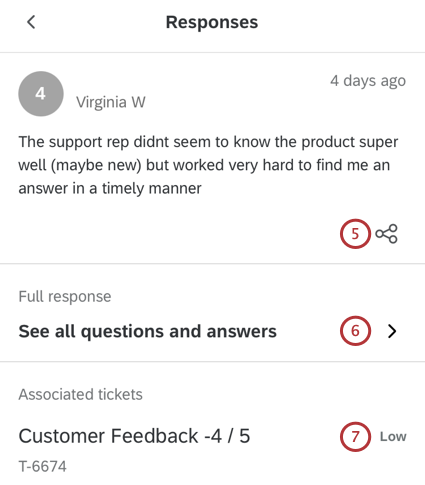
Qtip: You can only share the response or read the full response if the person who made the dashboard made that option available.
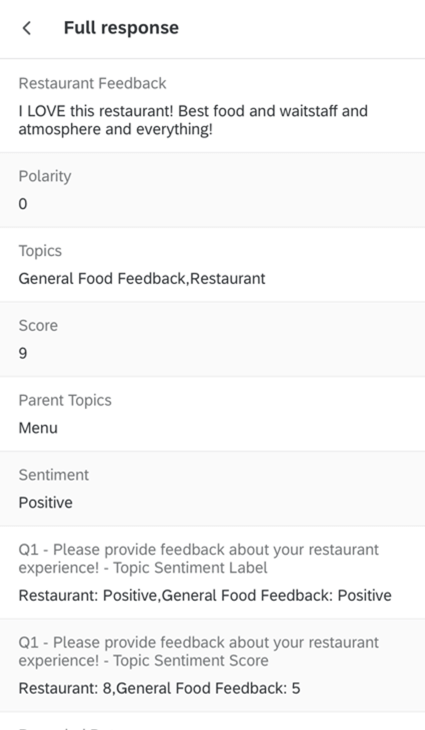
Qtip: The fields displayed are based on how the full response records were customized for the widget. Column configurations are not retained since they are not mobile-compatible, but section names and the list of selected fields will be the same.
Qtip: If you want to switch to a different response set, click the header to navigate back to the list of response sets.

Filtering Responses
You can filter your responses the same way you would your mobile dashboard pages. These filters will be pulled from the dashboard page where your response ticket widget is set up.

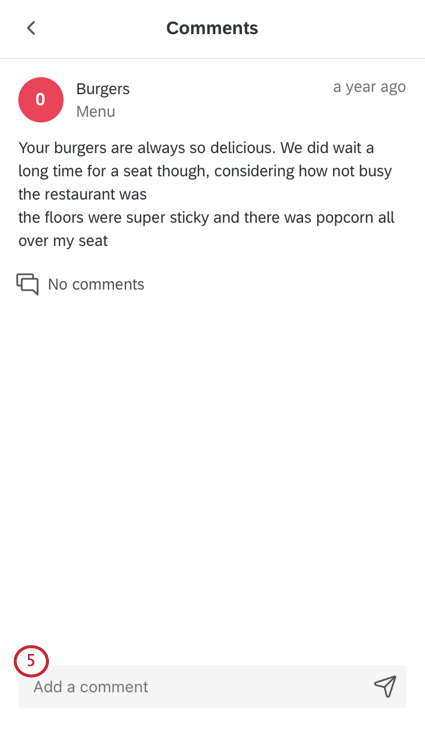
Commenting on Responses
Just like on desktop, you can comment on responses on the XM App.


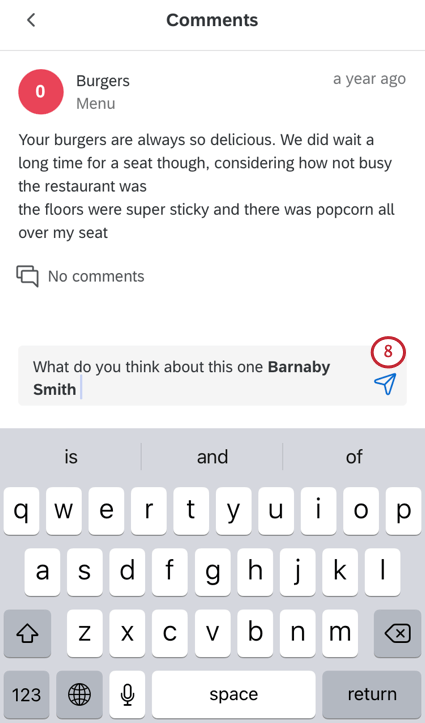
Qtip: Once you post the comment, the mentioned user will receive a notification. See Commenting on Responses for more details.
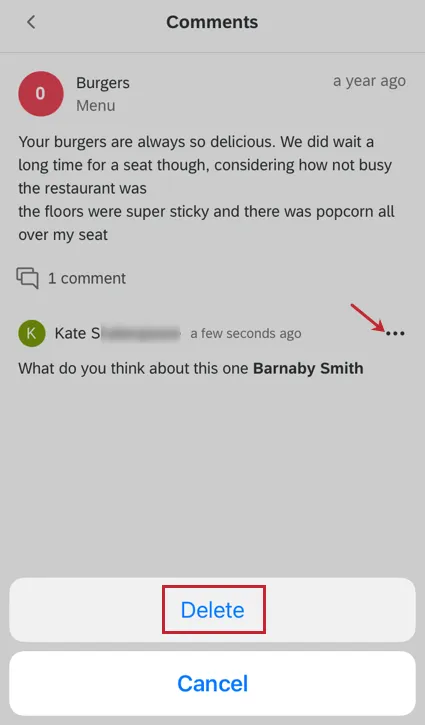
To delete a comment, click the dropdown, then select Delete. You can only delete comments you wrote.
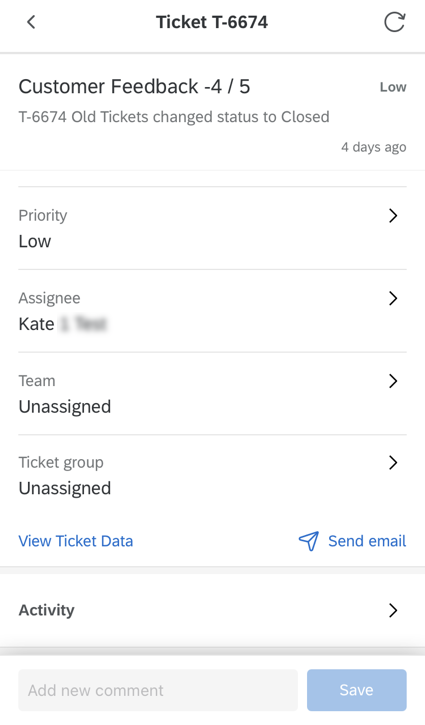
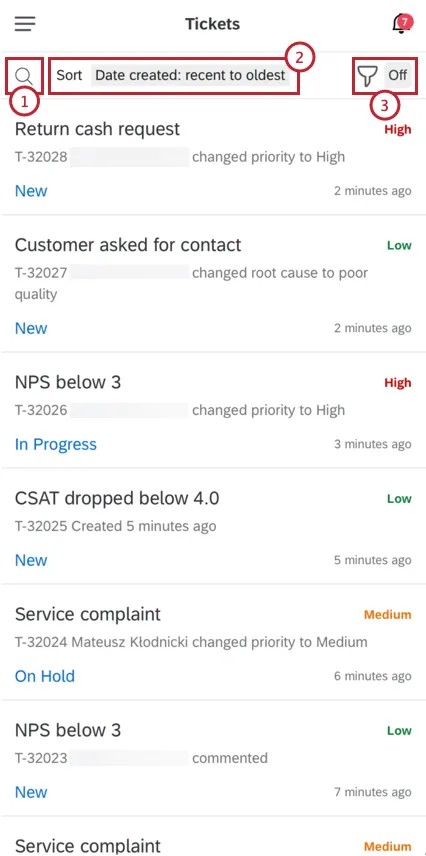
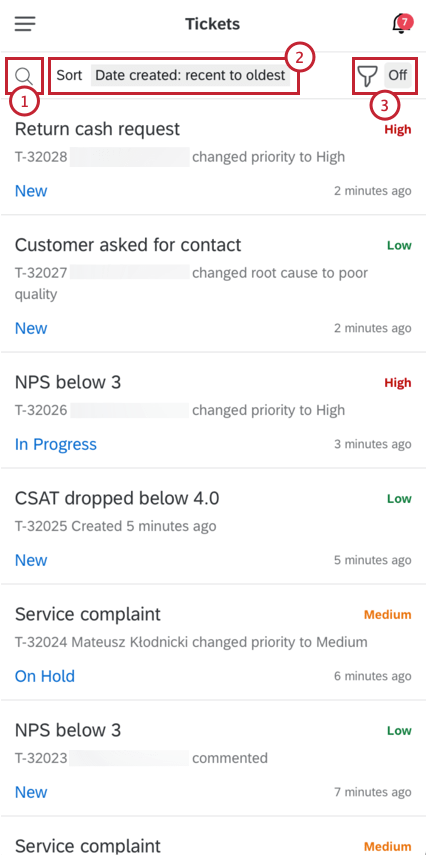
Tickets in the XM App
After logging into the app, you will be able to filter, sort, and search through all of the tickets assigned to you, as well as view and act on tickets directly from your mobile device. For more information on creating tickets or following up on tickets, please visit their respective pages.
Qtip: Logging into the Follow Up App via SSO is supported for most SSO configurations. For more details, please reference the Logging in through Mobile Apps SSO support page.
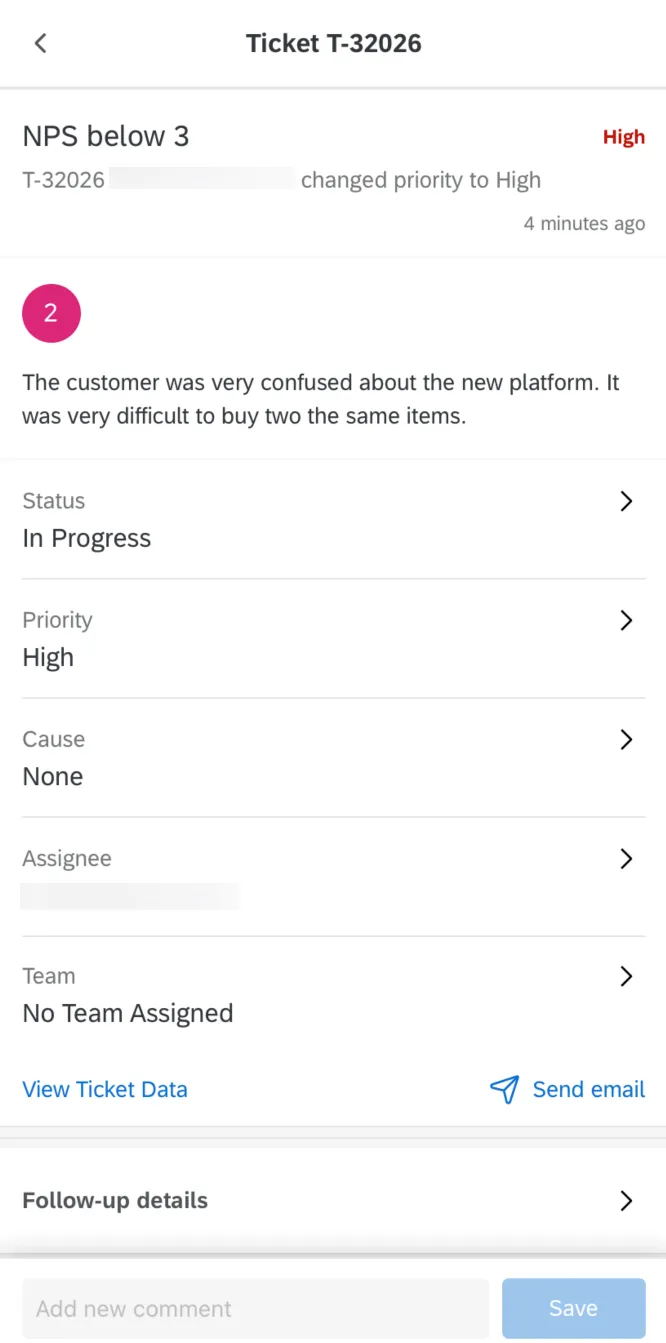
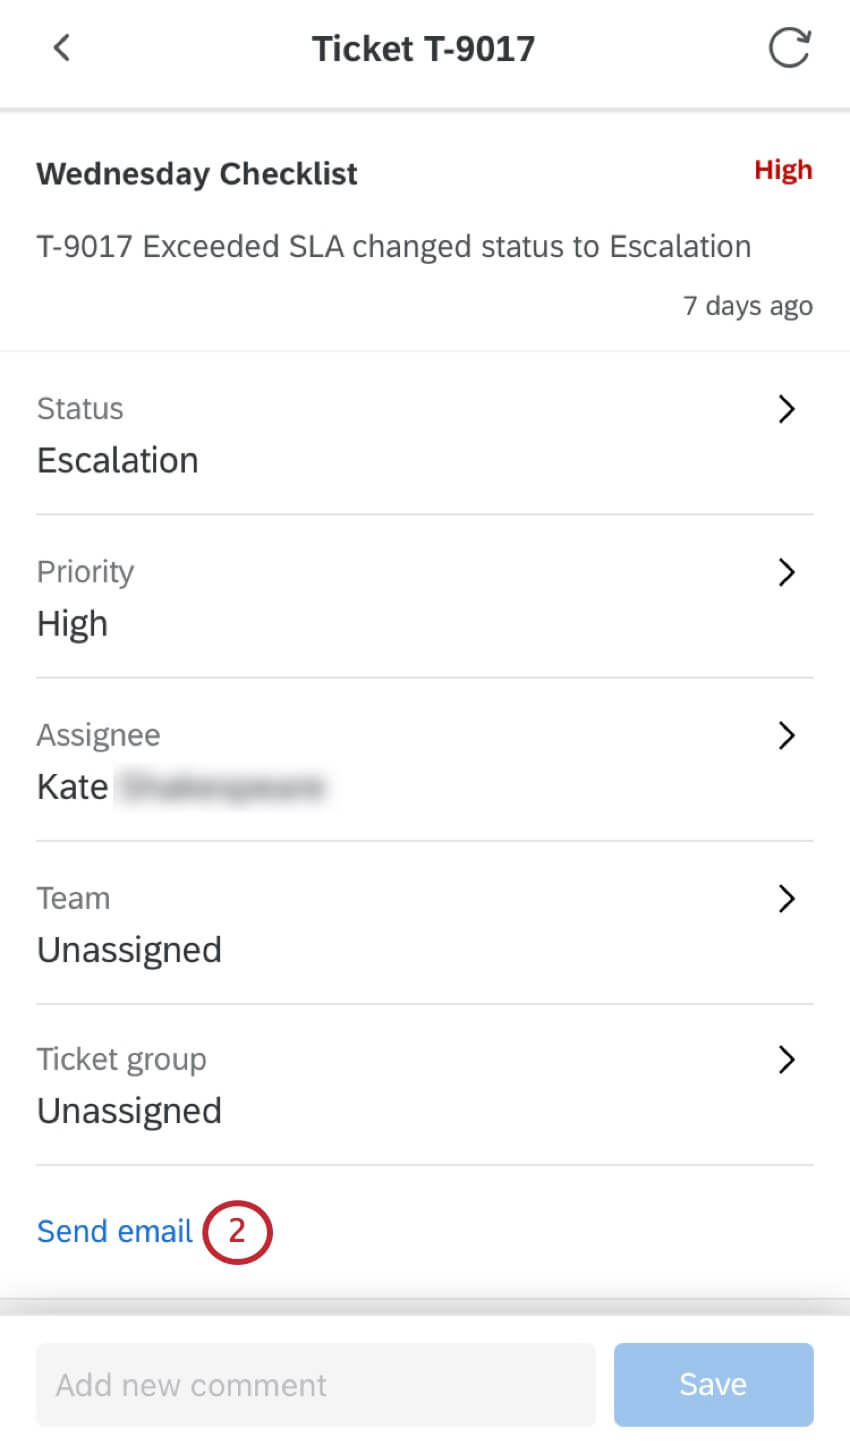
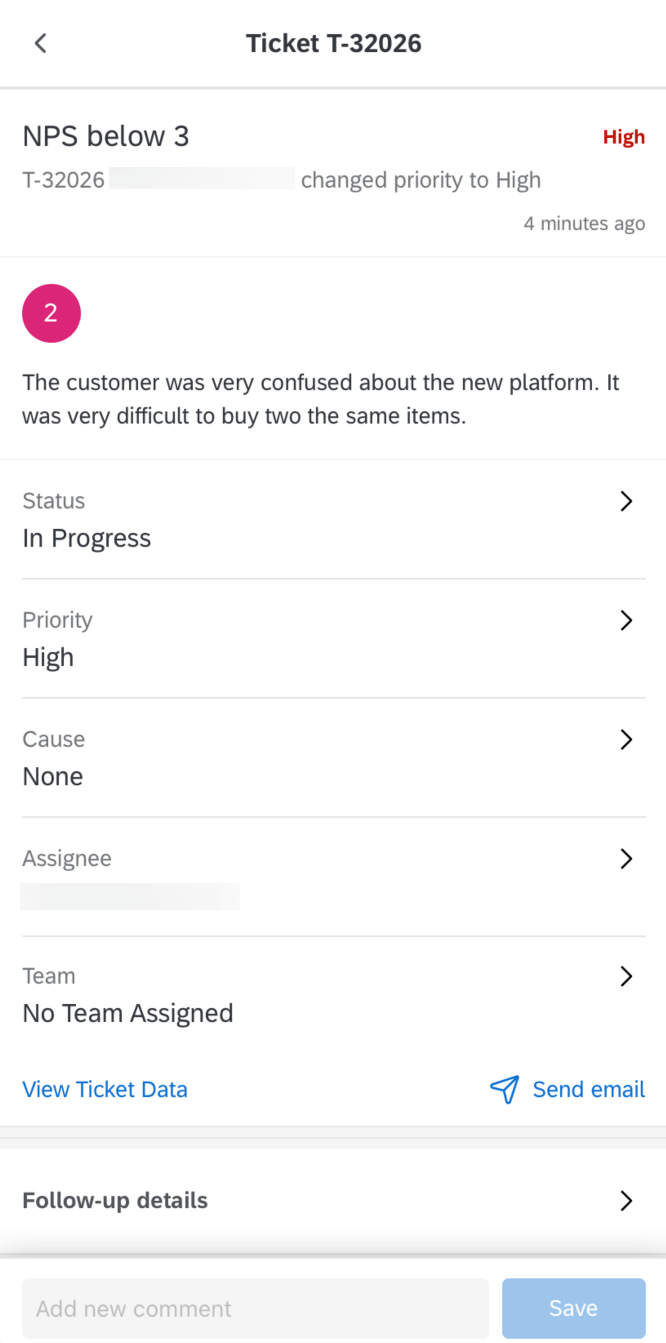
Simply click on any ticket to view all of the associated information. Once a ticket is selected, you can change the status by clicking on the current status or add any comments using the text box at the bottom of your screen.
Qtip: When a ticket gets assigned to you, you’ll receive a notification.
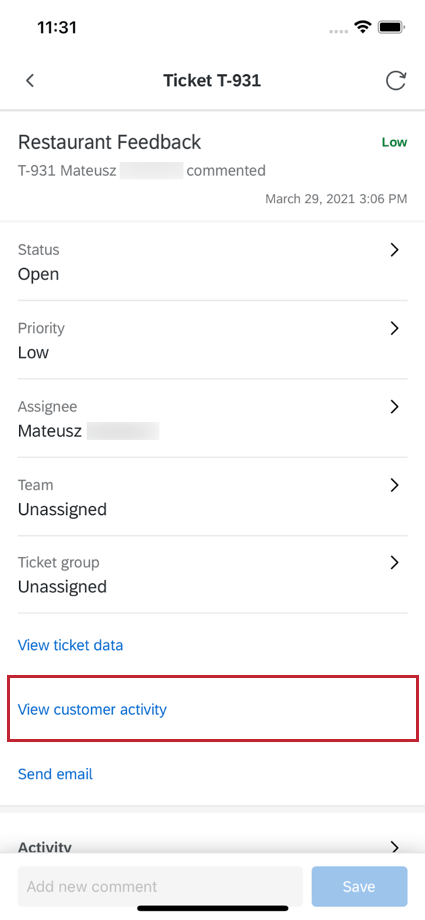
Viewing Customer Activity
Qtip: This feature is only available if you have access to XM Directory.
If a ticket is generated for a specific contact in your XM Directory, you can view that contact’s information from directly within the ticket in your Qualtrics XM App.
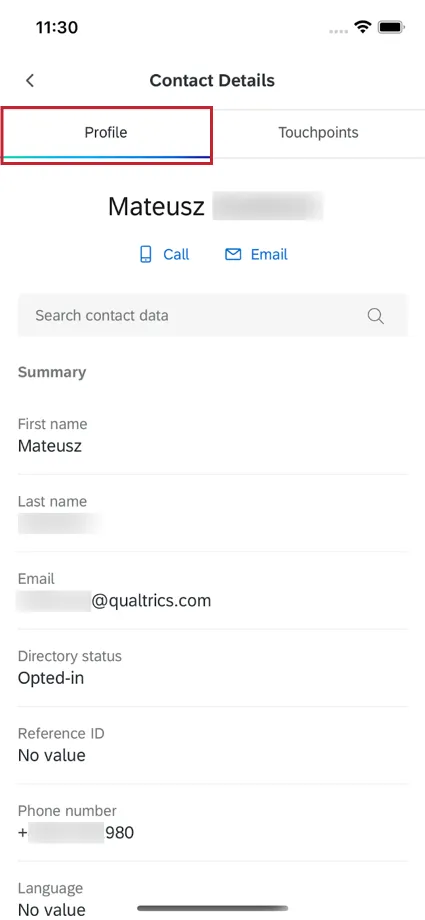
To view a contact’s information, click View Customer Activity at the bottom of the ticket.

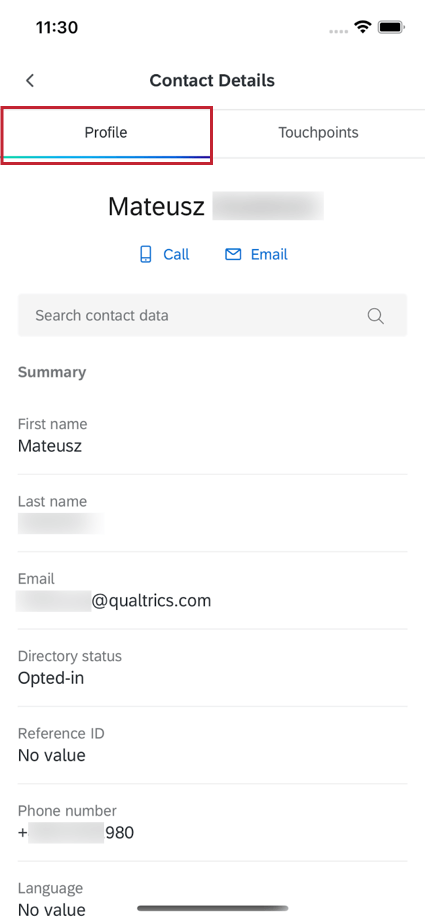
A window will appear that has that specific contact’s information. In the Profile section, you can see any of the contact’s attributes. This includes their first name, last name, email address, opt-in status, reference ID, phone number, language, and any additional embedded data.
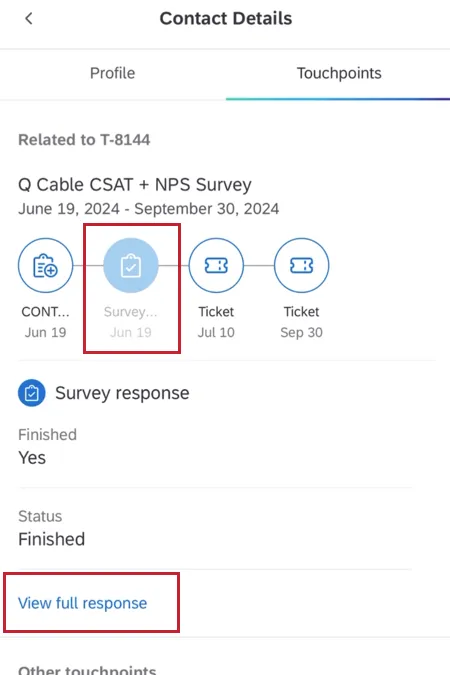
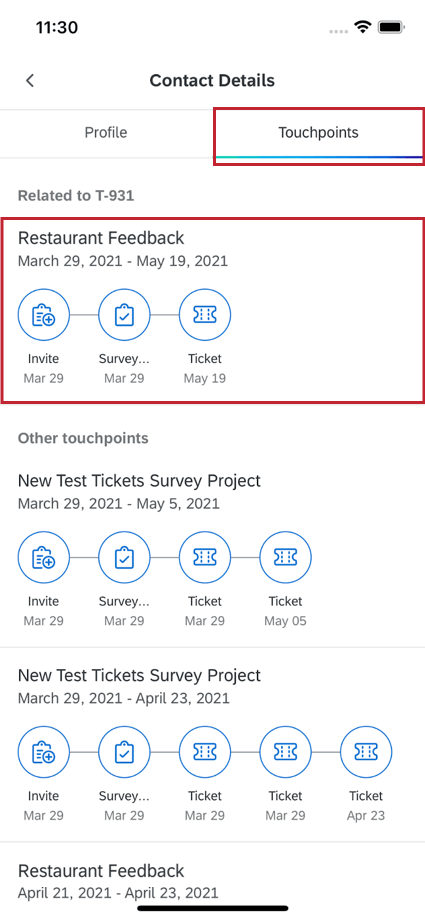
The Touchpoints section contains all of the points of interaction for your contact. The touchpoint timeline relevant to the selected ticket will be listed first, and any other touchpoint timelines for the contact will appear underneath.
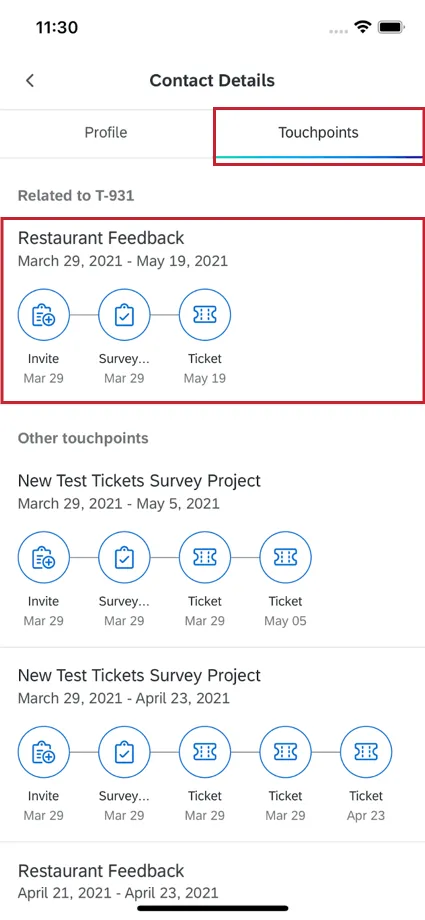
You can click on any touchpoint to see more details about that specific interaction.
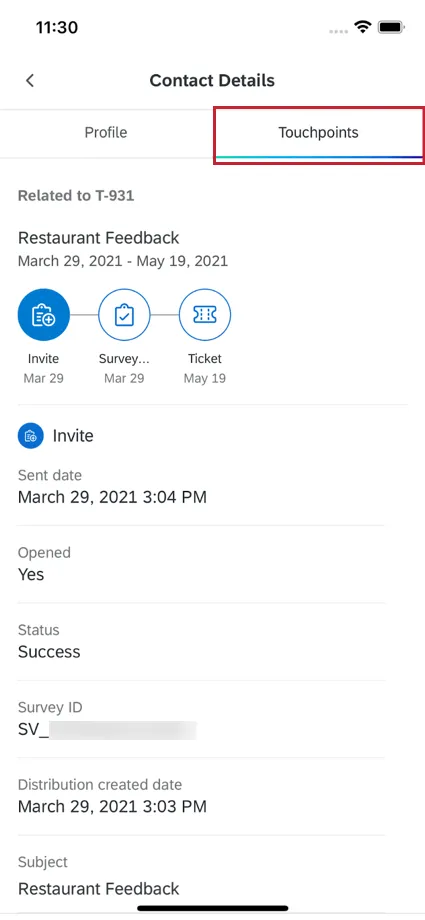
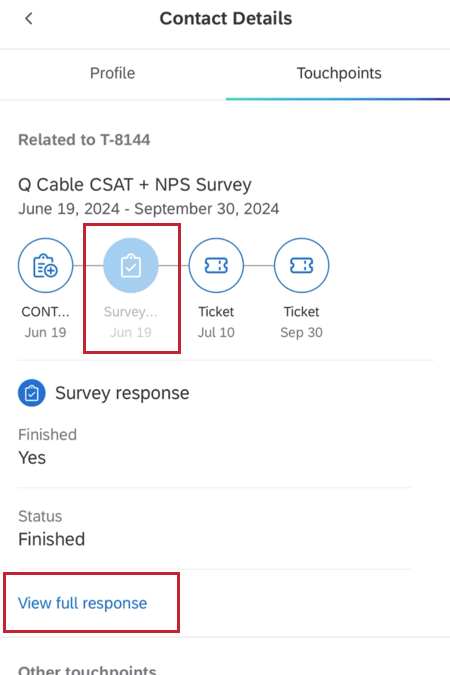
If you click on a survey response touchpoint, then you can click View full response to see the entire response.
Using Ticket Templates
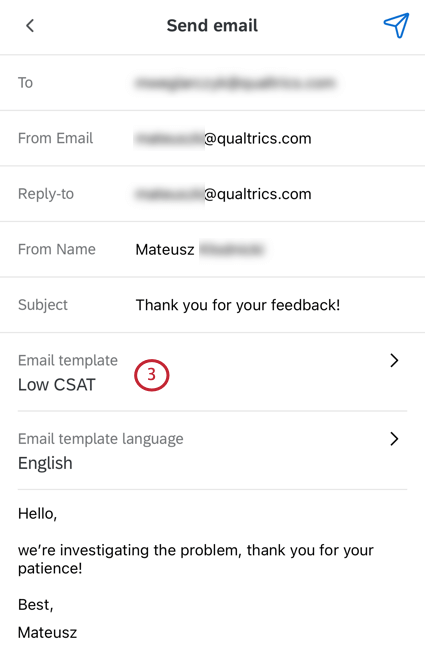
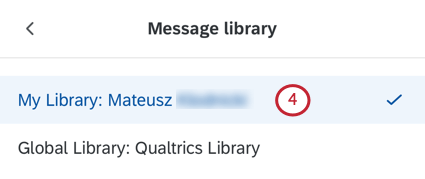
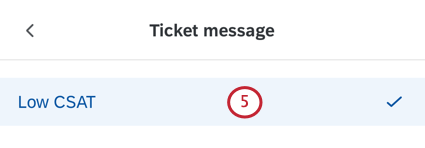
The XM app allows you to use saved library messages when you send emails from a ticket.
Qtip: Create your messages on the Qualtrics website and save them to your library before you try to use them in a ticket email.

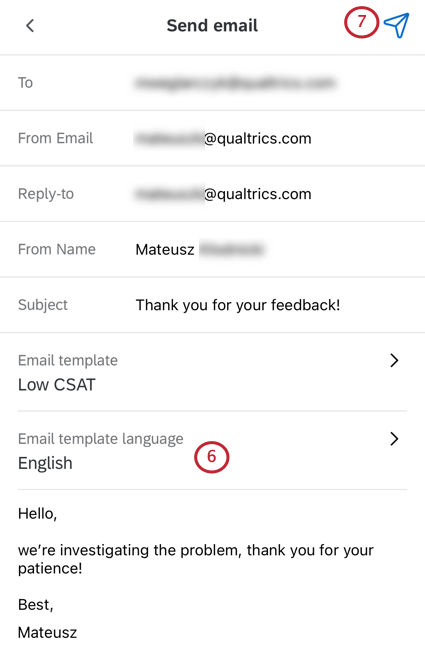
Qtip: Tickets in XM App do not support 2-way emails, even if 2-way emailing is set up in the account that the XM App is linked to (emails always only send 1-way). If you have 2-way emails set up and would like the reply to go back to the ticket, we recommend that you send emails from the desktop version of Qualtrics.
Qtip: The XM App does not currently support sending images in emails.
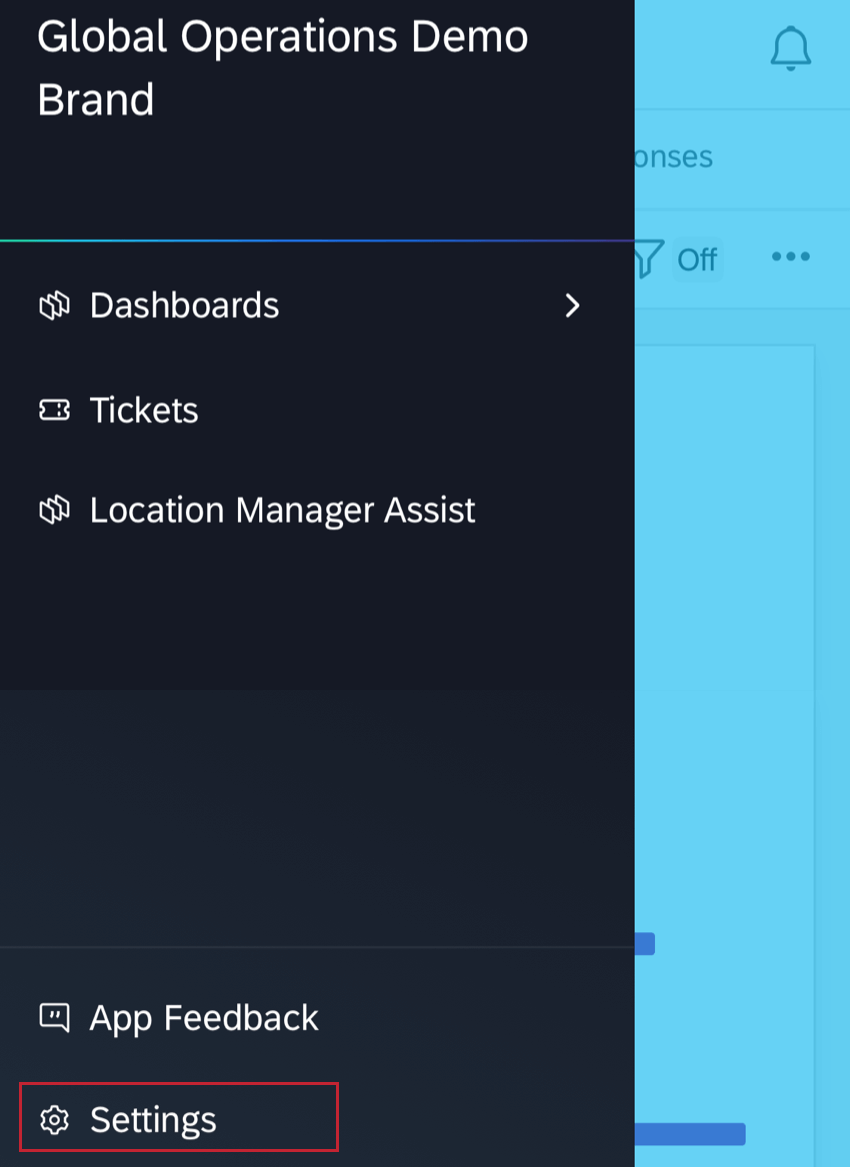
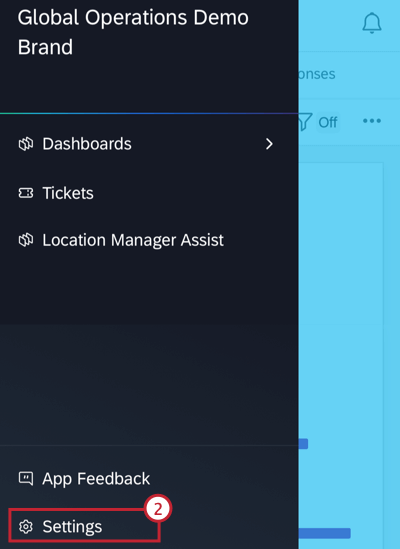
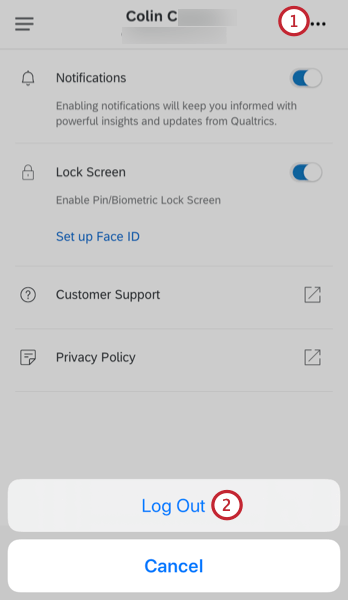
App Settings
The app settings allows you to turn notifications for the app on and off. You can also log out here.
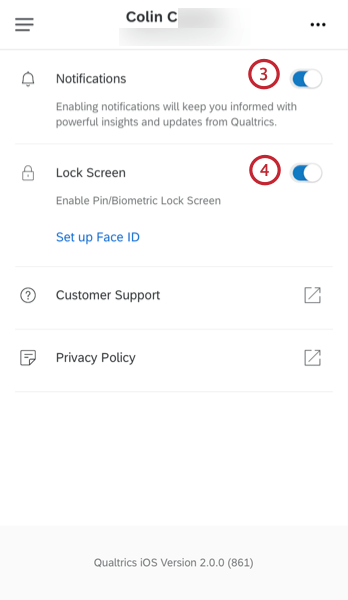
Qtip: If you disable this setting, then after 60 seconds of inactivity, you will be logged out of the app instead of being asked to re-authenticate. This is to ensure that even users without the lock screen enabled have an added security measure.
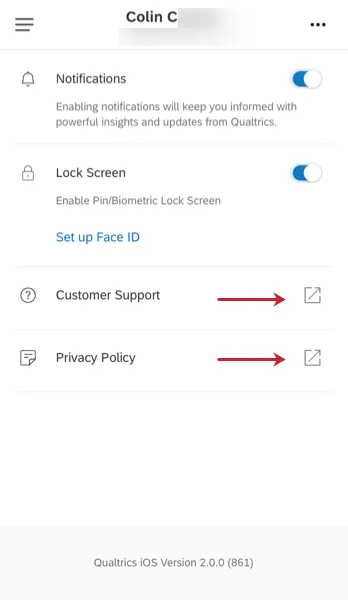
Qtip: From the settings menu, you can also give feedback on the app or go your Customer Success Hub to contact support.
Logging Out
To log out of the app:
App Language
Attention: The Qualtrics XM App is available for any language you can use in CX and EX dashboards. See the table on the Languages in Qualtrics support page for a full list of available languages.
The language of the app matches the language you have set inside your Qualtrics account. On desktop, go to your Account Settings to change the language. You may need to close the app and reopen it before you see your changes.
Qtip: Changing the language of the app changes the default text of the app. To change widget titles and field names, remember that a dashboard administrator needs to upload dashboard translations (CX | EX).
That's great! Thank you for your feedback!
Thank you for your feedback!