-

Qualtrics Platform -

Customer Journey Optimizer -

XM Discover -

Qualtrics Social Connect
Viewing Your Support History
About Viewing Support History
After logging into your Customer Success Hub, you can view your past support ticket history, including transcripts of your interactions with support and any connected escalations, and reply directly to email tickets you’ve submitted. If you are a Brand Administrator, you can also view the support tickets for your entire brand from this page.
To view your support history, click My Tickets in the upper-right of your Customer Success Hub.

Viewing Your Support Ticket History
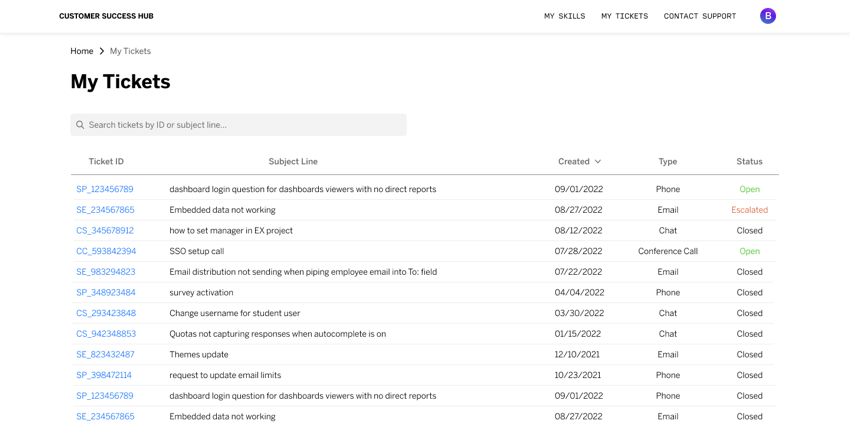
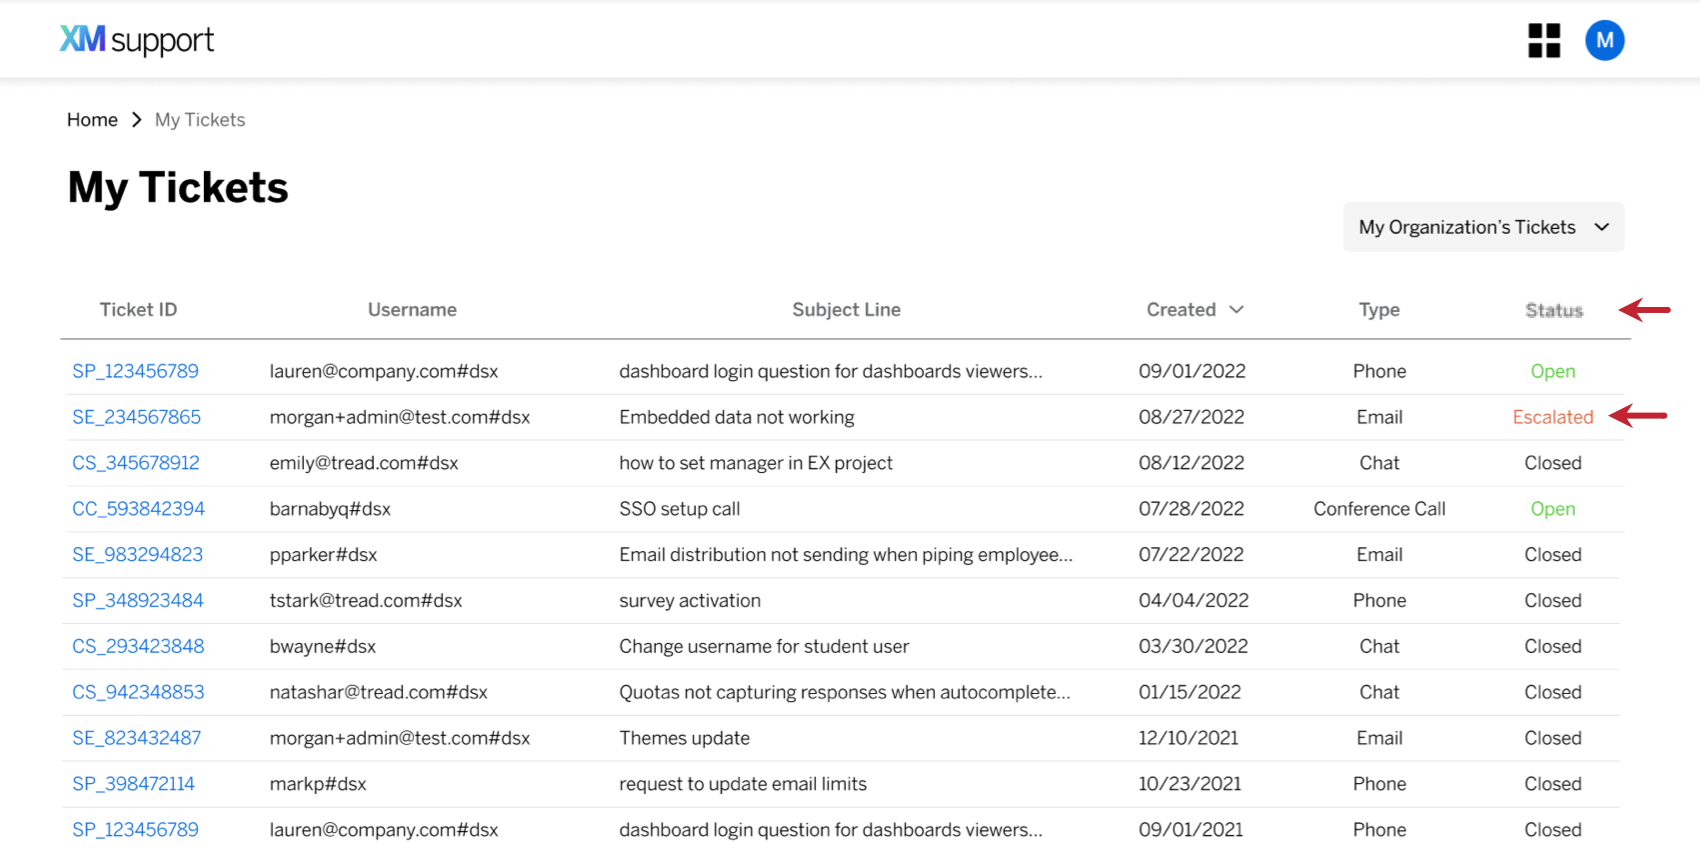
The My Tickets page shows you all the tickets you have filed with our support team. The table will contain all of your open tickets, as well as any closed tickets. You can also click anywhere on the row to see more details about that ticket.
Here’s the information you’ll be able to see for each ticket in the table:
- Ticket ID: This is a unique ID that our support team uses to track your ticket submission.
- Username: This column will only be shown for Brand Administrators when “My Organization’s Tickets” is selected. This is the username of any user associated with the support ticket.
- Subject Line: This will be the subject line that you provided when submitting the ticket. If the ticket was a conference call, it will only specify “Conference call – username”. Phone tickets default to “Phone call – username” if no subject line was provided.
- Created: This is the date that you originally submitted the ticket to our support team. The time zone matches what is set in your browser.
- Last activity: This is the date that the ticket was last updated. The time zone matches what is set in your browser.
- Type: Specifies whether this is a phone, chat, conference call, or email support ticket.
- Status: Open tickets are in the process of being addressed by our support team. Closed tickets have been addressed by our support team and the issue is considered resolved. Tickets that have been escalated will have an “Escalated” status.
Viewing Individual Tickets
When you click on a ticket’s name or ID in the table, you’ll be able to see more details about it. This is where you can find transcripts of the support interaction or any escalations that may be connected to it.
The ticket’s name and ID will be displayed along the top of the page. All tickets include the following information on the right side of the page:
- Ticket status
- Date of creation
- Date of last update
- Name of the support representative assigned to the ticket
- The user that submitted the ticket
- Any additional users associated with the ticket (if applicable)
- Escalation progress, if the ticket has been escalated
- Links to support resources shared during the support interaction
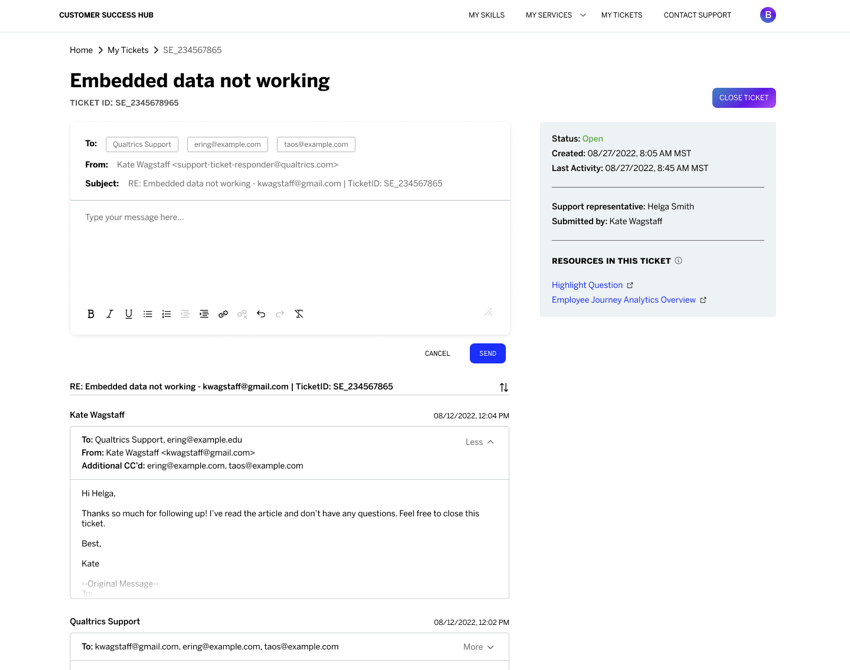
Email Tickets
Email tickets will display all of the emails in the support interaction. This can act as a helpful backup, or make it easier to find an interaction in your inbox, by searching the subject line or email content.
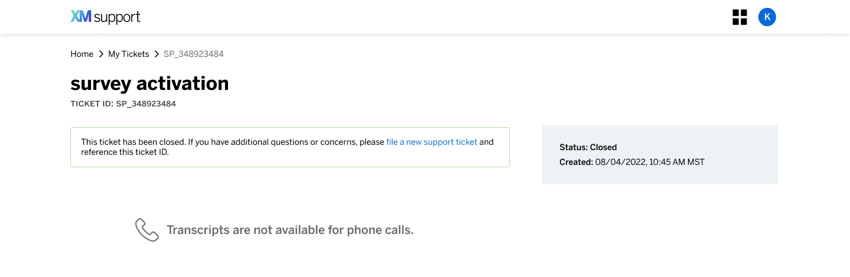
Phone Tickets
Transcripts are not available for phone calls, so you will only see the basic ticket information to the right. If any emails were sent related to the ticket, they will also appear in this view.
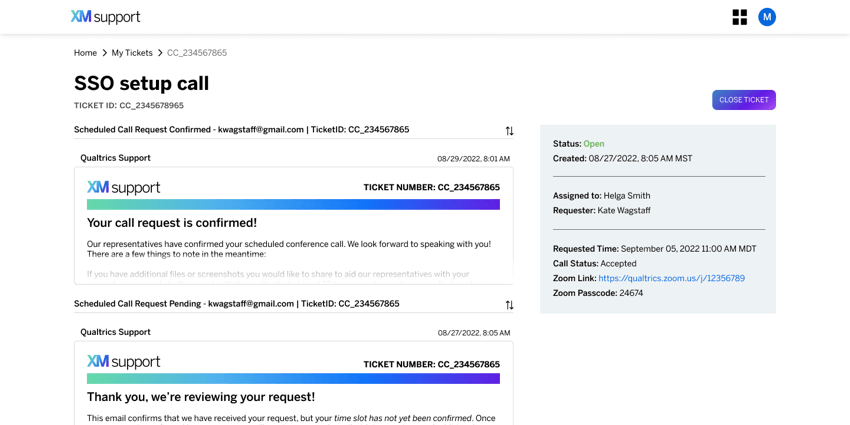
Conference Calls
In addition to showing your confirmation emails, conference call tickets also show information such as:
- Time the conference call was scheduled for
- Call status, either pending or accepted
- Zoom link
- Zoom passcode
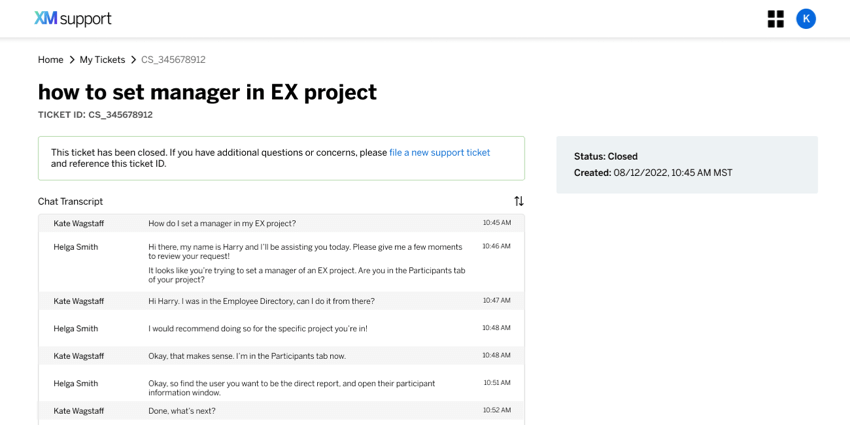
Chat Tickets
Chat tickets contain transcripts of the chat conversation. If there are also emails involved in the chat ticket, they will appear in this view.
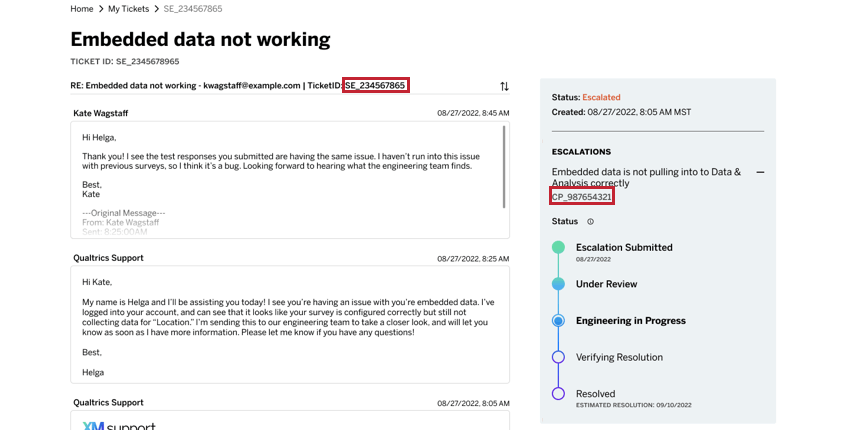
Viewing Escalations
Escalated tickets will be marked Escalated in the support ticket history and when viewing the individual ticket.
Click on the ticket to see more information regarding the escalation.
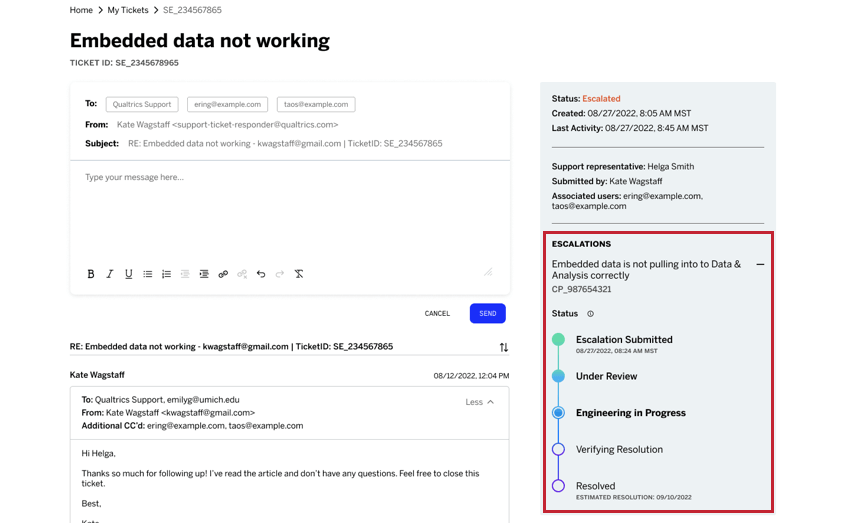
When a ticket has been escalated, you’ll see the following information:
- Description of the issue
- ID the support team uses to track your escalation (often starts with CP)
- Timeline with status of the escalation, which will update as the escalation is worked on.
- Escalation Submitted: Your escalation has been submitted and is awaiting review.
Qtip: Under this status, you’ll see the date the escalation was submitted.
- Under Review: Your escalation is currently being reviewed.
- Engineering in Progress: Your escalation is being worked on by the Engineering team.
- Verifying Resolution: This step requires action from you. This status means an engineer has implemented a solution for the issue. A representative will reach out to ask you to confirm that the issue you reported is no longer occurring.
- Resolved: Your escalation has been resolved.
Qtip: Before you reach this status, you’ll sometimes see the date the escalation is estimated to be resolved listed underneath it. Keep in mind that estimated resolution dates are not guaranteed.
- Escalation Submitted: Your escalation has been submitted and is awaiting review.
Following up on a Ticket or Escalation
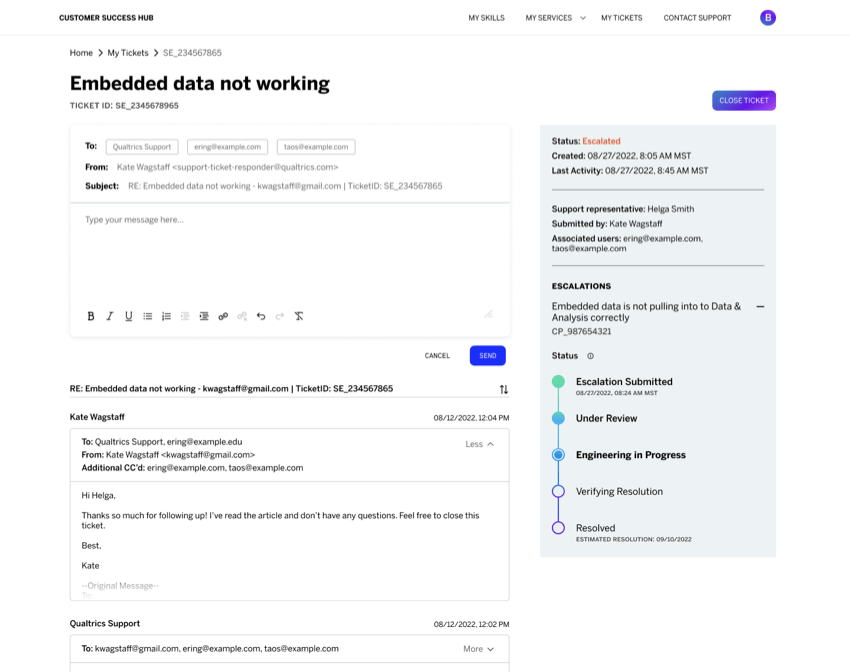
For open tickets with an email thread that you submitted, the ticket submitter and their Brand Administrators can respond to the email thread using a simple message editor that includes formatting options such as bold, hyperlinks, and file attachments. Any messages sent from the Customer Success Hub are added to the existing thread with the existing subject line and recipients.
File attachments have the following requirements:
- Up to 5 files can be attached per message.
- Only files up to 500KB can be attached.
- Files must be of one of the following types: CSV, TSV, XLSX, DOC, DOCX, PDF, TXT, JPG, PNG, GIF, MP4, MOV, HAR
If you cannot reply to a ticket
If you don’t see a message editor, the ticket may be closed or submitted by a user other than yourself. In this case, to follow up on a ticket or escalation, we recommend the following:
- For existing tickets or escalations where you still have the email thread in your email inbox, simply reply to the email to ask for an update. If you’re not sure if you still have the email thread in your inbox, copy the relevant Ticket or Escalation ID displayed in the table and search your email inbox for the ID.
- For tickets or escalations where you’ve lost the original email thread, copy the relevant Ticket or Escalation ID and then navigate to Get technical support to get in contact with our support team. In your message, be sure to include the ID that you copied.
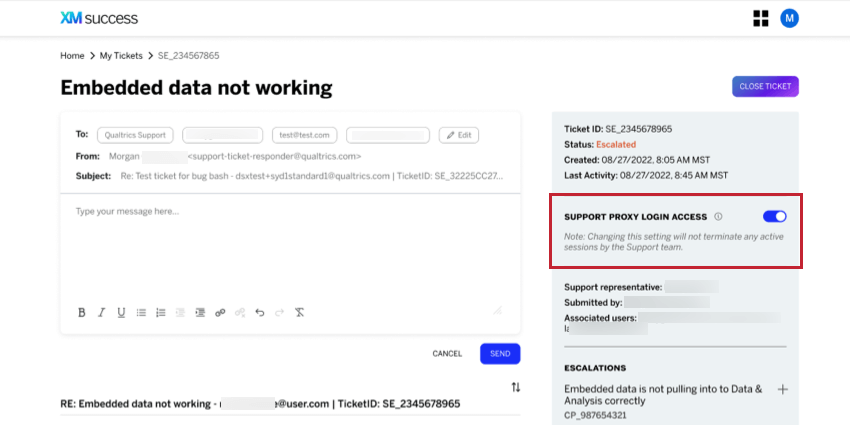
Support Proxy Login Access
When Support proxy login access is enabled, you grant the support team permission to log into your account to troubleshoot the ticket. You can revoke this permission at any time by disabling the setting.
This change only applies to your own account. If there are multiple users on a ticket, each user can configure their own proxy login access.
Closing Tickets

If you’re the owner of an open support ticket, you’ll see a Close Ticket button. If you no longer require support on the ticket, you can use this button to close it.
Once a ticket is closed:
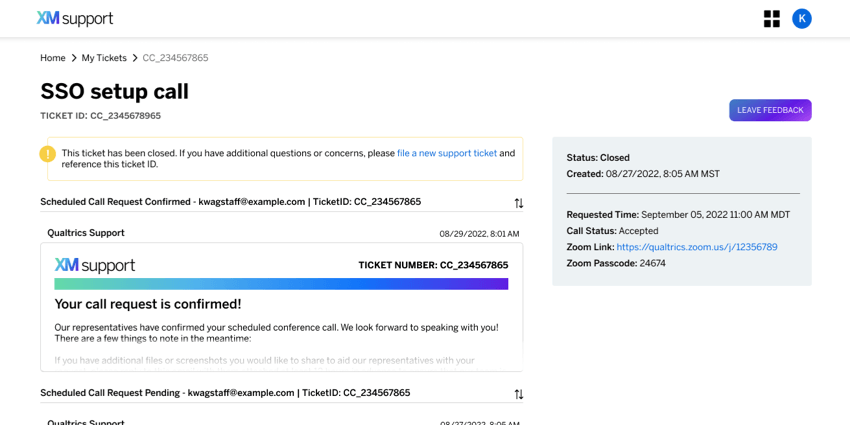
- You’ll see a message along the top of the page that says, “This ticket has been closed. If you have additional questions or concerns, please file a new support ticket and reference this ticket ID.”
- You’ll see a Leave Feedback button instead of the Close Ticket button. Click this to rate your support interaction. If feedback has already been submitted, you will see a thank you message instead.
See Following up on a Ticket or Escalation for what to do if you have additional questions.
Viewing the Brand’s Tickets
If you are a Brand Administrator, you can view the support history for your entire brand. On the My Tickets page, use the dropdown in the upper-right and select My Organization’s Tickets.
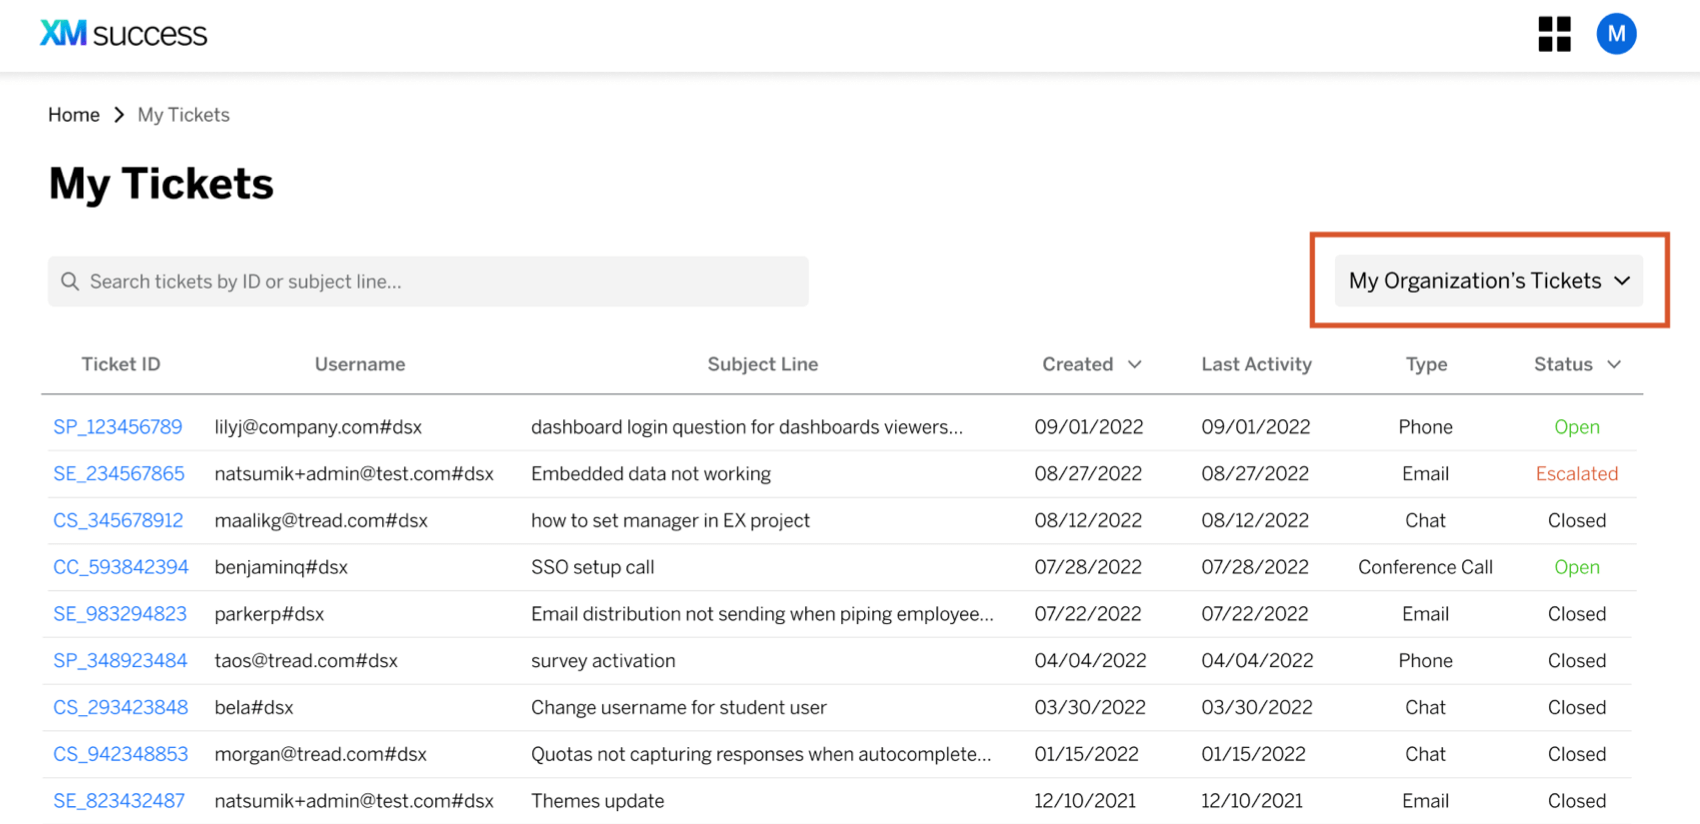
When viewing your brand’s ticket history, a “Username” column is added to the table, showing the user(s) associated with each ticket.