-

Qualtrics Platform -

Customer Journey Optimizer -

XM Discover -

Qualtrics Social Connect
Running an Engagement Project with Anonymous and Non-Anonymous Participants
About Running an Engagement Project with Anonymous and Non-Anonymous Participants
There are times where you may need part of your engagement results to be anonymized, while other parts of your results are not anonymized. For example, let’s say your company has a partially unionized workforce, and the union requires that engagement results be anonymous. You want to maintain your union workers’ anonymity, while still being able to report on your results as an entire organization. To do this, you can use a hybrid engagement project where some participants receive an individual link that identifies the respondent, while other participants receive a general anonymous link. You can place the anonymous responses in one specific part of your hierarchy, allowing you to analyze your anonymous data with the rest of your company engagement data.
Generating Your Hierarchy
For your hierarchy, we recommend using a level-based hierarchy, although you may use whatever hierarchy type you need to fit your business’ needs. When your anonymous respondents take the survey, they will answer an org hierarchy question which will place their response in the correct place in the hierarchy. More information about this setting up this question is in the following section.
Configuring Response Rates
Since your response set will contain anonymous responses, you will need to tell Qualtrics how many responses you are expecting in order to accurately calculate a response rate.
- Go to the Org Hierarchies section of the Participants tab.
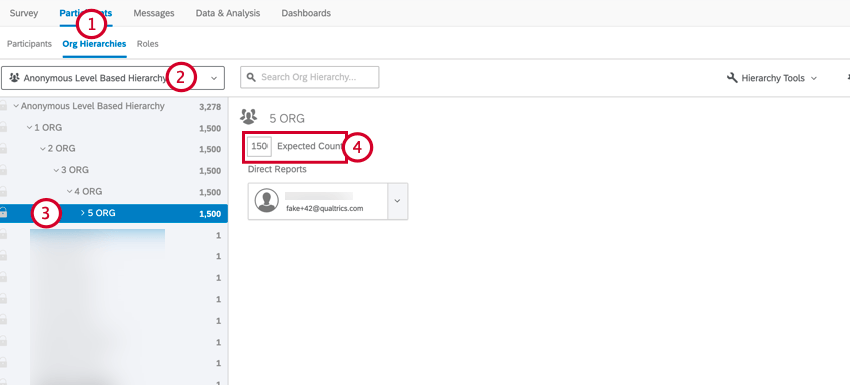
- Select your org hierarchy.
- Select the lowest level or unit.
- Enter the expected number of anonymous responses in the Expected Count box.
Creating Your Engagement Survey
For the most part, the content of your engagement survey will not change. You can ask the same engagement questions that you normally do. For help deciding what questions to ask, see this support page.
This section will cover the specific features you must add to your project in order to run your program correctly.
Displaying the Org Hierarchy Question to Anonymous Respondents
You will need to configure your survey so that only the respondents taking the survey via the anonymous link see your survey’s org hierarchy question. You will also need to ensure that your anonymous respondents select only the lowest level in the hierarchy.
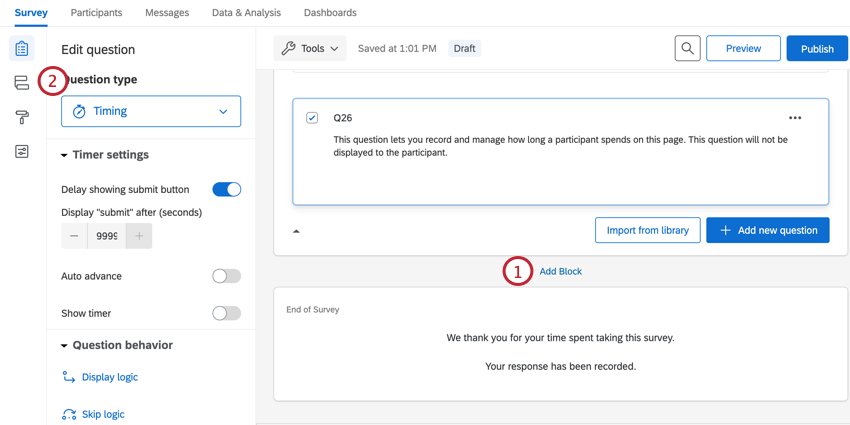
- In the survey editor, click Add Block to create a new question block.
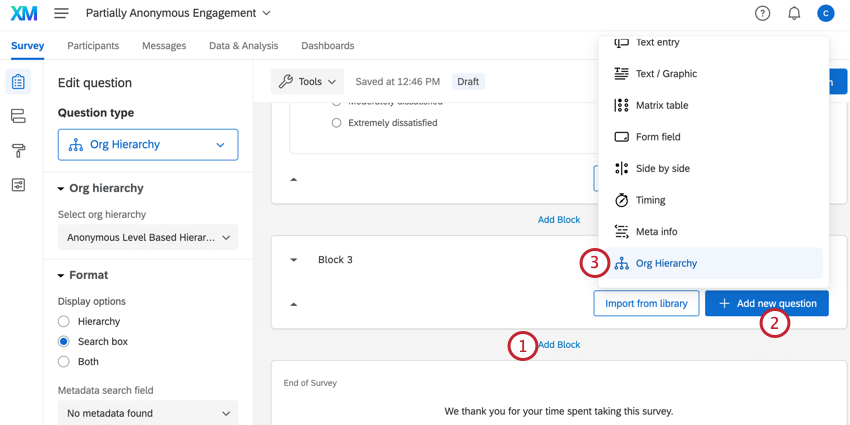 Qtip: Rename your block so you know what question is contained in the block. For this setup, we recommend renaming the block “Org Hierarchy Question Block.”
 - Click Add new question.
- Choose Org Hierarchy.
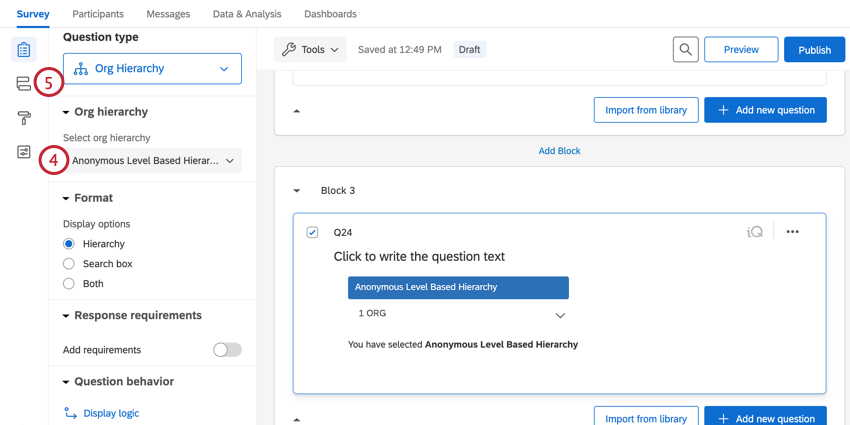
- Select your org hierarchy and finish setting up the org hierarchy question. For the question text, you’ll want to include instructions directing users to select the lowest level in the hierarchy. See this support page for more information about this question type.
- Navigate to the Survey flow.
- Click Add a New Element Here.
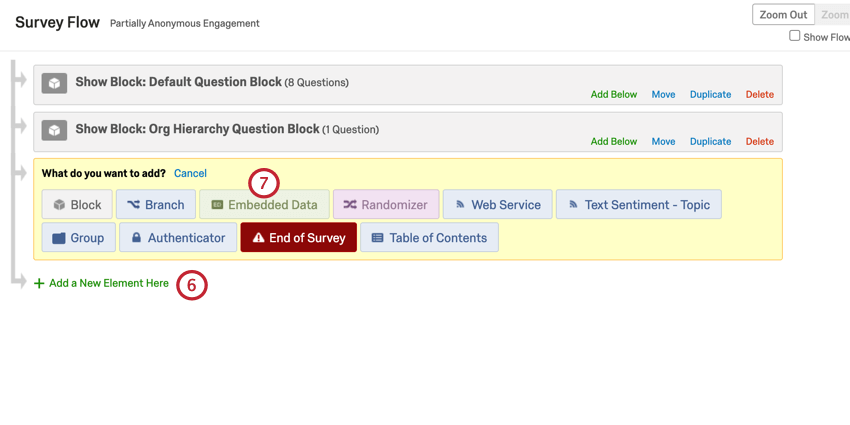
- Select Embedded Data.
- Move the embedded data element to the top of your survey flow.
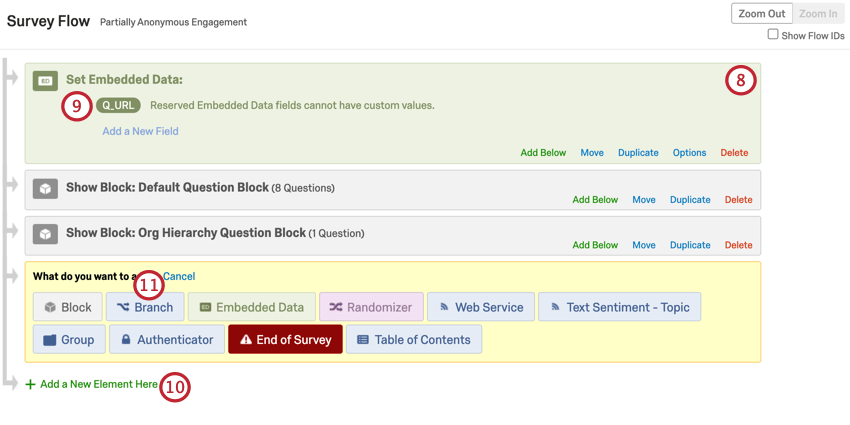
- Enter Q_URL as the embedded data field.
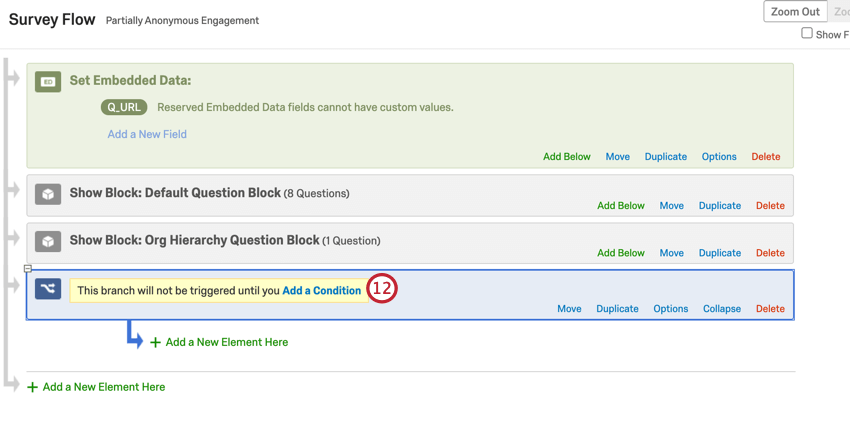
- Click Add a New Element Here.
- Select Branch.
- Click Add a Condition.
- Create the condition if Embedded Data Q_URL Contains Q_EE_ANON.
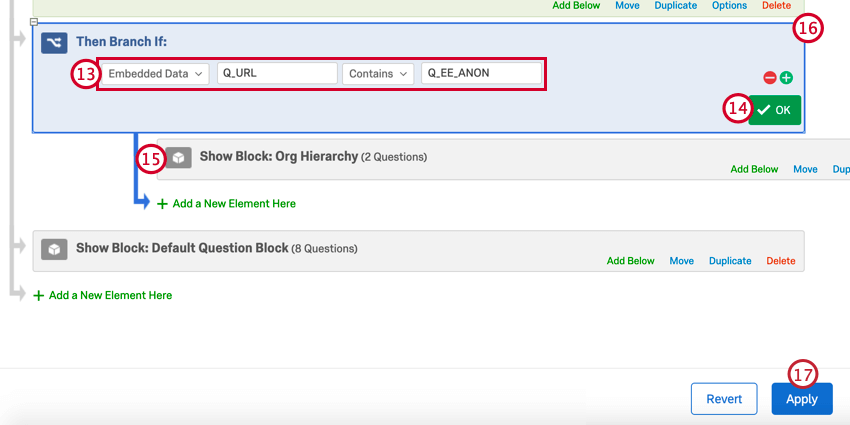
- Click OK.
- Move the block with the org hierarchy question so that it is nested below the branch.
- Move the branch so that it is after the embedded data element but before your other question blocks.
- Click Apply.
- Return to the survey editor and click Add new question in the block containing the org hierarchy question.
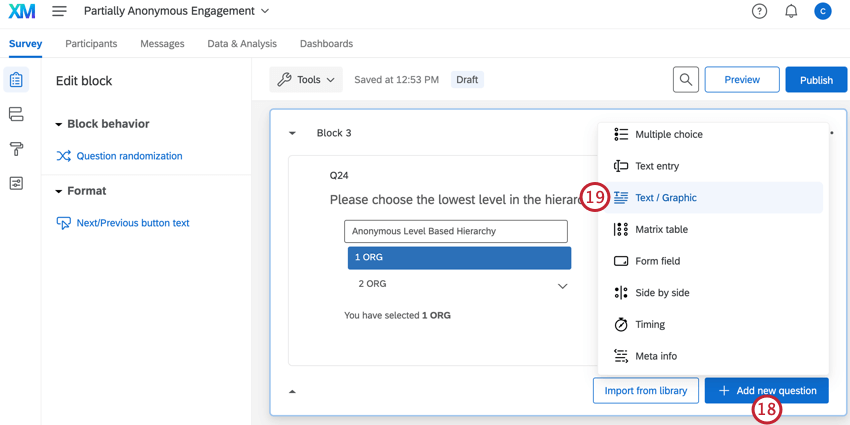
- Select the Text / Graphic question.
- Type a message for your participants to see if they select the wrong level in your hierarchy. This message should prompt them to return to the org hierarchy question and make a new selection.
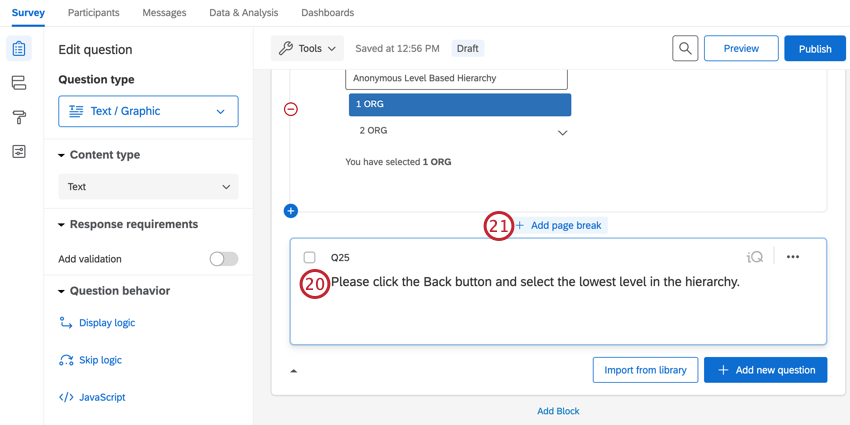
- Click Add page break between the org hierarchy question and the text / graphic question.
- Select the text / graphic question.
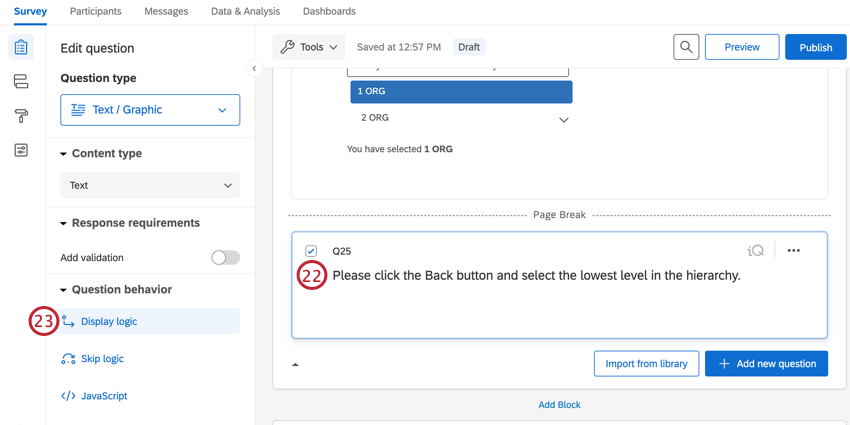
- Select Display logic.
- Choose Embedded Data.
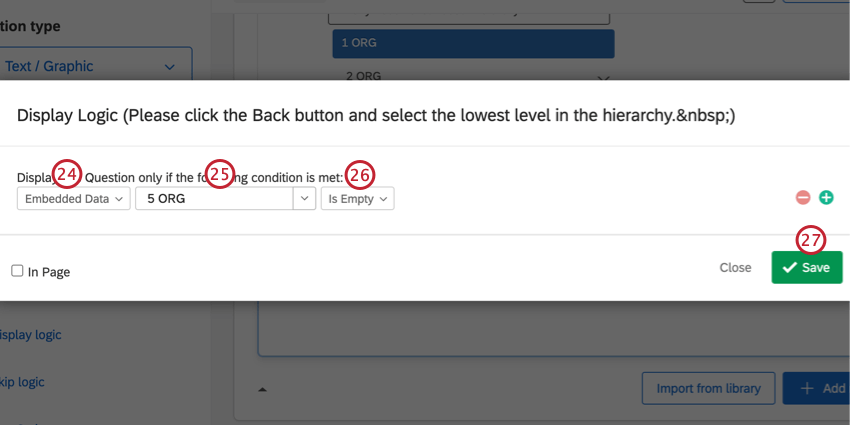
- Enter the name of the lowest level in your hierarchy. This must match the level name exactly. This field is case sensitive.
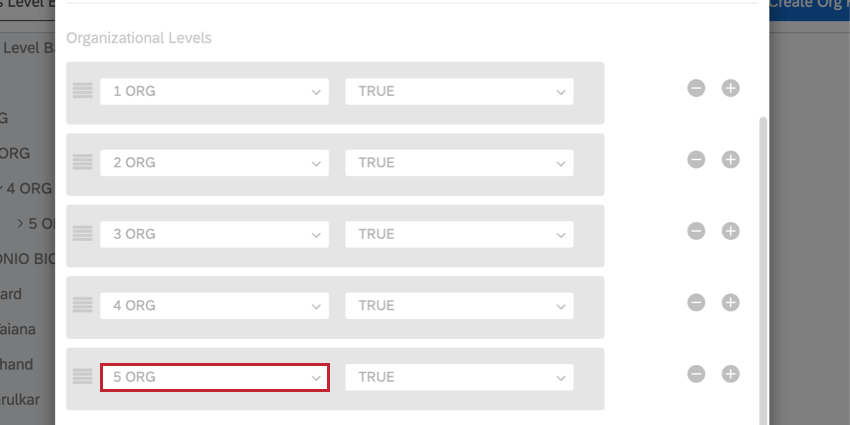
Qtip: You can find your lowest level’s name by clicking View Org Hierarchy Configuration in your hierarchy settings. The lowest level will be the last-listed level.
- Select Is Empty.
- Click Save.
- Click Add new question.
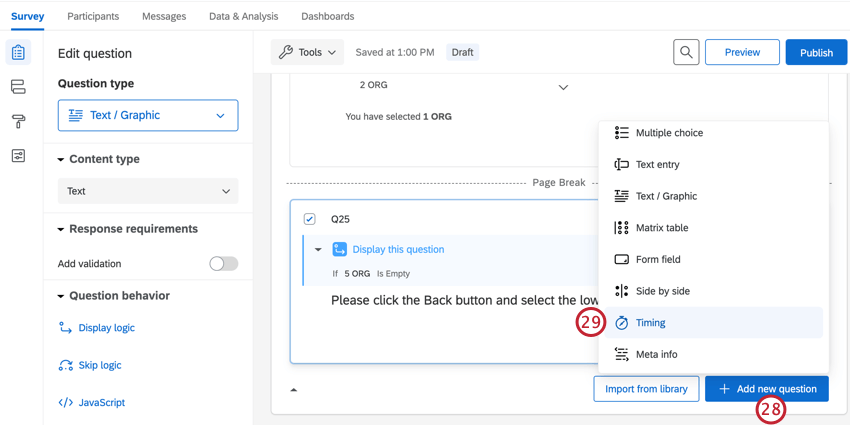
- Select Timing.
- Enable Delay showing submit button.
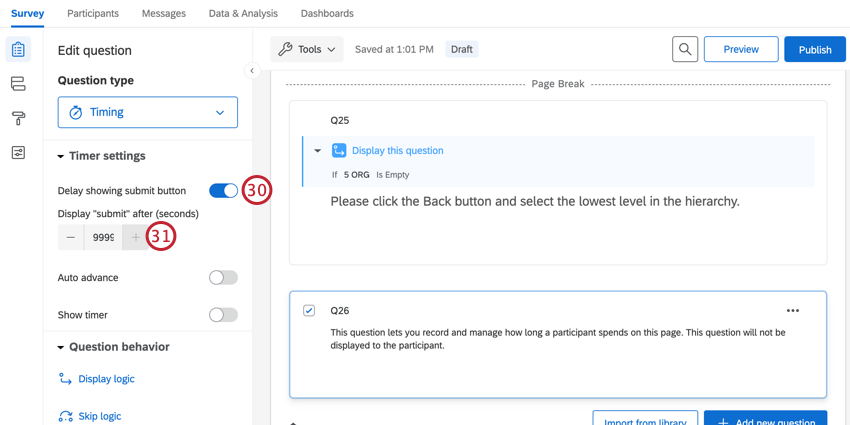
- Type 9999 into the Display “submit” after (seconds) box
Collecting Demographic Data for Anonymous Responses
If you want to ask your anonymous respondents demographic questions, create a new block and nest the block with your org hierarchy question block. This way, only your anonymous respondents will see the demographic questions. For your non-anonymous respondents, their demographic information should be uploaded as participant metadata.
Once you’ve created your questions, you also need to configure your survey flow to capture the participant’s response and save it as embedded data. This way, you’ll be able to report on your demographic data later.
- Create your demographics questions in a new question block. For most demographics, you’ll want to create a single-answer multiple choice question to collect demographic data. This way, you will have a discrete set of answer choices for respondents to choose from that map directly to your metadata field values.
- Navigate to Survey flow.
- Move your demographics block so it appears in the anonymous respondents branch.
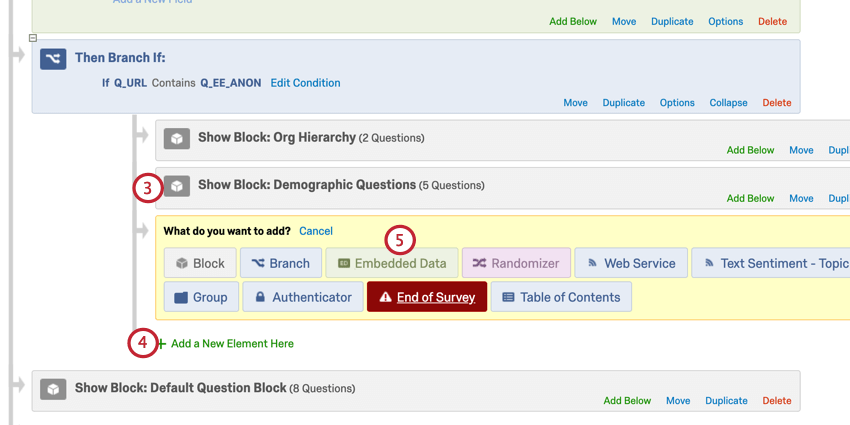
- Click Add a New Element Here below your demographics block.
- Select Embedded Data.
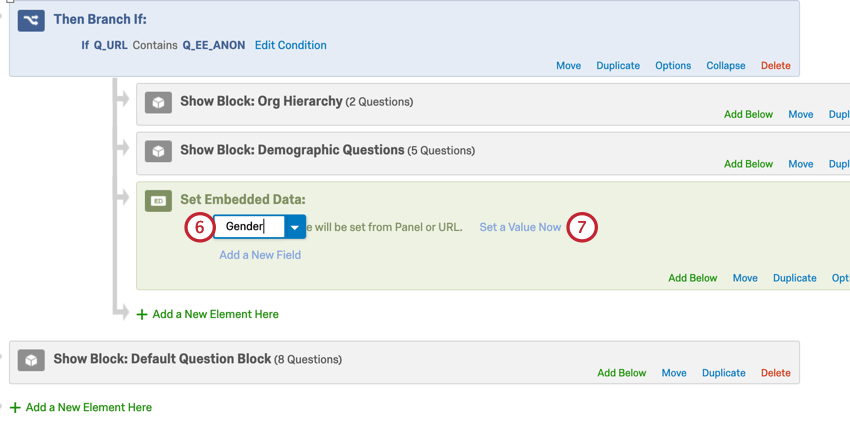
- Enter the name of the field you want to capture. This name should match your corresponding metadata field name exactly. These fields are case sensitive!
 Attention: It is crucial that your field names match so you can report on your participant demographics correctly.
 - Click Set a Value Now.
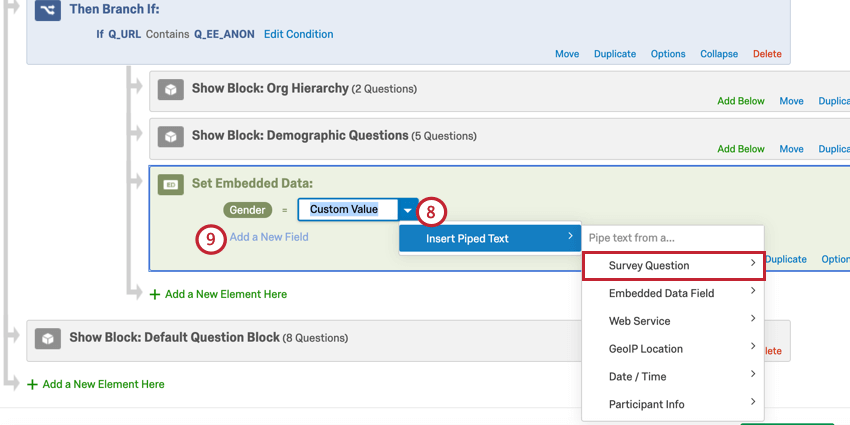
- Click the blue arrow and select the Survey Question that corresponds to the demographic field.
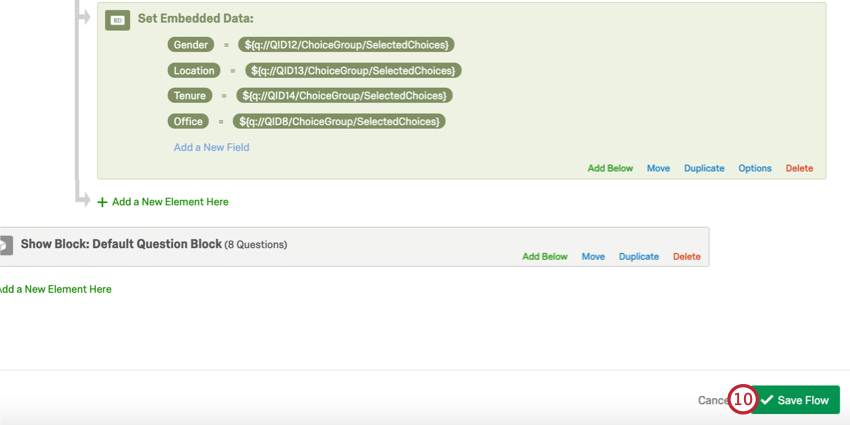
- Click Add a New Field and repeat steps 6 through 8 for any additional metadata fields you want to capture.
- When finished, click Save Flow.
Distributing Your Survey
To distribute your survey to any non-anonymous respondents, follow the instructions on this support page to send a participant invite.
To distribute to your anonymous respondents, you’ll need to enable the anonymous link and then send it to the respondents. The anonymous link option can be found in the Security section of Survey options.
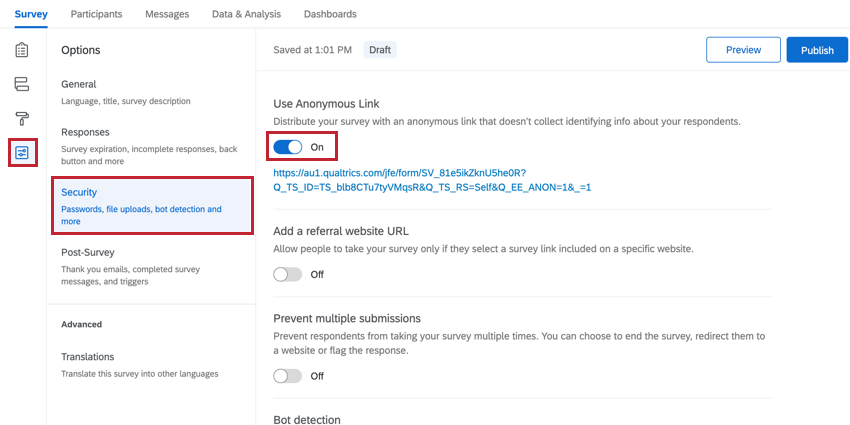
Once you have your anonymous link, you will need to distribute it to your respondents using your own distribution system. This could include sending it via email, on fliers/posters, via text, or any other way you communicate with employees.
Building Your Dashboard
Building your dashboard for this type of project is no different than other Engagement programs. See the below pages for more information about building dashboards.